Reading, Writing, and Compressing Data with the System.IO Classes
| After storing data in collections, the next most common tasks are to read and write data in a range of ways. This can include simply storing it in memory, accessing a stream of data from another object, or accessing the file systemin particular by reading and writing disk files. This section shows you some of the ways you can achieve all these tasks, as well as how you can compress data using classes built into the .NET Framework. Working with Streams, StreamReaders, and StreamWritersMany classes that handle data in .NET consume or expose it as a stream. A stream is just a series of data items read serially from the source object or to the target object. There is a base class Stream from which almost all stream-based classes in .NET are descended. The concrete classes you will use most often are the MemoryStream, FileStream, and perhaps the ASP.NET Response.OutputStream. There are operations you can perform directly on a stream. For example, (as you saw in the previous section) you can capture output from a class such as the BinaryFormatter in a MemoryStream: MemoryStream ms = new MemoryStream(); formatter.Serialize(ms, theTable); Effectively, this just creates the MemoryStream over the output of the Serialize method and pushes the data into the stream. Then you can reset the "current position" pointer of the stream back to the start, and read values from it. The Read method of a stream takes a reference to a buffer array of Bytes, the starting index within the stream for reading, and the number of bytes to read. In the example that you saw earlier, the code creates a new Byte array of the same length as the stream, and reads from zero to the length of the stream to capture all of it in the Byte array: ms.Position = 0; sourceBytes = new Byte[ms.Length]; ms.Read(sourceBytes, 0, (Int32)ms.Length); The MemoryStream is a useful tool for acting as an intermediary between other objects. You can also create a MemoryStream and populate it from an array of Bytes, like this: MemoryStream outStream = new MemoryStream(sourceBytes); The MemoryStream can then act as input to another process or object that requires data in stream format. Like most streams, the MemoryStream exposes a series of properties and methods that provide information and allow you to manipulate the stream. The CanRead, CanSeek, and CanWrite properties provide information about the stream, and their values depend on how you create the stream and from what object it is populated. The Capacity and Length properties provide information about the maximum and the current size, while you can read and/or set the current position using the Position property. The .NET Framework also provides classes you can use to read and write streams. The StreamReader and StreamWriter accept a stream as the input or output, and expose methods that make it easy to access the underlying stream. For example, the StreamReader exposes the Peek, Read, ReadBlock, ReadLine, and ReadToEnd methods for reading data from the stream. The Peek method reads a value without consuming it (without moving the current position pointer), while the Read and Read-Block methods read one or more values and move the current position pointer. The ReadLine method reads up to the next carriage return in a text stream, and the ReadToEnd method reads the remainder of the stream. The StreamWriter class exposes the Write method in a range of overloads for writing individual values to the stream, and the WriteLine method for writing a line of text followed by a carriage return. Both also expose the Close method, and it is important with all streams to close them when you have finished working with themor take advantage of the using statement construct to automatically close and dispose of the stream reader/writer and underlying stream after use.
Most of the stream-based classes are in the System.IO namespace, which you must import into your pages in order to use them. Other classes in this namespace include the BinaryReader and BinaryWriter for reading primitive types from a stream, and the BufferedStream that you generally use in networking applications. The example application uses a range of stream types, and the StreamReader class. For example, Listing 15.13 shows the code used to display the contents of a MemoryStream in the "results" part of the application. It first checks that it can read from the stream, then creates a StreamReader over the MemoryStream and ensures that the current position pointer of the MemoryStream is at the start of the stream. Then the code calls the ReadToEnd method to get the contents as a String to display in a Label control. Notice that, if the selected input type was a Web page, the content is HTML encoded for display. Otherwise, the browser will interpret the HTML tags in the result rather than displaying the string itself. Listing 15.13. Using a StreamReader over a MemoryStream
You will also see a StreamReader used in the sections "Reading Text and Binary Files from the File System" and "Retrieving Web Pages" later in this chapter. One other very useful class is the Path class, which exposes a series of static methods you can use to manipulate file paths and file names. For example, you can use the GeTDirectoryName, GetExtension, GetFileName, GetFileNameWithoutExtension, GetPathRoot, and GetFullPath methods to extract sections of an existing path and file name string. You can check if the name has an extension, and change it, using the HasExtension and ChangeExtension methods. You can see if a path contains the root drive information using the IsRooted method. You can also combine parts of a path, automatically ensuring that the correct separator character is used, with the Combine method. Other methods of the Path class allow you to check for invalid characters in the file name and path, get a random or a temporary file name, and discover the path to use for temporary files. Reading Drive, Folder, and File InformationMany Web-based applications require access to disk files and folders. The .NET Framework provides a rich set of features for working with the file system. These classes are all in the System.IO namespace, and the example demonstrates how you can use them to get listings of drives, files, and folders. The main classes are the DriveInfo, DirectoryInfo, and FileInfo classes; and the corresponding Directory and File classes. The "info" classes provide information about the corresponding object. For example, the DriveInfo class exposes properties such as Name, TotalSize, TotalFreeSpace, AvailableFreeSpace, DriveFormat (such as NTFS or FAT32), DriveType (such as local, removable, or network), IsReady, RootDirectory, and VolumeLabel. It also provides the static Getdrives method to get a list of all available drives. The DirectoryInfo class provides information about a specific folder, including creation, last read, and last access times; the name and name extension; and the parent folder. You can also manipulate folders using methods such as Delete, CreateSubdirectory, and MoveTo. Finally, there are methods to get a list of files and folders within this folder. The FileInfo class provides a similar set of properties and methods for getting information about a specific file; deleting or moving the file; and reading and setting the file attributes. In addition, there are methods to open, read, and write to the file, create a new file, and set encryption on the file. While the DirectoryInfo and FileInfo classes reference specific instances of a folder or a file, the Directory and File classes provide a range of static methods for performing similar operations but require you to specify the target folder or file. This means that you do not have to navigate to the drive and folder tree and get a reference to the folder or file you want to manipulate or get information about. They also provide a few extra useful methods beyond the "info" classes. For example, the Directory class provides the GetCurrentDirectory method that returns the current working directory of the application, and GetdirectoryRoot method that returns details of the volume and root folder for a specific path. Meanwhile, the File class provides the useful ReadAllBytes, ReadAllLines, and ReadAllText methods that read an entire file and then close it afterwards, and the WriteAllBytes, WriteAllLines, and WriteAllText methods to write data to a file, replacing any existing file, and then close it.
Other commonly-used classes in the System.IO namespace include the Textreader and TextWriter classes, and the StringReader and StringWriter classes, which you can use to read and write to streams, files, and String instances. Reading Drive InformationThe example application provides a listing of all the local fixed drives on your system, and the contents of these drives, when you select the Use an existing file option in the main section of the page. The listing, shown in Figure 15.5, uses a treeView control (as discussed in the section Styling and Dynamically Populating a TreeView Control, earlier in this chapter). While the basic style of the treeView comes from the XPFileExplorer image set, applied with the auto-format option in Design view, one or two aspects are different in the example. Figure 15.5. The drive, folder, and file listing in the example application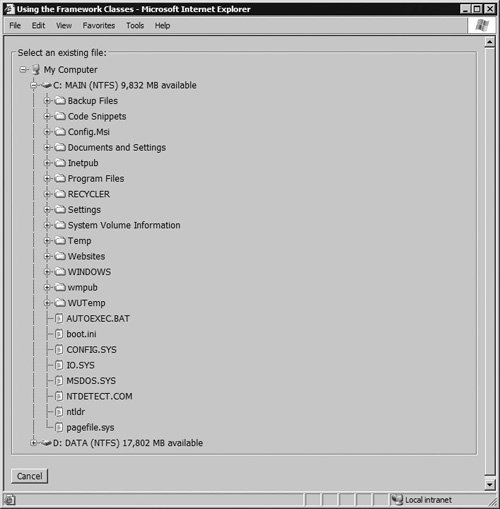 The image shown for each drive is a custom GIF image, located in the images subfolder, and any empty folders show with another custom image from the same location. In the latter case, this is a one-pixel-square transparent image accompanied by the text "(no files)." Without this, because the node is a leaf with no child nodes, the control will display an empty folder using the file icon instead of the folder icon. The code to populate the treeView control is in default.aspx.cs, and it first clears the control of any existing nodes before creating a root treeNode instance with the name "My Computer" and the value "Root" (see Listing 15.14). As the child nodes of this root node (the list of drives) will be visible by default, the SelectAction property of the new node is set so that clicking it has no effect, and the Expanded property is set to TRue. Then the code adds the new node to the treeView. Following this, you can see the code that uses the static GeTDrives method of the DriveInfo class to get a list of all installed drives, then iterates through them. For each fixed, formatted, and available (ready) drive, the code creates a new node containing details of the drive. It then sets the ImageUrl to the custom image, specifies that clicking this node will cause a postback that executes the "populate on demand" event handler, and adds the node to the treeView. Listing 15.14. Creating the List of Drives in the TreeView Control
Notice in Listing 15.14 that the value for each drive node is the name of the drive, such as "C:\". You will see later how, combined with the values of the folder and file nodes, this makes it easy to extract the full path and name of a selected folder or file. Reading Folder and File InformationWhen the user clicks a drive node or a folder node in the treeView, the PopulateNode event handler executes because the declaration in default.aspx specifies this as the OnTreeNodePopulate attribute of the treeView. The PopulateNode event handler, shown in Listing 15.15, gets the value of the current path for the clicked node, and removes the string "Root" from the start of it. This works because the declaration of the TReeView also sets the PathSeparator property to the value "\", which means that the ValuePath of a node will return, for example, "Root\C:\\folder1\folder2". By using the path to the current node to get a DirectoryInfo instance, and from this a FileSystemInfos collection (through the GetFileSystemInfos method of the DirectoryInfo class), the code can obtain a list of all folders and files within the current node and physical file system drive or folder. Then it is just a matter of iterating through the contents of the FileSystemInfos collection examining each FileSystemInfo to see if it is a subfolder (in which case the actual type is a DirectoryInfo instance) or a file (a FileInfo instance). If it is a subfolder, the code creates a new TReeNode, sets the relevant properties so that it causes a postback that will populate its child nodes, and adds it as a child to the current node in the treeView. For files, the code adds a new child node that is selectable, and which will therefore raise the server-side OnSelectedIndexChanged event of the TReeView control when clicked. Notice how the code ends by checking if any child nodes were created, and if not adding the "(no files)" leaf node as discussed earlier. The final section of code concerned with the treeView is the handler for the OnSelectedIndexChanged event, which the declaration in default.aspx sets to the event handler named SelectNode. This just has to extract the full path and file name, remove the leading "Root", and replace any double backslashes (such as will exist after the drive letter). Then it makes the Label control visible and shows the View control containing the treeView control (see Listing 15.16). Listing 15.15. Populating the TreeView Control on Demand after a Postback
Writing Files to the File SystemAs you have seen in the descriptions of the File and FileInfo classes, there are several different ways you can create and write to disk files. The example contains simple routines that write both a text file and a binary file, demonstrating both approaches (see Listing 15.17). If the sourceType variable indicates that the input data is binary (an array of Bytes), the code creates a FileStream that writes directly to the file system, specifying the physical path to the disk file and the Create value from the FileMode enumeration so that it will overwrite any existing file with the same name. Then it creates a BinaryWriter over the FileStream and calls the Write method to write the contents of the Byte array named sourceBytes to the file, closing it afterwards. Writing a text file is even easier. Still in Listing 15.17, you can see that the code simply creates a new StreamWriter pointing to the result of a call to the static CreateText method of the File class. This creates a text file, and the code then writes the contents of the sourceString variable to the file and closes it. Listing 15.16. The Event Handler for the TreeView OnSelectedIndexChanged Event
Listing 15.17. Writing Text and Binary Files
Of course, you can create files in other ways and write values to them individually rather than all in one step as shown in this example. You can create a text file, open a StreamWriter over it, and then write individual lines to it using the WriteLine method, or you can open a TextWriter and use its WriteLine method. Alternatively, for a binary file, you can use the Write method of the FileStream class or the Write method of the StreamWriter class. Reading Text and Binary Files from the File SystemReading file contents is just as easy as writing them. The example page makes some assumptions about the file type from the file extension using the code shown in Listing 15.18you can see the use of the static Path.GetExtension method here. Listing 15.18. Deciding if the File Is a Text File or a Binary File
If the file is a text file, you can read the contents into a String using a single line of code: sourceString = File.ReadAllText(filePathAndName); Likewise, if it is a binary file, you can read all of the bytes from it into an array using: sourceBytes = File.ReadAllBytes(filePathAndName); You can also read individual lines and characters or all the content from a text or binary file by using the various "read" methods of the StreamReader, BinaryReader, or FileStream classes. In the example, the code uses a BinaryReader over a FileStream, as shown in Listing 15.19. Notice the using construct, which ensures that the classes correctly dispose of any unmanaged resources they use (important when dealing with the file system). Because the ReadBytes method accepts only an Int32 value for the buffer size, you must call it more than once for files larger than Int32.MaxValue. However, because this is over 2GB, you will probably find this situation occurs rarely. Compressing DataThe .NET Framework in version 2.0 adds support for compressing files using the non-proprietary GZIP and Deflate algorithms. The example page allows you to apply GZIP compression to the source you select, as shown in Figure 15.6. Figure 15.6. Specifying GZIP compression for a file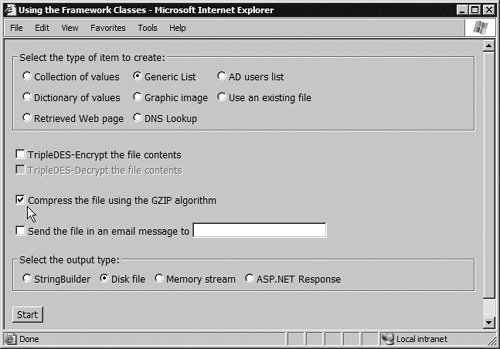 Listing 15.19. Reading a Binary File Using a BinaryReader and a FileStream
The result, if you choose to output to a file, is a link that you can use to open the file (see Figure 15.7). Figure 15.7. The result after compression, allowing you to access the new file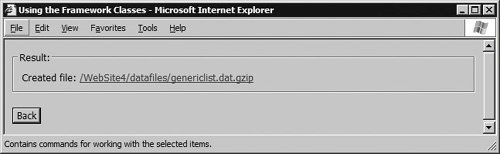 However, if you want to "look inside" this file, or any other file of any type, remember that Visual Studio provides a binary editor. Right-click on the file in Solution Explorer, select Open With, and then choose Binary Editor (see Figure 15.8). Figure 15.8. Viewing a file as bytes using the Binary Editor in Visual Studio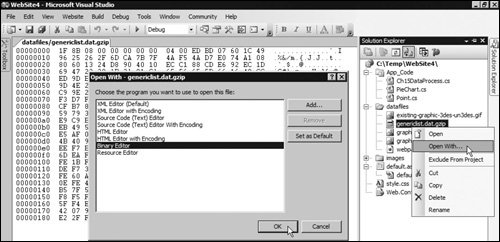 The code in the example that applies the compression to the file takes advantage of the GZipStream class from the System.IO.Compression namespace. You create a stream to receive the compressed data and then instantiate a GZipStream over this stream, setting the CompressionMode option (Compress or Decompress). The final parameter determines if the GZipStream will leave the output stream open after writing. Because the output stream in this example is a MemoryStream, this parameter is set to TRue so that the data is available afterwards. If you are writing to a file, you would use false for this parameter (see Listing 15.20). The next step is to call the Write method of the GZipStream class, specifying a buffer array (of Bytes) that contains the data to compress, the starting point within the array, and the number of bytes to compress. Once complete, the code retrieves the compressed data from the MemoryStream into another Byte array. Listing 15.20. Compressing Data Using the GZipStream Class
|
EAN: 2147483647
Pages: 147