| The Web DataGrid provides a way of displaying and editing data in a tabular format. It emulates the behavior of the Windows Forms DataGrid control by implementing a paging technique whereby the grid automatically recreates the underlying DataSource each time the user wants to scroll to the next page of records. While not terribly efficient, the effect is decent. As long as there are only a few records in the DataSource the performance of the grid is not too bad. We cannot simply scroll through the rows as with the Windows Forms DataGrid because of that darn stateless problem again. There is a way to take control of the paging mechanism and implement your own paging logic to improve performance. The control also supports a type of in-place editing and updating. All of these features require a considerable amount of configuration on the programmer's part, and they all require some behind-the-scenes code support. Unlike the Windows Forms DataGrid, almost nothing is automatic. It's as if Microsoft provided the hooks but left the actual implementation up to the programmer. This makes the control versatile, but not so easy to use. Hopefully, this section will clear up some of the basic techniques and get you started being productive with the control. To demonstrate the control, let's create a web application project and name it ADOBook09-02. Once the project is created, delete the default form that it provides. We will copy the previous project's form into this project to use as a starting point. Use Windows Explorer to copy the files highlighted in Figure 9.15 to the new project folder. Remember you must look in your web server's root folder to find the path to your project. Your project may not be under the EM folder like mine. I put all my projects in a folder that has meaning to me, just in case some other vendor uses the same project name as I did. In this case EM is the abbreviation of my company name . Sometimes I will use a client's stock ticker symbol. Figure 9.15. Files to move for new project. 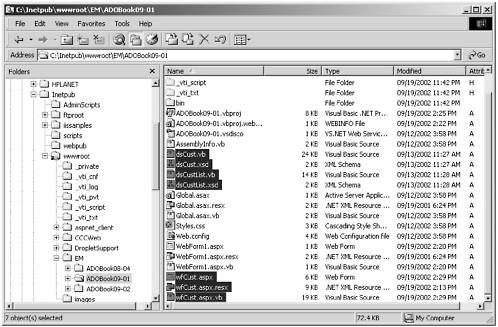 Once the files have been copied , you must include them in your project. The easiest way to do this is to click the Show All Files button in the Solution Explorer and then right-click each file and select Include In Project. One more thing. You may have noticed that I have my wwwroot folder shared. This is normally a really bad thing to do. The reason I have it shared is because I am on a private internal class C network using the 192.168.1.0 subnet. This is a private subnet and cannot be accessed by the outside world unless I open a hole in my firewall, which I haven't. Because I develop on two different machines, I have chosen to take some liberties so I can easily share files between them. Do not do this yourself unless you really know what you are doing with TCP/IP networking. You could open your network to attack. Once we have the project configured properly, let's open the wfCust form. We will be chopping and hacking it down. Delete most of the fields and buttons until your form looks like Figure 9.16. Figure 9.16. The new stripped-down form. 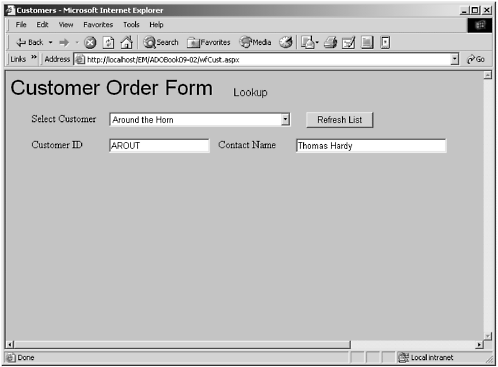 Next we will add a DataGrid to our form. You can just drag it from the toolbox onto the form. The grid will be used to display all the orders for each selected customer. So we will also need another SqlDataAdapter and another DataSet. We could also just use an existing DataSet, but let's create a new one for the exercise. Let the wizard create the DataAdapter normally. Only include the following columns from the Orders table in the select query: OrderID, OrderDate, RequiredDate, ShippedDate, ShipVia, and Freight. If you want to get fancy you could create a join to the Order Details table and summarize the details total into the query using a subquery and a Group By. But let's keep it simple for now. Use this SQL statement when creating your DataAdapter: SELECT OrderID, CustomerID, OrderDate, RequiredDate, ShippedDate, ShipVia, Freight, ShipName FROM Orders WHERE (CustomerID = @CustomerID) The parameter is so we can select the rows for the customer chosen using the DropdownList. When you first drop the grid on the form, all you get is an ugly HTML table as in Figure 9.17. Figure 9.17. The raw grid control. 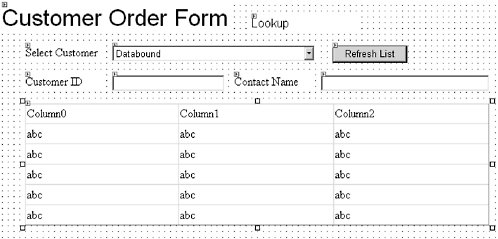 We will make our grid look really pretty in no time. When we are done, it will look like Figure 9.18. Figure 9.18. The form with the formatted grid control. 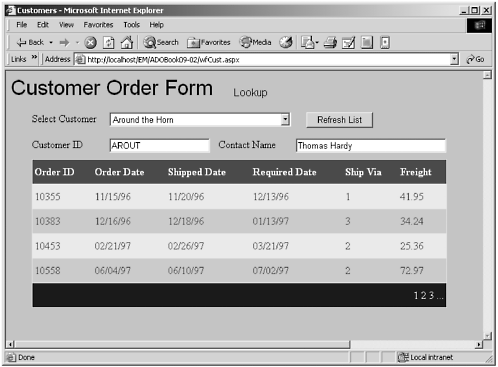 Setting the Visual Appearance It's too bad this book's illustrations are in black and white. The grid is in complementary shades of blue on a gray background. It looks real sharp. So how do we make it look so nice? It was easy. You could set numerous properties to the different colors manually, but you can also choose from a set of predefined styles. To do this, select the grid, then click the Auto Format link at the bottom of the Properties window. See Figure 9.18. While you are at it set up the DataSource properties as shown in Figure 9.19. When you click the autoformat link, a window opens which allows you to select from several styles. Figure 9.19. The Auto Format... link. 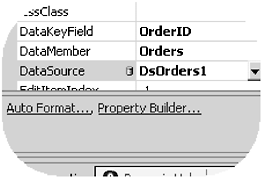 Figure 9.20. The Auto Format dialog. 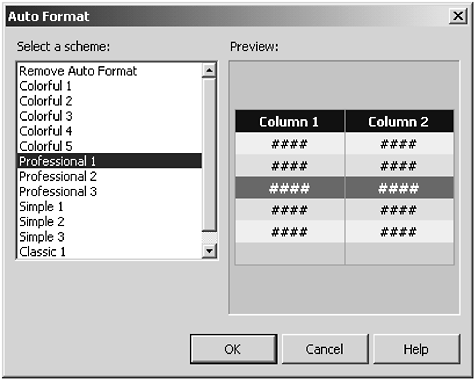 Once you have set all this up, your grid should look something like Figure 9.21 in Design mode. Figure 9.21. The roughed-out DataGrid. 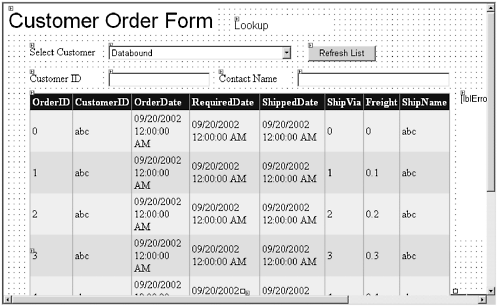 It's an improvement, but we still need to tweak it a little. There are two things glaringly wrong with the grid: the date display is ugly and the grid is bottomless. In the date display we don't need the time component and the fields are all wrapping. This makes the rows too tall. We describe the grid as bottomless, meaning that if there were 50 rows, we would get a page that was really long, because the grid will display all 50. This also means that we cannot count on any two pages being the same length. There is a way of dealing with this called paging. It allows the grid to show only so many (configurable) rows at a time. It also then displays paging controls at the bottom of the grid to allow the user to navigate between pages. First we will deal with the display issues. Notice that there is a Columns collection with this grid. You can use this to open a property builder that will assist us in configuring our display. Open the property builder by clicking the link at the bottom of the Properties window right next to the autoformat link. The property builder opens as in Figure 9.22. Figure 9.22. The DataGrid property builder with default settings. 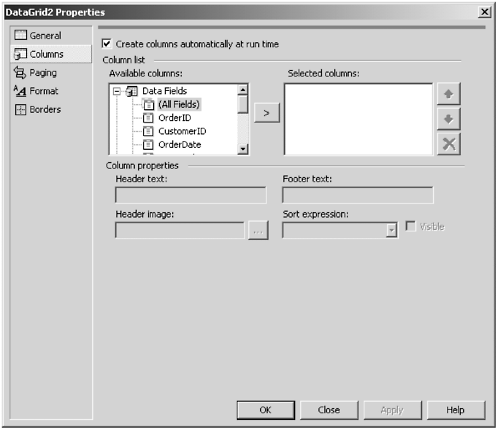 Notice that Create Columns Automatically at runtime is checked. This is the default behavior. With this selected, the grid will simply take all of the columns in the DataSource and display them using default settings. We don't want this behavior, so let's uncheck the box. Now we have to select the columns we want to display. We do this by selecting the fields in the Available Columns list and moving them to the Selected Columns list using the arrow button as in Figure 9.23. Figure 9.23. Selecting columns for display. 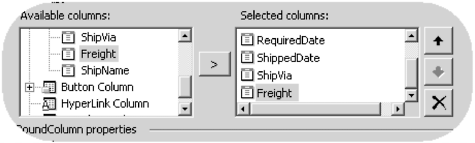 Next we want to change the date display format. This took me quite a while to figure out, and I'll show you why. If you are not a web guru, this will pay for the book right now. My instinct when setting up the date format was to use a standard Visual Basic format string. This is how all the other grids do it. Let's see what happens when I tried it as in Figure 9.24. Figure 9.24. The wrong way to format a date. 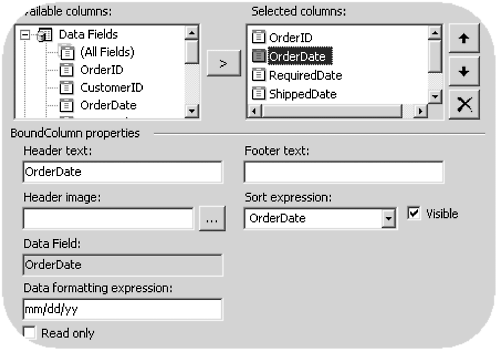 When I run the program, look what happens in Figure 9.25. Figure 9.25. The bad date format. 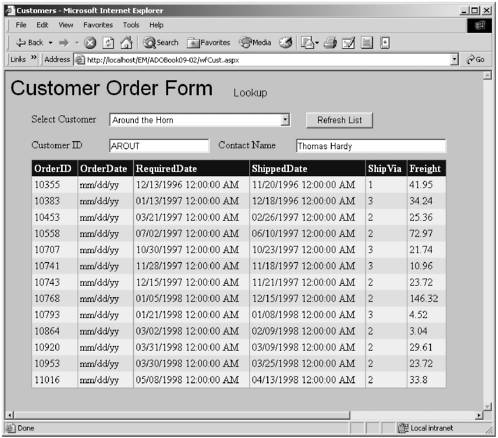 What happened ? Why did it display the literal format string instead of formatting the date? It turns out that there are whole other sets of formatting expressions you must use with Web Forms. These are documented, but they are really hard to find. In the documentation for the Web DataGrid it tells you to use them, but does not provide a link to them. The correct date format is {0:d}. These are regular expression format strings. If any of you ever used the print function in C these may be familiar to you. They can be used in the WriteLine method of the console object to format output in a similar way you would use placeholders in the print C function. If we use the correct format string the display comes out right. Enter the expression as in Figure 9.26. Figure 9.26. The correct expression. 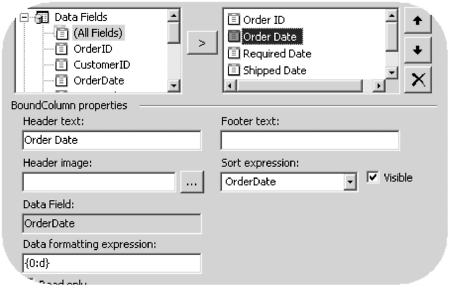 Next we want to make sure the lines don't wrap within each cell if the data is too long. We do this using the Format page of the builder as in Figure 9.27. Figure 9.27. The Format page. 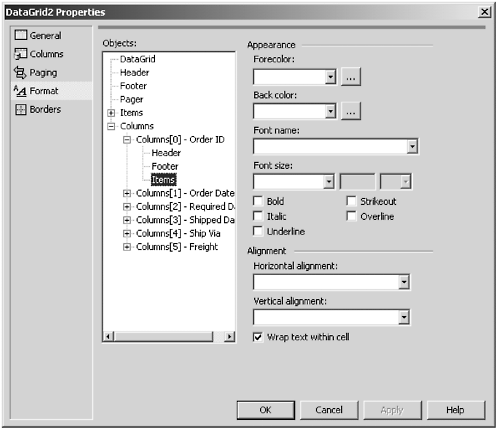 There are many items we can format. The one we're interested in is the "Wrap text within cell" check box. You have to uncheck this item for each column in the tree view control. You must do this in two places for each column, the header and the item. Now we have to implement the paging mechanism we mentioned earlier. This will ensure that no more than four lines appear in the grid at any one time. To do this, we must first enable paging. With the property builder still open, select the Paging page of the builder. This page appears as in Figure 9.28. Figure 9.28. The Paging builder page. 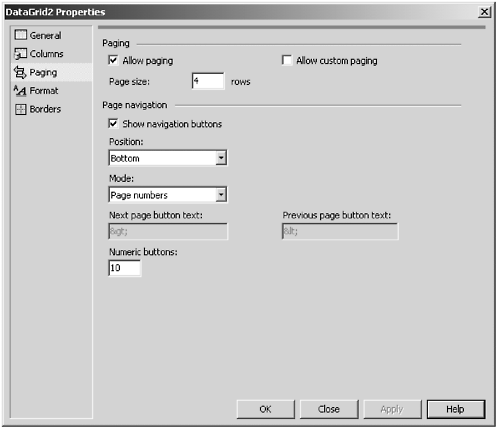 Check the Allow Paging button and change Page Size to four. That's all we have to do in the designer to implement paging. We still have to add code to implement it behind the scenes, but not very much. After adding the paging feature your grid should look like Figure 9.29 in Design mode. Figure 9.29. The finished grid control. 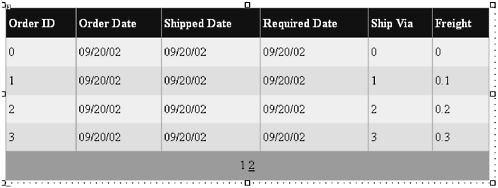 Let's close the builder and open the code window. If you have not already done so, delete all the event procedures for any buttons we have removed and remove any references to controls we have deleted. The first thing we need to do is add the code to populate the DataSet that is the grid's DataSource. The likely place for this is the DropdownList's SelectedIndexChanged event, which we are already using to get the customer's record. Add the following code to the procedure: Private Sub Drop downList1_SelectedIndexChanged(ByVal sender As System.Object, ByVal e As System.EventArgs) Handles Drop downList1.SelectedIndexChanged If Me.IsPostBack Then SqlDataAdapter1.SelectCommand.Parameters("@CustID").Value = Drop downList1.SelectedItem.Value Session("selIndex") = Drop downList1.SelectedIndex SqlDataAdapter1.Fill(DsCust1) SqlDataAdapter3.SelectCommand.Parameters("@CustomerID").Value = Drop downList1.SelectedItem.Value SqlDataAdapter3.Fill(DsOrders1) Me.DataBind() End If End Sub Let's also do a little refactoring. Change the Page_PreRender event to look like this: Private Sub Page_PreRender(ByVal sender As Object, ByVal e As System.EventArgs) Handles MyBase.PreRender If IsPostBack Then DsCustList1 = Session("CustList") Drop downList1.DataBind() Drop downList1.Items(Session("selIndex")).Selected = True Else SqlDataAdapter2.Fill(DsCustList1) Session("CustList") = DsCustList1 Drop downList1.DataBind() End If Session("dsCust1") = DsCust1.Copy Session("dsOrders1") = DsOrders1.Copy End Sub We can then delete the Page_Load code. It is no longer needed. One thing the documentation never tells you is that you must save all of your DataSets in Session variables between requests . This is best done in the Pre-Render event as that is the last event that the code executes before creating the HTML. Now let's add the code to support the paging. This is code is quite simple, as the grid does most of the work for you. Private Sub DataGrid1_PageIndexChanged(ByVal source As Object, ByVal e As System.Web.UI.WebControls.DataGridPageChangedEventArgs) Handles DataGrid1.PageIndexChanged DsOrders1 = CType(Session("dsOrders1"), dsOrders).Copy DataGrid1.CurrentPageIndex = e.NewPageIndex DataGrid1.DataBind() End Sub The DataGrid has a PageIndexChanged event which fires when the user clicks one of the paging buttons. You must first restore the DataSet. Remember, this is a PostBack, so the program reexecutes all over again. Next, assign the new page index to the current page index of the DataGrid. The new page index is passed to the event through the DataGridPageChangeEventArgs parameter. Then call the DataBind method. This causes the grid to recreate the DataSet and position itself on the first row of the new page. It then reads the next four rows (because that is what we told the grid to display on each page) and then data binds them to the grid. Then it sends the page back to the client. The finished product looks like Figure 9.30. Figure 9.30. The finished read-only grid. 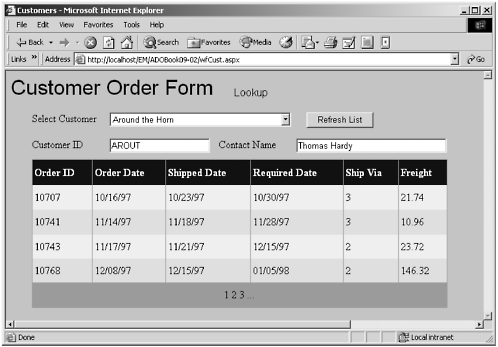 Adding In-Place Editing Capabilities The DataGrid is capable of in-place editing as well. In-place editing emulates the ability of the Windows Forms grid to allow the user to directly edit the cells of the grid. We say emulate because it is not quite the same as the Windows Forms grid. The way this works is that the user must put the desired row into an Edit mode first. This is done by clicking a button on the desired row. The row then changes from static text to text boxes in each cell. The user then edits the data and clicks an Update button to save the data and put the row back into static text mode. To add this ability, we first have to add some controls to the grid. When we are finished, the grid, at runtime, will look like Figure 9.31. Figure 9.31. Grid with edit controls added. 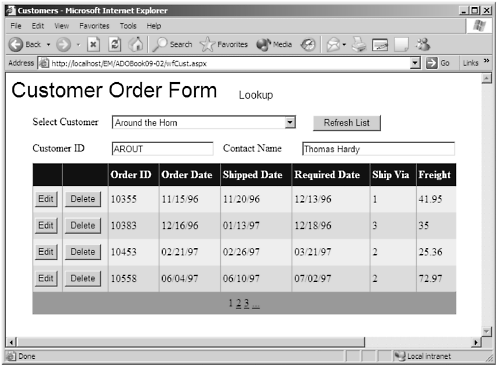 The first step in implementing in-place editing is to add the buttons to the grid. To do this we will use the familiar property editor. Open it by clicking on the ellipsis in the Columns collection property. Expand the tree on the available columns list until you find the Button Column node. Add the Edit, Update, and Cancel buttons to the selected columns list as in Figure 9.32. Figure 9.32. Adding buttons to the grid. 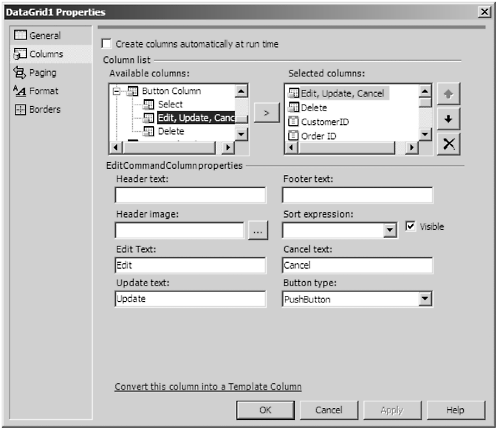 You can also go ahead and add a Delete button to the selected columns. Use the arrow buttons (Figure 9.33) to move the button columns to the top of the list. This will ensure that they appear to the left of the data columns. Figure 9.33. The arrow buttons. 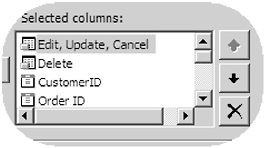 You end up with a grid that, when in Design mode, looks like Figure 9.34. Figure 9.34. The grid with the buttons added. 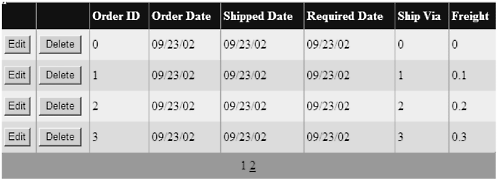 Once we've added the buttons, we must add the code to implement them. The way this works is a little interesting. When the user clicks one of the buttons, the DataGrid does a PostBack to the server and raises an event. It is then up to the programmer to respond to the event. This is similar to the paging feature we looked at in the last section. The EditCommand event is raised. The programmer then must set the grid's EditItemIndex property to the row that is being edited. Here is the procedure: Private Sub DataGrid1_EditCommand(ByVal source As Object, _ ByVal e As System.Web.UI.WebControls.DataGridCommandEventArgs) Handles DataGrid1.EditCommand DataGrid1.EditItemIndex = e.Item.ItemIndex DataGrid1.DataBind() End Sub It is necessary to rebind the grid after each of these events, just like with the paging event. The DataGridCommandEventArgs class passes the index of the row clicked as shown in the code. When this completes, the row changes into a row of text boxes for editing. The Edit button changes to Update, and a Cancel button appears as in Figure 9.35. This happens automatically by setting the EditItemIndex. Figure 9.35. The grid in Edit mode. 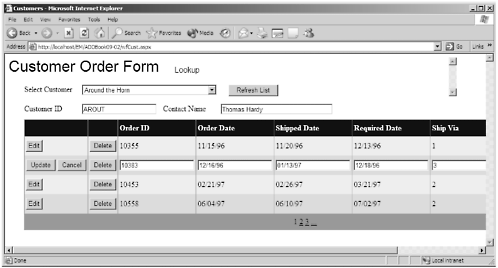 If the user clicks the Edit button on another row, it has the effect of canceling the edit on the original row and starting an edit on the new row. Now we must respond to the Update button being clicked. To do this we must use the UpdateCommand event. Here is the code: Private Sub DataGrid1_UpdateCommand(ByVal source As Object, ByVal e As System.Web.UI.WebControls.DataGridCommandEventArgs) Handles DataGrid1.UpdateCommand Dim i As Integer Try For i = 3 To e.Item.Cells.Count - 1 If Not DsCust1.Orders.Columns(i - 3).ReadOnly Then DsCust1.Orders.Rows(e.Item.ItemIndex)(i - 3) = CType(e.Item.Cells(i).Controls(0), TextBox).Text End If Next SqlDataAdapter3.Update(DsCust1) Catch errobj As Exception lblError.Text = errobj.Message & vbCrLf & errobj.StackTrace Exit Sub End Try DataGrid1.EditItemIndex = -1 DataGrid1.DataBind() End Sub Since we do not know which column the user might have changed, we can loop through all of them. You must test each column to see whether or not it is read-only. Attempting to assign to a read-only column will throw an exception. We must also coerce each column to a text box. An interesting thing is the Controls collection that is part of the Cells collection's Item property. In this case we are referencing the first and only member of the collection. However, this implies that there can be more than one control per cell. Is this true? I'll leave it up to you to find out. Hint: Look at custom column templates. Once we have assigned our values to the DataTable rows item, we can then make the database update using the usual Update method of the DataAdapter. If all this succeeds, we take the row out of Edit mode. To cancel the edit on a row, we just need to respond to the CancelCommand event and set the EditItemIndex to 1. This takes all rows out of Edit mode. For completeness, here is the code. Private Sub DataGrid1_CancelCommand(ByVal source As Object, ByVal e As System.Web.UI.WebControls.DataGridCommandEventArgs) Handles DataGrid1.CancelCommand DataGrid1.EditItemIndex = -1 DataGrid1.DataBind() End Sub You can also delete rows from the grid. To do this, we respond to the DeleteCommand event. Here is the code to delete a row. Private Sub DataGrid1_DeleteCommand(ByVal source As Object, ByVal e As System.Web.UI.WebControls.DataGridCommandEventArgs) Handles DataGrid1.DeleteCommand Try DsCust1.Orders.Rows(e.Item.ItemIndex).Delete() SqlDataAdapter3.Update(DsCust1) Catch errobj As Exception lblError.Text = errobj.Message & vbCrLf & errobj.StackTrace Exit Sub End Try DataGrid1.DataBind() End Sub Remember, we use the Delete method, not one of the Remove methods . As you can see, the DataGrid is a very powerful control. We have only scratched the surface, but we have given you enough to whet your appetite and to encourage you to explore on your own. Next we will look at another approach at presenting repeating data, the DataList control.  | 