| This workshop introduces using more-advanced trimming techniques as you edit the next scene. Remember to take a look at the finished sequence if you need to refer to where you should end up. There are many ways to get away from the Razor Blade tool, and you'll find that as you leave it behind, you'll speed up your editing. At the same time, you'll make better edits, because you are using more-powerful tools to judge the changes. Begin with Scene 2 Start by sorting the footage up front. Create a new bin in the Browser, and name it "Scene 2." -
From the Picture Clips bin, click the disclosure triangle next to the 2 and 3hr timecode section master clips. Command-click these nine markers to highlight them: -
Dog footage from the 3 hr timecode section at 03:06:07;04 -
Sam Falls in Snow chasing sled tk 1 from the 2 hr timecode section at 02:06:39;01 -
Sam Falls in Snow chasing sled tk 2 from the 2 hr timecode section at 02:06:55;06 -
Sam on Sled tk 3 from the 2 hr timecode section at 02:17:10;21 -
Sam Falls tk 3 from the 2 hr timecode section at 02:13:59;00 -
Sam falls in Snow med tk 2 from the 2 hr timecode section at 02:15:02;24 -
Cap walks to sam tk 2 from the 2 hr timecode section at 02:15:58;03 -
Sam in Snow CU delivers line to Cap from the 2 hr timecode section -
Dog Footage 2 tracks in snow from the 2 hr timecode section at 02:18:22;23 -
Press Cmd+U to create subclips of these markers. Close the disclosure triangles to easily drag the new subclips in the Picture Clips bin to the Scene 2 bin. When you are done, your Scene 2 bin should look like Figure 7.11. Figure 7.11. The Scene 2 bin after step 2. 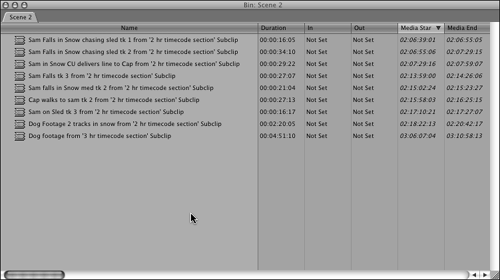 Begin Editing Scene 2 Open the "Dog footage" from the Scene 2 bin in the Viewer. Take a look at this footage. Some of it was shot for slow motion in camera. -
Set an In point just as the slow-motion shot begins at 03:06:38:25, and set an Out point at 03:07:22:29 in the Viewer just past the last frame of the sled on camera. Drag this selection to the Timeline, and butt it next to the "Cap and Sam look over the hill FS" clip. Don't forget to turn on snapping. Place it from the right side of the V1 track, and slide left until it snaps next to the last outgoing shot. -
Double-click the edit at the head of "Dog Footage clip i" in the Timeline window to open the Trim Edit window, with its head frame on the right and the last frame of the previous shot, "Cap and Sam look over the hill FS," on the left. Play the slow-motion shot. Notice that there are a lot of dog tracks in the snow ahead of Cap. They sort of destroy the feeling that our heroes are in the middle of nowhere. To minimize this, click the window on the right to activate the green upper line to be only on the incoming shot. Move the playhead on the right side of the Trim Edit window to 03:07:04:28. Press I to trim this shot in the sequence. -
While the Trim Edit window is still open on these two shots, add a cross-dissolve centered on this edit point. Either Ctrl-click the edit point, pull it from the Effects tab, or select it from the Effects menu after highlighting the Timeline window. The Trim Edit tool closes automatically. Try the different methods , and decide which works best for you. One of the nice things that happens if you leave the Trim Edit window open and add the transition before you close it is that the Trim Edit window closes automatically, and the Transition Editor can be opened with a quick double-click on the transition in the Timeline, all ready to modify. After you have added the dissolve, double-click it to open the Transition Editor window. Another nice thing is that if you have added the default transition by using the context menu (Ctrl-clicking the edit point to add it) or you've dragged the transition from the Effects window to the edit point, the pointer sits near the new transition, and you can double-click it. -
Drag either end of the newly added dissolve icon in the Transition Editor window until its new duration is 2 seconds. Create the Harsh Environment Take a look at the playback from before the dissolve through to the end of the Dog Footage. Not bad, but not perfect. There isn't much footage of the dog team in fresh snow (there's almost none), and you need a new shot here to further introduce the characters and their environment. This one minimizes the non-virgin snow the most. The characters definitely need to be shown in the harsh environment to tell the story with emphasis on their struggle. -
Double-click the "Dog Footage 2 tracks in snow from '2 hr timecode section' Subclip" to open it in the Viewer. You want to reveal the two men trudging through the snow, so navigate to 02:20:17:03 and set an In point there. Next, drag the clip directly from the Viewer to the Timeline, and butt it up next to the "Dog footage" shot with snapping turned on. Then double-click the head of this shot's edit point in the Timeline window. This opens the Trim Edit window. -
Take a look at the current edit by playing it in the Trim Edit window or the Timeline. The outgoing shot of the dogs seems to go on forever. Click the left side of the Trim Edit window to activate it alone, or press U repeatedly until it is set that way. Drag the position indicator in the left window to 03:07:12:14 and press O to trim the Out of the dogs shot. You keep the action going a bit faster by showing only a smaller portion of this shot, which really only serves to introduce that our heroes have a dog sled with them. This trims the edit 00:10:15, as shown in Figure 7.12. Figure 7.12. The Trim Edit window after step 2. 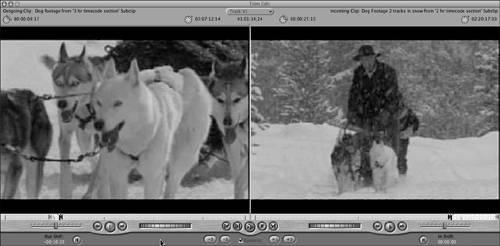 -
Click the incoming shot to activate its green line. Play the shot in its window. You can see some preceding sled tracks in the snow. -
Minimize the tracks a bit by trimming this shot's In point to 02:20:17:18 so that the sled is near the bottom of the frame, as shown in Figure 7.13. You might save some time by just clicking into the shot in the Trim Edit window's scrubber bar beneath it, moving the position indicator to the right, and then using the +1 or +5 button to creep up on the proper edit point. Figure 7.13. The Trim Edit window after step 4. 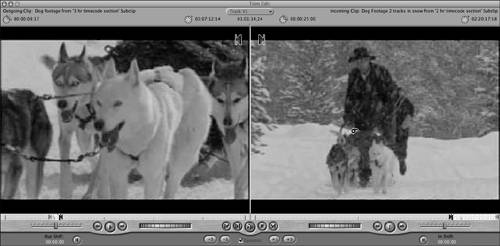 -
Notice that you trimmed the incoming shot +00:00:15, as indicated in the bottom right of the Trim Edit window. Even though you took off frames, they don't show up as being a negative number. You've moved the edit point 15 frames forward into the shotthus the positive number. The clip doesn't look like it minimized the preceding tracks much, but you'll put a dissolve here from the outgoing shot, which minimizes it further. -
Add a dissolve centering on the edit point, and make its duration 2:15. -
Double-click the subclip "Sam Falls in Snow chasing sled tk 1," and play it in the Viewer. Notice that most of Sam's body is cut off at the top of the frame. Compare this to the subclip "Sam Falls in Snow chasing sled tk 2." -
This is a better take, but the actor who plays Cap was replaced by a stunt man. Use the lesser of two evils and add the first take in its entirety to the Timeline as the next V1 shot. Double-click the edit point between "Dog Footage 2 tracks in snow" and "Sam Falls in Snow chasing sled tk 1." -
Trim the outgoing shot 19:20 and the incoming shot +5:16, as shown in Figure 7.14. Add another 2-second cross-dissolve centered on the edit point. You'll see that Sam is following the sled, but you can't tell who is driving it. The audience will assume it is Cap. Figure 7.14. The Trim Edit window after step 9. 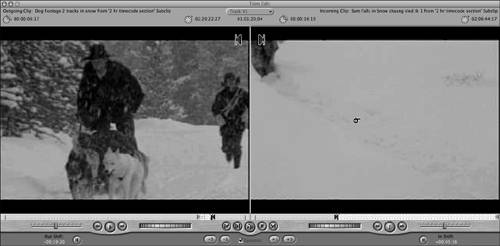 -
Save your project file. -
Double-click DANCLEAN.AIF-05 from the Voice Overs bin. Listen to the read. It's a bit quiet, so raise its level to +4dB. Then add all of it to the sequence on the A2 audio track at 01:01:14;03 in the sequence's timecode. Don't forget to target the correct track. Go to Our Heroes in Real Time Now we will go "live" to our heroes. In other words, we are with them in time; we are watching things as they happen . Hopefully we'll begin to get the audience emotionally involved with the characters, identifying with them. One thing that must be done is adding realistic sound effects to the scene. -
Add the clip "Foley 1-Guy#2 Run#1-02" to A3 at 01:01:25;06 in the sequence. You'll find it in the *Foley bin you created earlier. -
Add to the end of "Wind,desert Lonely,66_1-11" the sound clip "Wind,desert Lonely,66_1-01" to extend the cold wind sound, leaving no gap between the clips (snapping helps). Use the entire clip by simply dragging it to tracks A6 and A7. Again, you must target the tracks to even drag clips to them in the Timeline window. Ctrl-clicking the source track allows you to quickly change tracks. -
Turn off monitoring for all audio tracks except these two. The easiest way to do this is to click the headphone icons on the far left of the Timeline window. If you don't see them, open them by clicking the speaker button in the bottom-left corner of the Timeline. Then listen to the edit point of the wind sounds. The incoming sound is quiet and then sort of takes off. -
Double-click this new audio cut point to open it in the Trim Edit window. Notice the speaker icons. -
On the incoming clip only (cycle through the green line changes by pressing U), trim 2:07 into the sound, and start the incoming shot there instead. You can trim audio just as you trim video. -
Listen to the new sound edit by clicking the Play Around Edit Loop button, or press the spacebar. It should now sound flawless. -
Drag the "Sam in Snow CU delivers line to Cap" subclip from the Scene 2 bin directly to the sequence in the Timeline. Place it on V1, butted against the end of the "Sam Falls in Snow chasing sled tk 1" clip there. -
Open the subclip's In edit point in the Trim Edit window, revealing an edit point with a slate on either side of it. -
Trim the last 2:24 frames of the outgoing shot and the first 3:18 frames of the incoming shot. When you're done, the Trim Edit window should look like Figure 7.15. Figure 7.15. The Trim Edit window after step 9. 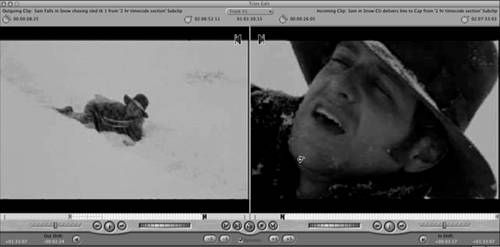 Listen to Sam's Thoughts While Sam lies in the snow, we need to know what he is thinking. Adding his thoughts via sound is a great way to do this. The "language of film" lets us change our view of the characters instantly and listen to their thoughts. I wish we could do this in real life! -
Locate the "City, 19th Century 19th 13_1-01" clip in the Sound Clips bin. Add all of it to the A2 track at 01:01:29;08. This clip sets up "where" Sam is thinking abouthis home in Tennessee. -
Locate in the Sound Clips bin the clip "VO Girlfriend Tk#4-04." Edit the whole clip into the Timeline at 01:01:29;23 on track A1. This makes your edit to the CU of Sam a motivated one. It's motivated because we want to look closely at Sam's face when we "hear" his thoughts. -
Edit the clip "SAMSDIALOG.AIF-02" into A1 at 01:01:33;03. -
Locate in the Sound Clips bin the clip "VO Girlfriend Tk#4-05," and edit it into the sequence on A1 at 01:01:37;02. Locate the clip "VO Girlfriend Tk#1_3-12," and edit it into A1 at 01:01:40;04. Locate the clip "sam mic 3.aif-02.L," and edit it into A1 at 01:01:43;06. You've edited a flashback scene that precedes the movie itselfa memory of Sam's. Cap's boisterous voice (the first audio that was recorded on the set live) brings Sam back to reality. -
Play back this new area of sound you've added to check its mix. The background city sound is too loud, and the dialog needs to be brought out. Because these are very short clips, it's best to not use the Audio Mixer to attempt a mix. Manually lower the city sounds to 4dB. Raise the girlfriend's audio on all three of her VO clips to 8dB. Raise SAMSDIALOG.AIF-02 to 5dB. Listen again. This is much better. Cap's voice is just about right. -
Double-click the City sounds from the Timeline window to open it in the Viewer. Place a keyframe on both ends of the Viewer's audio level line in the waveform. Place another matching set about 1 second in from the beginning and about 1 second before the end. -
Drag the very first keyframe indicator to the bottom of the window. Do the same with the last keyframe indicator. When you are done, your Viewer and Timeline should look like those shown in Figure 7.16. Figure 7.16. The Timeline and Viewer after step 7. 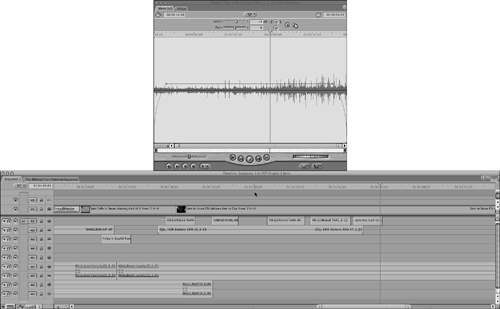 Add Synchronized Sound Locate the clip named "S7AT1.AIF-01." This sounds like an esoteric name, but it actually contains some information. It's from the original scene number 7, angle "A," and it's take 1. This naming convention was used to digitize the clip as it was recorded originally from a Nagra recorder on the set. Because the Telecine (the process of transferring the film to video) was done without syncing the sound, it's your job to sync it in Final Cut Pro. It's not as hard as it sounds. Rather than have you worry about it, I'll give you the sync point. If you edit the entire clip onto the A3 track at 01:01:47;24 in the Timeline window, it syncs perfectly . I'll show you some techniques for making these sorts of edits in the next chapter. -
Relocate the clip "Sam Falls in Snow chasing sled tk 2" from the Scene 2 bin, and double-click it to open it in the Viewer. It's the clip that was rejected the first time we looked at it, but it's a complete take. The first take ended before Cap re-entered the scene. -
Set an In point in it just past Sam's line at 02:07:19:21, and then edit to track V1 to the end of Sam's close-up. Trim the Out point of the close-up in the Trim Edit window by removing the last 3:14 from it, as shown in Figure 7.17. You can simply type 314 with only the outgoing clip's window active. You'll trim 3 seconds and 14 frames from its Out point. Notice Sam's head position in Figure 7.17. It matches the head position in the incoming shot. You create a seamless edit when you pay attention to details like this. You also keep that suspension of disbelief you are trying to achieve with the audience. Figure 7.17. The Trim Edit window after step 2. 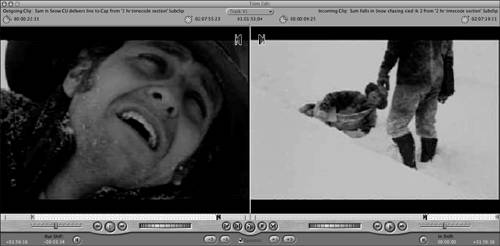 -
Locate the clip "Foley 1-Guy#1 Away#1." It's the foley recorded for this moment in the movie. As Cap walks away, we need to hear him. Edit this clip in the sequence on track A2 at 01:01:52;12. Use it all, and then raise its level to the maximum of +12dB. -
Edit "DANCLEAN.AIF-07" from the Voice Overs bin into track A3 at 01:01:54;07. -
Locate the three "Sam on Sled" takes in the 2 hr timecode section clip in the Picture Clips bin. You can double-click the markers themselves to open them in the Viewer. Compare them. They seem about the same as far as the actor's performance, but there is a much better take here. You're trying to show Sam wishing that he'd "sooner be in hell." I picked the third take because it has more snow falling in it, and Sam looks much colder because of it. -
Edit "Sam on Sled tk 3" into the Timeline on V1 butted against the previous clip. Load its In edit point into the Trim Edit window by double-clicking it. Trim the outgoing shot (Cap leaving Sam in the snow) 30 frames and the incoming shot +5:06, as shown in Figure 7.18. Add a 2-second dissolve that ends on the edit point so that we see Sam dissolving in, trudging along over the completely white snow. Again, this dissolve was programmed with this in mind. Make Sam really look as if he's buried in the snow, which, as we will see, is his worst nightmare. This moment is foreshadowing. That is, it's a hint of things to come. The previous shots of Sam's falling also were a sort of foreshadow. Sam will freeze to death, and this area of the story is preparing the audience for this. As we will see in a moment, he almost is completely buried in the snow. Figure 7.18. The Trim Edit window after step 6.  -
You've run out of wind, so locate "Wind,desert Lonely,66_1-03." Edit it into the sequence next to the end of the earlier wind sound (on tracks A6 and A7). Trim the first 30 frames of the incoming sound for the same reason as before. This time you can quickly do that by double-clicking the edit point between the two wind sound effects, pressing U, and clicking the +5 button six times quickly. Listen to the playback by pressing the spacebar. To stop the looping playback, press the spacebar again. There's no "right" way to trim with this window. I think the best way to use this tool is the way that makes the most sense to you or the task you need to perform. -
Locate the three markers titled "Sam Falls," takes 1 through 3, in the 2 hr timecode section master clips. Take a look at each one by double-clicking its marker. They are very similar, but more snow is falling in take 3, and the performance is better as well. -
Edit the entire "Sam Falls tk 3" subclip from the Scene 2 bin into the sequence next on V1 butted up against the "Sam on Sled tk 3" clip. Trim the last 5:25 of the outgoing clip, "Sam on Sled tk 3," and trim the first 5:11 of the incoming clip, "Same Falls tk 3." The Trim Edit window should look like Figure 7.19. Figure 7.19. The Trim Edit window after step 9. 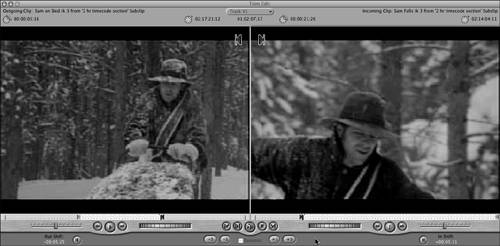 -
Place a 2-second centered dissolve between the two shots. A Few Aesthetics While You're Editing Take a look at the picture edits between the scenes of different places using dissolves between them. Dissolves can make a dramatic statement if you pick shots where the movement is either similar in direction or constantly dissimilar. In this case, dissimilar directions between shots seem to make the action more disjointed , adding to the feeling of helplessness on Sam's part. It's almost as if he's going nowhere, as if he's even retracing his steps. If the shots were similar in direction, they might propel the viewer forward in time in a smoother fashion, leaving the impression that things are moving forward evenly and in an orderly fashion. The idea here is to get the shots' directions not smooth and moving in different directions, reflecting the feeling that all is not going well for Sam. Subtle choices like this are part of the aesthetics of the language of film. No one will take note particularly, but it adds a touch of tensiona feeling that things are not OK. Emphasize the emotions in your story even when picking directions of movement between shots that dissolve to each other. Emphasize emotion in any way that's not distracting to the viewer. Keep it subtle, though, almost on a subconscious level. You'll affect the audience's emotions, manipulating their feelings. They will be unconscious of it if you are subtle, and you'll keep their rapt attention. |
-
Locate the markers named "Sam Falls in Snow med tk 1" and "Sam Falls in Snow med tk 2" in the 2 hr timecode section master clips. Compare them. Take 1 seems fine, but it looks a bit like Sam falls into a downy pillow. Take 2, on the other hand, looks a bit harsher, and more snow flies when he falls, so it tells the story better. This is why the shot was used. Edit "Sam Falls in Snow med tk 2," and butt it up to the end of the last shot, "Sam Falls tk 3." Prepare to trim between them with the Trim Edit window. Double-click this new edit point, and open it in the Trim Edit window. -
These two edits are matching action, meaning that they cut to each other in real time. Matching action needs to look seamless, so trim the outgoing shot to 02:14:22:11 or take off the last 3:25 frames of it. What should happen is that Sam just leaves frame. I fudged here just a bit. I held a couple of frames past his last frame on camera to extend the duration and length of his fall. Trim the incoming shot to 02:15:08;13, taking off the first 5:19 frames. I also left a few frames before Sam enters the shot for the same reason. -
You can experiment with this edit if you want to see what happens as you trim each side, but end up with the edit as the preceding step directed so that the rest of the movie works as planned. Try editing between them before Sam leaves frame on the outgoing shot and after he enters frame in the incoming shot. He doesn't seem to fall as far. Use the spacebar to start and stop the looping playback as you adjust. You'll begin to see the power of the what-ifs I've been talking about. When you're done experimenting, the Trim Edit window should look exactly like Figure 7.20. Perform Undos (Cmd+Z) if needed to get back. Figure 7.20. The Trim Edit window after step 13. 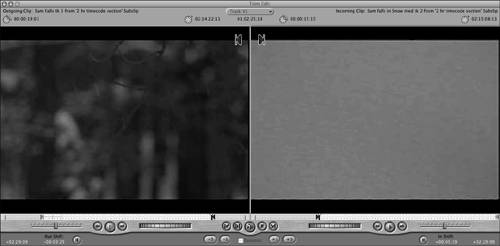 -
These shots are similar to Sam's earlier falling experience; he's almost hallucinating now. To enhance his desperate feeling, add some totally " opposite " memory experiences to this moment by hearing his childhood recollections of a hot summer's day swimming in a pond back in Tennessee. Add the foley first, just to be certain that it is in sync with the picture. From the *Foley bin, add "Foley 1-Sam Dog Sled #4-16" to the A4 track at 01:02:09;07 in the sequence. Raise its level to +10dB. At 01:02:25;18 in the sequence, add "Foley 1-Sam Dog Sled #4-18," also on the A4 track, and raise its level to +10dB as well. Play back through these new edits to check to make sure that they sound correct. You might need to slightly move the foley clip of Sam falling in the snow to sync exactly with the action if you altered the last edit point. -
Add the following clips from the Sound Clips bin at 01:02:10;14 to the sequence: "GIGGLI~1.AIF-02 Verb" as a whole into A1 "Children Swimming 40_1-03 Verb" into A2 and A3 (it's a stereo pair). Don't forget to target both tracks of audio. -
Locate the "COMEIN~1.AIF-02" clip in the Sound Clips bin, and edit it into A1 at 01:02:25;02. This clip invites Sam to fall. You'll match its audio quality to the earlier reverb clips in the next chapter, which covers the use of audio filters. -
Compare the two markers of "Cap walks to sam tk 1" and "Cap walks to sam tk 2." In take 1, Cap walks up and kicks Sam. In take 2, he just admonishes him with his hand. The first one is too rough, so edit "Cap walks to sam tk 2" into the sequence by butting it up against the end of the "Sam Falls tk 3" clip on track V1. You can do this directly from the marker double-clicked in the Viewer, or create a subclip and edit it into the sequence from that. Trim them in the Trim Edit window by clicking the new edit point between them and trimming 8:06 to the outgoing edit and 5:08 to the incoming edit (see Figure 7.21). Figure 7.21. The Trim Edit window after step 17. 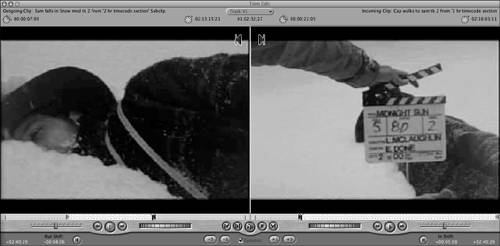 -
Locate the "Foley 1-Guy#1 Approach#3" clip in the *Foley bin in the Sound Clips bin, and double-click it to open it in the Viewer. Set an In point at 7:00 (1 second in from the beginning), and set an Out point 30 frames from its end. (To do this quickly, press the End key and type 30 .) Edit the clip to track A1 at 01:02:27;03. Raise its level to the limit of +12dB. Fade up its audio level with keyframes from the beginning for about a second or so to give the effect that Cap is walking toward Sam. You can do this by adding keyframes to the clip's level overlay after you have double-clicked the clip to view these keyframes in the Viewer. -
Edit the sound sync lines. Locate "S8DT2.aif-01" in the Sound Clips bin, and double-click it to open it in the Viewer. With the Viewer active, press Shift+Z to reveal the clip's entire waveform. Play through it to see that last bit of Cap's line. It's a bit too hot. Zoom in a bit on it by pressing Z and clicking the clip with the Zoom tool. Press P to activate the Pen tool. Add a set of four keyframes on either side of the waveform representing Cap's last line. Press A to activate the Selection tool, and drag the middle section down to 4dB. Set an In point at 00:00:01;02 and an Out point at 00:00:11;22. Overwrite this shot to the A1 track in the sequence at 01:02:37;03. When you're done, the Viewer should look like Figure 7.22. Figure 7.22. The Viewer after step 19. 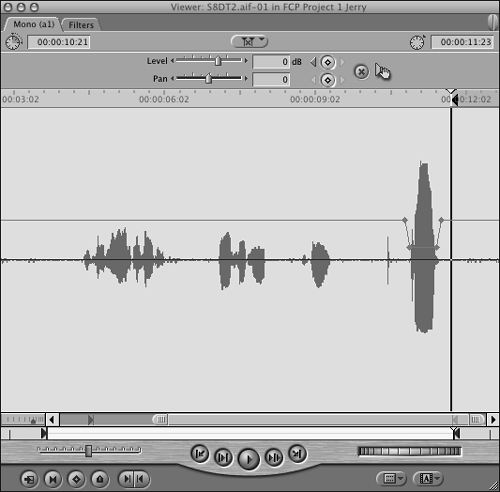 -
Find the clip named "Foley 1-Sam Away #2-01" in the *Foley bin. Load it into the Viewer. Mark an In point at the very beginning and an Out point at 7:15. Edit the clip into the sequence at 01:02:44;22 on A2. Raise its level to +12dB. The Timeline for this new area should now look like Figure 7.23. Figure 7.23. The Timeline of Scene 2 after step 20. 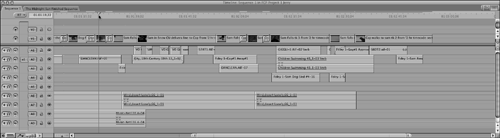 |