Remote Installation Services (RIS)
Client Management: Remote Installation Services (RIS)
Our next topic in client management is the Remote Installation Service (RIS) . RIS allows client computers to boot from the network (or from a network boot floppy disk). They can then install an entire copy of Microsoft Windows right over the network without cracking open a CD-ROM jewel case. The RIS process is outlined here in figure 4-13:
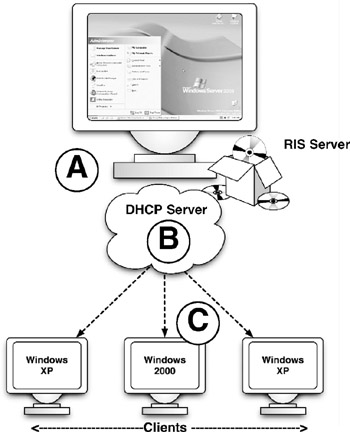
Figure 4-13: Remote Installation Services
A . Installation files for Windows Operating Systems are stored on the RIS Server.
B . Clients "boot" from the network with information provided by a Dynamic Host Configuration Protocol (DHCP) server.
C . Installation of Windows takes place over the network.
In order for the RIS server to work, we must have the following on our network and test systems:
-
Active Directory Domain
-
DNS Server
-
Dynamic Host Configuration Protocol (DHCP) Server authorized for use in Active Directory
-
A Preboot Execution Environment (PXE) compliant ethernet card or a network card supported by the PXE boot disk.
-
Second hard drive of 5GB or more formatted in NTFS format.
-
Licensed copies of Microsoft Windows 2000 and/or XP.
Obviously at this point in the book, we already have the first two requirements. The third, a DHCP server, is responsible for handing out IP addresses, as well as other information to clients on the network. For example, a DHCP can be configured to provide clients with default router and DNS server information so that the administrator need not configure each workstation one by one with these settings. RIS works hand in hand with DHCP.
What is the Preboot Execution Environment ( PXE ), and why is it important? PXE is the technology that makes network booting possible (booting without a floppy disk or CD-ROM). Many network cards available today support PXE, but there are still many that do not. For those that don't, Microsoft has provided a utility called RBFG.exe which allows the creation of a PXE boot floppy disk. The client boots from the floppy disk just far enough to receive information from the DHCP server. The client then receives information from the RIS server, at which time the network install of Windows can take place.
When installing Windows over the network, the Windows installation files must be kept in a centralized location on the RIS server. This location cannot be on the same hard drive as the server's system drive (typically the C drive). Therefore, we must have a separate hard drive of at least a 5GB capacity, and this drive must be formatted in NTFS format.
And, of course, we need to have the Windows installation CDs handy. When we configure the RIS server, the installation files are copied from the installer CDs over to the second hard drive. It is from this second hard drive that clients receive the installer data in which to install Windows over the network. For the following tutorial, we use Windows XP Professional.
Tutorial: Installing and Configuring Remote Installation Services
Before we configure RIS, we must install the DHCP and RIS services. Make sure to have your Windows Server 2003 installer CD handy.
-
On DC01, open the Add/Remove Programs control panel and click the Add/Remove Windows Components button on the left side of the window.
-
In the list that appears, double-click the item labeled Network Services . A new list appears. Place a check in the item labeled Dynamic Host Configuration Protocol (DHCP) and click OK .
-
Place a check in the item labeled Remote Installation Services . Click Next to run the installation. You may be prompted for your installer CD. Restart the server when prompted.
We must now set up our DHCP server to assign IP information to clients on the network.
-
Open the DHCP configuration program located on Start ˆ’ > Administrative Tools ˆ’ > DHCP .
-
In the left column, click once on dc01.guinea.pig . You are informed that the DHCP server is not configured, and that we need to add a scope . A scope is a range of IP addresses that our DHCP server will assign to other computers on the network. You are also informed that this DHCP server must be authorized for use in the Active Directory, which we address later in this tutorial.
-
Click the Action menu and choose New Scope . The New Scope configuration wizard appears. Click Next .
-
You are asked to provide a name and description of the new scope. Since this scope affects the guinea.pig domain on an IP address span covering 192.168.1.x, enter the following:
Name: Guinea.pig DHCP Scope
Description: 192.168.1.x Subnet -
We must now provide a range of IP addresses that this DHCP scope will service. Since we have already assigned many IP addresses to our test computers manually, we shall pick a safe range of addresses that won't conflict with any existing clients on the network. On the IP Address Range window, enter the following:
Start IP Address: 192.168.1.50
End IP Address: 192.168.1.100This gives our server 51 IP addresses that it can assign to client computers logging onto the network. The Length and Subnet mask fields are filled in automatically. Click Next .
-
The configuration wizard now asks if we have any IP addresses that we wish to exclude from any assignments made on the network. This is useful if we were to have any manually assigned IP addresses that might fall within the range of addresses that we set up in step 8. Leave this area blank and click Next .
-
The wizard asks for a lease duration, measured in days, hours, and minutes. A lease is simply an amount of time that each client may hold the assigned IP address. After this time period passes , the IP address is recycled back into the list of addresses that may be assigned to other clients on the network. Leave the default of 8 days and click Next .
-
The next screen asks for additional options that the DHCP server will provide to clients beyond that of an IP address. Make sure that Yes is selected, and click Next .
-
The first screen asks about routing information. Routers are typically used to pass information between different IP divisions, or subnets. Since we only have one subnet at this time, leave this blank and click Next .
-
We are now asked for domain and DNS information. This information is vital if the clients are to find the correct domain (guinea.pig) and be able to resolve the domain name. Enter the following:
Parent domain: guinea.pig
Server name: dc01.guinea.pigAfter entering the server name, click the Resolve button and then the Add button. This adds our domain controller as the primary means in which to resolve DNS queries on the network. Click Next .
-
We are now asked about Windows Internet Naming Service ( WINS ). WINS is a process for older Windows operating systems to resolve computer/client names on a network (e.g., the computer names you see in the Network Neighborhood or My Network Places window). WINS can be especially useful when crossing IP subnets, and can also reduce network traffic. Because we are using DNS to resolve names instead of WINS, and have set up no WINS server on our domain controller, leave this screen blank and hit Next .
-
When asked to activate the scope, click Yes . Click Next and Finish .
The DHCP server is now ready to provide IP information to clients on the network. But before it can be switched on, it must be authorized for use in the Active Directory. This is for security reasons. Before we authorize this server for use in Active Directory, we must configure RIS. For now, close the DHCP server screen.
-
Open the RIS configuration program located at Start ˆ’ > Administrative Tools ˆ’ > Remote Installation Services Setup . Click Next to move past the introduction screen.
-
The wizard asks you for a location in which it should store the Window installation files. Recall that this location cannot be the main system volume. For this tutorial, the path is set to D:\RemoteInstall ., where the D drive is a separate hard disk of 5GB in size and formatted in the NTFS file system. Click Next .
-
In order for the RIS to function properly, it must be told to respond to clients requesting information. Place a check in the box labeled Respond to client computers requesting service . Leave the second checkbox blank and click Next .
-
The wizard asks for the location of the Windows installer files. For this tutorial, we use Windows XP Professional (you may, however, use Windows 2000 Professional if desired). Place the Windows installer CD in the CD drive, ensure that the drive letter represents your CD drive in the Path field, and click Next .
-
You are asked for a folder name in which to copy the Windows XP files. Enter WindowsXP in the Folder Name field.
-
The next window asks for a friendly description for the installer screens that greet the user when he or she is installing Windows over the network. Leave the defaults, and click Next .
-
The last screen displays a summary of the RIS configuration. Click Finish . The setup wizard copies the needed files to the hard disk, configures RIS, and finally authorizes the DHCP server for use in Active Directory.
Tutorial: Configuring Clients for RIS
Congratulations! The RIS server is ready to go! If your client computers on your network contain PXE boot ROM code, you may simply turn the client on, hit the F12 key, and follow the instructions for installing Windows XP Professional right over the network. However, if your computer's network cards are not PXE bootable, you may still remotely install Windows by creating a PXE emulator floppy disk. You may then boot from this floppy, hit F12, and proceed to install Windows XP.
The following tutorial covers PXE boot floppy creation.
-
To create the PXE boot floppy, we must use the rbfg.exe program located in the \remoteinstall\admin\i386 folder on the RIS hard drive containing the Windows installer files. Locate this program and double-click it.
-
The Remote Boot Disk Generator screen appears. Recall that only supported network adapters will work with the boot disk. To check if yours is supported, click the Adapter List button.
-
To create the boot disk, insert a blank, 3.5" high-density floppy disk and click Create Disk . Once the disk is created, quit the Boot Disk Generator program.
Tutorial: Installing Windows XP Professional via RIS:
-
Make sure that your test client computer does not have anything important stored on its hard drive, as the RIS process does erase all data.
-
Power down the client computer. If the network adapter is not PXE compliant, insert the PXE boot disk. Start the computer.
-
If your computer contains a PXE network card, immediately press F12. If you're using the PXE boot floppy,
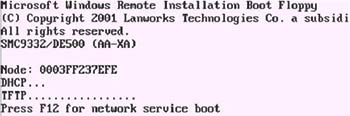
wait until you see this text:
Hit F12 when asked to do so.
-
The computer greets you with a setup screen. Hit the Enter key to continue.
-
In order for you to install and join this computer to the domain guinea.pig, you must be able to supply a username and password of a user with privileges to do so. Enter the DC01's administrator username and password, as shown here:

-
Hit Enter to continue. You are warned of the impending erasure of your hard drive. Again, make sure that this hard drive has nothing of great importance stored on it. Hit Enter to continue.
-
You are presented with a summary screen. If you have the PXE boot floppy in the drive, remove it now . Hit Enter to continue.
At this point, the Windows installer files are copied over the network to the client's hard drive, where Windows installation can take place. And this all happens without inserting the Windows installer CD in the client's CD drive.
| Get Info | When installing Windows, always make sure that you have the proper number of licenses for each computer you install Windows on. To do otherwise is against the law! |
EAN: 2147483647
Pages: 88