Joining XP2000 Clients to a Domain
Joining XP/2000 Clients to a Domain
Tutorial: Joining a Windows XP/2000 Professional Client to an Active Directory Domain
Before we add our Windows XP or 2000 Professional client to the domain, we need to configure its network adapter Properties. For this tutorial, we make the following assumptions:
-
You are using a test computer for this tutorial, and not a computer that is in actual production ( It's always good to have a guinea pig to test before things go live ).
-
You have only one network interface card (NIC) attached to the test computer.
-
Click the Start Menu and select Control Panels (or Start Menu ˆ’ > Settings ˆ’ > Control Panels for Windows 2000).
-
Double-click Network Connections (or Network and Dial-up Connections for Windows 2000), right-click Local Area Connection , and choose Properties .
-
The Local Area Connection Properties window appears. In order to join the domain, Windows XP Professional must have Client for Microsoft Networks and Internet Protocol (TCP/IP) installed. These items are installed by default by the Windows XP Professional installer. If, for some reason, you don't have these installed, you may add them by clicking the Install button and double-clicking client (for Client for Microsoft Networks) or Service (for TCP/IP). The system may require a restart after installing these components .
-
Double-click Internet Protocol (TCP/IP) . Click the item marked Use the following IP address . We shall set this test system up on the same IP subnet as our Windows Server 2003 computer. We shall also configure our test system to use the Server 2003 machine as its DNS. Since we are not needing to cross subnets or add internet access at this time, we shall leave the Default gateway (or router) blank.
Enter the following information:
-
IP address: 192.168.1.2
-
Subnet Mask (usually entered automatically): 255.255.255.0
-
Default Gateway: leave blank
-
Preferred DNS server: 192.168.1.1
-
-
Click OK twice. A system restart may be required. If so, restart.
-
Go back to Control Panels , and double-click System .
-
Click the Computer Name tab at the top of the window. Toward the bottom of the window, click the Change button (or Properties button in Windows 2000) next to To rename this computer or join a domain, click Change .
-
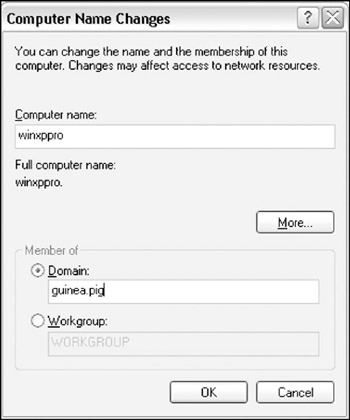
Enter winxppro (or win2kpro for Windows 2000) in the Computer name field.
-
At the bottom of the window, click the option marked Domain . and enter guinea.pig in the text field, and click OK :
-
Windows asks you for a username and password of a user with permission to add this computer to the domain. Type administrator and the administrator's password and click OK . After a short pause, Windows welcomes you to the guinea.pig domain. Click OK and restart the computer when prompted.
Get Info When we type a username and password of a user authorized to join a domain, you might wonder just who is authorized to join accounts to the domain? Obviously, the Administrator is able to join a computer to the domain. But there are other groups (and the members thereof) that have the authority to perform this action. They are the Administrators (located in the Builtin folder container in Active Directory Users and Computers), Domain Admins, and Enterprise Admins (both located in the Users container folder in ADUC). These groups have full control over the domain. Therefore, you should exercise caution when assigning users to them .
Now that our Windows XP or 2000 computer is joined to the domain, we must log in.
-
When the computer finishes rebooting, you are presented with either the 2000 or XP logon screen. Hit Control-Alt-Del .
-
For this exercise, we use one of our Marketing group members in the South Wing OU:
-
User Name: tknot
-
Password: <knot's password>
-
-
In the Log on to field, the default location is the local computer. In this case, you have either winxppro or win2kpro. This does not log us into the domain. Click the drop down menu to the right of your computer's name and select the entry labeled GUINEA . Your logon screen should appear similar to Figure 4-3 on the following page. Click OK .
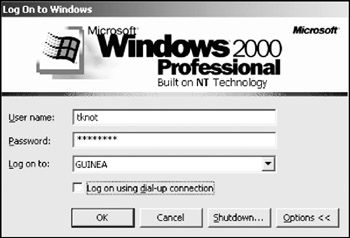
Figure 4-3: The Windows 2000 Professional logon window, fully configured to log into our domain with the user tknot.
Congratulations! You've just joined your first client computer to your first domain. Next, we cover Windows 98 and Windows Me.
EAN: 2147483647
Pages: 88