Configuring NTFS Permissions
Tutorial: Configuring Proper NTFS Permissions and Publishing a Network Share to AD
-
Click the Security tab at the top of the Marketing Properties window. This brings back the NTFS file permissions window.
-
All users and/or groups that have permissions assigned to them to this share are listed in the top half of the window. Since we set the permissions on the parent folder shares to Administrators/Full Control, this permission is inherited by our Marketing folder. The NTFS permissions themselves are listed in the bottom half of the window. Notice that Administrators' permissions are " ghosted ," meaning that you are unable to check or uncheck each permission. This is because our marketing folder is inheriting permissions from its parent folder. Since we need to give the marketing group access to this folder, we need to add some NTFS permissions.
-
In the center of the window, click the Add button. In the window that appears, type marketing and hit Enter . The marketing group appears in the list of users and groups in the upper half of the window.
-
Highlight the marketing group by clicking it once. We shall give the marketing group the following permissions: Modify , Read & Execute , List Folder Contents , Read , and Write . Checking the Modify box under the Allow column automatically selects all other boxes except Full Control ( note: the Full Control permission should be reserved for administrators and not normal users, such as our marketing group ). Notice that the checkboxes are not ghosted for the marketing group. This is because the marketing group is not part of the parent folder's permissions. However, all new folders created inside the Marketing folder will inherit Marketing's permissions, along with Marketing's parent folder, shares. Click the Apply button, and click OK .
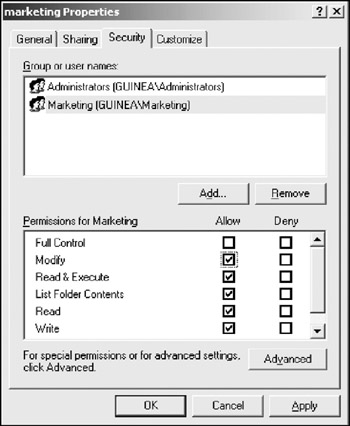
Figure 3-9: The NTFS permissions assigned to our marketing shared folder.We must now publish this share to the Active Directory in the South Wing OU. To add a bit more to our organizational scheme, we shall create a new OU inside of South Wing named Shared Folders .
-
Open Active Directory Users and Computers . Find the South Wing OU and expand it if necessary. Right-click South Wing , point to New , and click Organizational Unit . In the name field, type Shared Folders and click OK
-
Right-click the newly created Shared Folders OU, point to New , and click Shared Folder .
-
The new shared folder dialog box appears with two fields: name and network path . In the name field, use the same name that you entered when you created this share in the tutorial on page 50. In this case, type the name marketing .
-
In the Network Path field, we must type the exact network path to the share, and not the local path. For example, we know that the share is located at:
D:\shares\marketing
However, for someone logging into the network, this path is meaningless, as the user has a different D: drive than the one on the server. Instead, we need to specify the full network path, called the UNC path, which takes the syntax of \\server_name\share
Since our server's name is DC01 and the share is called marketing, the full network path to our marketing share looks like:
\\DC01\marketing
Enter this into the network path field and click OK . Notice that the new share appears in the right column.
We now need to make the marketing shared folder searchable in the Active Directory based on keywords. For example, other than the obvious keyword of marketing, we might add other words such as south wing . This makes things easier for the user to find shares on the network.
Get Info You may be thinking that we are publishing the Marketing shared folder twice: once on the network, and once to the Active Directory; and you're right. The process does seem tedious , and can be confusing, especially when having to specify the name twice. You do have the ability to specify a different name in step 7 on the preceding page; however, you are then forced to keep track of two different names for the same shared folder. For this reason, it's best to stay with a consistent name throughout, as we are doing here.
-
Right-click the marketing share in the right hand column of the screen and choose Properties . Enter a description in the Description field (i.e., Marketing Department Active Directory shared folder).
-
Click the Keywords button. Enter a keyword(s) in the supplied field and click the add button. Enter as many keywords as you wish, hitting the add button after each. When finished, click OK . Click OK once again.
-
Now for the fun part! Repeat this process for each of our other departments: Accounting and Art. Be sure to create these two new shares (using Windows Explorer initially) inside the shares folder on the D: drive (i.e., the physical, local locations of these two new folders should be D:\shares\accounting and D:\shares\art ).
Congratulations! You have just shared your first network folders out over not only the network, but also Active Directory! Go take a break; you've earned it (don't worry; we'll wait). When you return, we'll start on sharing printers!
EAN: 2147483647
Pages: 88