User Security
|
| Every aspect of security is extremely important to the success of your website. Without users, you don't have a website. You will lose your users if you can't guarantee that their passwords are secure, and that you can reliably authenticate and authorize users if your site requires it. Authenticating UsersThe process of authentication is the process by which a user's identity is confirmed. Through some means, your web site determines who the user is. ASP.NET provides several different methods for authenticating users and determining identity. They are as follows:
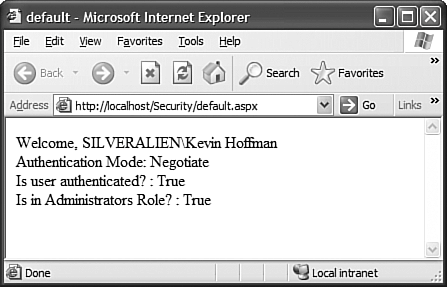
Windows AuthenticationWindows authentication mode uses the current user's Windows identity to authenticate the user. This is an extremely secure way of authenticating users when you can guarantee that the users of your website will be on machines within a domain that has some relationship to the server's domain. This authentication mode is done in combination with IIS authentication. IIS authentication can be done using basic (clear text), digest (hashed identity information), or integrated Windows authentication. Windows Authentication through ASP.NET is accomplished through an authentication provider called the Windows Authentication Provider. This provider requires the smallest amount of code to implement security. Everywhere that a user's security context is required in the .NET Framework, two types of objects are used: principals and identities. A principal is a container for an identity. You use the principal to find out the identity of the principal and the list of roles to which that principal belongs. An identity contains the actual identity of the user. The identity enables the programmer to determine the method by which the user was authenticated (for example, Windows, Passport, or Forms), whether the identity has been authenticated, and the name of that user's identity. When Windows authentication is used, ASP.NET will automatically provide a WindowsPrincipal and a WindowsIdentity object to every page for the programmer to use. To set up Windows authentication, just set the <authentication> element in Web.config to the following: <authentication mode="Windows" /> You can then set the <authorization> element to choose whether your site allows anonymous or authenticated users or both. The comments in the default Web.config file explain the syntax of the <authorization> element. The following section of code shows you a couple of the common ways in which you can use the WindowsIdentity and WindowsPrincipal objects that are part of the ASP.NET security model when you are using Windows authentication: private void Page_Load(object sender, System.EventArgs e) { // Put user code to initialize the page here WindowsPrincipal wp = (WindowsPrincipal)User; Response.Write("Welcome, " + wp.Identity.Name + "<br>"); Response.Write("Authentication Mode: " + wp.Identity.AuthenticationType.ToString() + "<BR>"); Response.Write("Is user authenticated? : " + wp.Identity.IsAuthenticated.ToString() + "<BR>"); Response.Write("Is in Administrators Role? : " + wp.IsInRole( WindowsBuiltInRole.Administrator ) ); } The preceding code prints out the user's name, whether the user is authenticated, and how authentication was performed. The IsInRole method is part of the IPrincipal interface. The WindowsPrincipal class provides an override that enables you to check whether a WindowsPrincipal belongs to one of the built-in Windows groups. If you supply a string, the WindowsPrincipal will check for group membership within the named NT group. The output from the preceding code is shown in Figure 36.1. Figure 36.1. Output of some data using Windows authentication.
As you can see, using Windows authentication is pretty easy. With only a quick change to the Web.config file, you automatically gain access to the entire Windows security model and can make use of that functionality within your web application. Forms AuthenticationWith Windows authentication, there is no need to log in. The login is already handled by Windows. If Windows knows who you are, the web application automatically knows who you are. This is not true with Forms authentication. Windows authentication is great for intranet websites and private websites that you might find on the Internet, but it isn't a very good way of providing authentication for public websites. For that, you need a more versatile way of providing authentication. For this, ASP.NET provides the Forms Authentication Provider. When a request is made for a protected page by an unauthenticated user, the user is redirected to a login page that performs the login and user authentication. After that user has been authenticated, she can access protected pages and the website can then identify her. The default mode is to use a cookie that provides a secure method of authenticating a request. To change the website from the previous example to work with Forms authentication, make a change to the Web.config file. Change the <authentication> element to the following: <authentication mode="Forms"> <forms loginUrl="login.aspx" name=".SECURITYAUTH" /> </authentication> The <forms> tag takes two attributes: loginUrl and name. The loginUrl specifies the URL of the login page to which an unauthenticated user will be redirected when he attempts to access a secured page. The name attribute is actually the suffix used for the authentication cookie that will be written to the client. If you have more than one secure website on the same server using Forms authentication, you will need to make sure that those suffixes are unique across the applications. With the <forms> tag in place in Web.config, you need to create a login.aspx page to handle verification of the user's identity. To do that, add a new Web Form called login.aspx to whatever web project you're working on. Add a TextBox for the user ID called txtLogin, a TextBox for the password called txtPassword (set the TextMode property to Password), a CheckBox called chkPersistCookie, and finally a button called btnLogin. If the user checks the box in the Persist Cookie check box, the authentication cookie will be persistent and the website will remember that user even after his session has ended. Double-click the btnLogin button to wire up the following Click event handler: private void btnSubmit_Click(object sender, System.EventArgs e) { if ( (txtLogin.Text == "kevin") && (txtPassword.Text == "password" )) { FormsAuthentication.RedirectFromLoginPage( txtLogin.Text, chkPersistCookie.Checked ); } } This method uses the FormsAuthentication class's static method RedirectFromLoginPage. This method not only writes out the authentication cookie, identifying the user by the first parameter, but it also redirects the user to the page he was trying to access before he was redirected to the login page. Obviously you will not want to perform your real authentication like this. Hard-coded usernames and passwords were used in the example just to demonstrate authentication. Typically you would be using a database to perform secure password authentication. In fact, you'll see a way to ensure password security and privacy later in this chapter. This redirection gets rid of the problem that many sites used to have with bookmarks on secured pages. If someone were to bookmark a page that required a login and the site didn't have this redirection logic, the bookmark would be useless because after logging in, the user would be directed to some home page. With ASP.NET and Forms authentication, the website knows what protected page the user initially requested and can return her to that page after she has been authenticated. The FormsAuthentication class contains many other utilities and tools for dealing with forms-based security. Some of them are listed in Table 36.1.
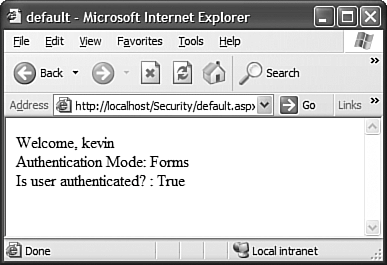
After removing the WindowsPrincipal-specific code from default.aspx, I then tried to open that page in a browser. As expected, I was redirected to my quick-and-dirty login page. After logging in with my hard-coded username and password, I am presented with a default.aspx page, as shown in Figure 36.2. Figure 36.2. The default.aspx page under the protection of Forms authentication.
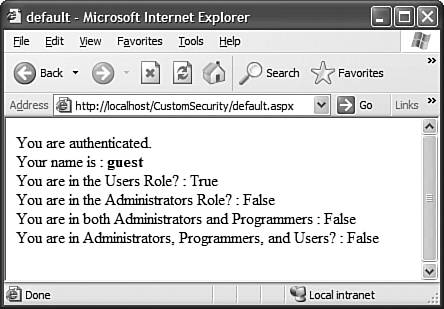
The point to take away from this section of the chapter isn't that Forms authentication is the best authentication system in the world. It isn't; it is a starting point and you have to do a lot of the heavy lifting yourself to get it to work the way you need. However, Forms authentication is the most commonly used form of website authentication on the Internet for ASP.NET websites. The reason for this is that it is the most available. Both Windows and Passport authentication have restrictions that make them less frequently used on public websites than standard Forms authentication. Forms authentication is extensible and configurable and with a little work, you can get it to work with just about any security needs you might have. Passport AuthenticationPassport authentication is an implementation of single sign-on technology. In other words, you have a single authentication ticket (a passport, if you will) that you own and that you present to each site that you access. If the site you are accessing is aware of the Passport authentication scheme, that site can authenticate you on the spot without you having to go through the painstaking process of signing up as a new user including typing in your name, address, email, contact information, and so on. There are several benefits and limitations to using the Passport Authentication Provider. The major benefit is, of course, the use of single sign-on technology and the ease of use for the end user as well as the ability to use something called a Kids Passport for compliance with the COPPA (Children's Online Privacy Protection Act). The problem is that this technology isn't easy to use nor is it free. For your site to be able to recognize and authenticate valid Passport identities, you need to download and install the Passport SDK after reading the license agreement and documentation found at www.passport.com/business. Another downfall of this system is that your ability to authenticate users is at the mercy of some other party. Although that other party is Microsoft, that fact doesn't make it immune from downtime. I have had many days where my Passport simply wouldn't work anywhere because the central Passport authentication server was not responding or was having some other trouble. Unfortunately, many of the sites that could benefit from Passport simply can't afford it. The current pricing at the time this book was being written is a periodic compliance testing fee of $1,500 and an annual per-company fee of $10,000. Authorizing Users with RolesAs you saw earlier, the IPrincipal interface implements a method called IsInRole. Up to the implementer to define, this method determines whether the user is part of a named group or role. Roles are abstractions that relate different types of users together. For example, you can have roles that are for administrators, data base personnel, developers, and end users. As you saw, the implementation of the WindowsPrincipal class determines membership within a Windows group. Other implementations of principal use that method for determining membership within their own custom groups. In the next section, you will see how to create your own implementation of IIdentity and IPrincipal and use your custom implementations to not only add your own functionality, but also to provide your own role-based security system that integrates seamlessly with ASP.NET security. Implementing IIdentity and IPrincipalEven though the default implementations of IPrincipal and IIdentity should be sufficient for most applications, there may be times when you want to create your own implementation and use it on top of the existing ASP.NET security functionality. For example, if you want to be able to get an enumeration of all the roles to which a user belongs, you can't get that functionality with the default IPrincipal implementation. Or if you want to use your own data source for the list of roles assigned to each user for Forms authentication, you will want to create your own principal. You can implement your own custom IPrincipal without implementing a new IIdentity, but the example shown next uses custom implementations of both interfaces and shows you how to integrate those into ASP.NET. This example will show you how to create your own IIdentity and IPrincipal implementations and integrate them into ASP.NET with very minimal effort. To start off, create a new Web Application and follow the same steps as you did in the previous sample to set it up for Forms authentication. This includes creating a login.aspx page and setting up the Web.config file to deny anonymous users and set up the authentication ticket. The following code simply authenticates whomever attempts to login. The goal of this exercise isn't to show secure authentication, but to show you how to enhance the existing user identity system. private void btnLogin_Click(object sender, System.EventArgs e) { // ordinarily you would call business tier to authenticate user // instead we're just going to authenticate them. FormsAuthentication.RedirectFromLoginPage( txtLogin.Text, chkRememberLogin.Checked ); } This code will automatically accept whatever username is typed into the login form and create an authentication ticket for that user. The next thing to do is create identity and principal objects. Listing 36.1 and Listing 36.2 show both of these classes. Listing 36.1. The CustomIdentity Class using System; using System.Security; using System.Security.Principal; namespace CustomSecurity.Classes { /// <summary> /// Summary description for CustomIdentity. /// </summary> public class CustomIdentity : IIdentity { private string name = null; public CustomIdentity( string name) { this.name = name; } #region IIdentity Members public bool IsAuthenticated { get { // TODO: Add CustomIdentity.IsAuthenticated getter implementation return !(name == null); } } public string Name { get { return name; } } public string AuthenticationType { get { // TODO: Add CustomIdentity.AuthenticationType getter implementation return "Custom"; } } #endregion } } The CustomIdentity class is a fairly simple class. All it needs to store is the authentication type and the name of the identity. The CustomPrincipal object shown in Listing 36.2 is a little more complex because that is where all of the custom role-based security code goes. Listing 36.2. The CustomPrincipal Class using System; using System.Xml; using System.Collections; using System.Collections.Specialized; using System.Security; using System.Security.Principal; namespace CustomSecurity.Classes { /// <summary> /// Summary description for CustomPrincipal. /// </summary> public class CustomPrincipal : IPrincipal { private StringCollection sc = new StringCollection(); private IIdentity identity; public CustomPrincipal( IIdentity identity ) { this.identity = identity; LoadRolesFromDataSource(); } private void LoadRolesFromDataSource() { // this is where we obtain the list of roles that belong // to the custom identity. XmlDocument doc = new XmlDocument(); doc.Load( System.Web.HttpContext.Current.Server.MapPath("~/users.xml")); XmlNode user = doc.SelectSingleNode("//user[@id=\"" + identity.Name + "\"]"); foreach (XmlNode node in user.SelectNodes("role") ) { sc.Add( node.Attributes.GetNamedItem("name").Value ); } } #region IPrincipal Members public IIdentity Identity { get { return identity; } } public bool IsInRole(string role) { return sc.Contains(role); } public bool IsInAllRoles(string roleList) { bool inAll = true; string[] roles = roleList.Split('|'); foreach (string role in roles) { if (!sc.Contains(role)) inAll = false; } return inAll; } #endregion } } When the CustomPrincipal is created via the constructor, it takes the CustomIdentity that is passed to it and uses that to retrieve the role membership for the user. If you wanted to do so, you could implement lazy-loading and request the role list only when the IsInRole or IsInAllRoles methods are called. The LoadRolesFromDataSource method could have loaded the role list from a database, from a different kind of XML file, or even from Active Directory. The beauty of it is that even though the back-end store is something you can choose yourself, the CustomPrincipal class still integrates into ASP.NET security by virtue of implementing the IPrincipal interface. Here is a look at the users.xml file used for the sample: <?xml version="1.0" encoding="utf-8" ?> <users> <user > <role name="Administrators"></role> <role name="Programmers"></role> </user> <user > <role name="Users"></role> </user> </users> For this example, the users.xml file was simply added to the project as content. Obviously it isn't secure to put user data in the root directory of an application. Again, the goal of this exercise is to show you how to add your own code to the security infrastructure. Ensuring data security is discussed in the next section. Now you need to integrate the CustomPrincipal and CustomIdentity with the application. These should be available to any page in the application during any event handler, postback or otherwise. For this to happen, you need to insert code into the Application_AuthenticateRequest event handler. You could write an HttpModule that handles that event as you have seen in previous chapters. For the purposes of this example, just make the changes in global.asax. Listing 36.3 shows the new global.asax.cs file after modifications. Listing 36.3. The Application_AuthenticateRequest Event Handler in Global.asax.cs /// <summary> /// This method is called to authenticate a given request. This is where we /// should construct our custom principal and identity objects. /// </summary> /// <param name="sender"></param> /// <param name="e"></param> protected void Application_AuthenticateRequest(Object sender, EventArgs e) { string authTicketId = FormsAuthentication.FormsCookieName; HttpCookie cookie = Context.Request.Cookies[ authTicketId ]; if (cookie == null) return; FormsAuthenticationTicket ticket = null; try { ticket = FormsAuthentication.Decrypt( cookie.Value ); } catch { // insert code to log error } if (ticket == null) return; Classes.CustomIdentity ci = new Classes.CustomIdentity( ticket.Name ); Classes.CustomPrincipal cp = new Classes.CustomPrincipal( ci ); Context.User = cp; } This code first grabs a reference to an authentication cookie, if one exists. If it does, the code decrypts the contents of the cookie to create a new authentication ticket. From that ticket, you can obtain the user's name. The user's name is used to construct the identity and the principal. With the newly created principal, you can set that to the value of Context.User, essentially overriding the ASP.NET principal with your own. You won't break existing functionality because the principal class implements the IPrincipal interface and its identity implements the IIdentity interface. The only thing left to do in this example is to write some code in the default.aspx page that makes use of the new principal, both as a generic IPrincipal and as a CustomPrincipal. That code is shown in Listing 36.4. Listing 36.4. The default.aspx Page Making Use of CustomPrincipal private void Page_Load(object sender, System.EventArgs e) { // Put user code to initialize the page here if (User.Identity.IsAuthenticated) { Response.Write("You are authenticated.<br>"); Response.Write("Your name is : <b>" + User.Identity.Name + "</b><br>"); Response.Write("You are in the Users Role? : " + User.IsInRole("Users").ToString() + "<BR>"); Response.Write("You are in the Administrators Role? : " + User.IsInRole("Administrators").ToString() + "<BR>"); Classes.CustomPrincipal cp = (Classes.CustomPrincipal)User; Response.Write("You are in both Administrators and Programmers : " + cp.IsInAllRoles("Administrators|Programmers").ToString() + "<BR>"); Response.Write("You are in Administrators, Programmers, and Users? : " + cp.IsInAllRoles("Administrators|Programmers|Users") + "<BR>"); } else Response.Write("You are not an authenticated user."); } Build the application to make sure that everything is okay. Now try to open default.aspx in your browser. As expected, you should be redirected to the login page. For the first test, the login is kevin. The password is irrelevant because the code will authenticate you no matter who you are. After logging in as kevin, you will be presented with the output shown in Figure 36.3. Figure 36.3. The default.aspx output, with an administrative user.
Now close the browser and log back in to the website, but this time as the user guest. You will notice that you have fewer privileges because you belong to fewer roles. Keep in mind that all the assignment of roles is being done by your code, and that list can be coming from an XML file, an Access database, a SQL Server instance, or even a web service. Figure 36.4 shows the output of default.aspx after logging in as a guest. Figure 36.4. The default.aspx output, with a guest user.
This section has shown you how to create custom implementations of IPrincipal and IIdentity so that you can extend the ASP.NET authentication mechanism to provide your own functionality or provide more advanced versions of existing functionality. The next section will show you how to secure the sensitive data pertaining to your website and your users to continue the discussion of ASP.NET security. |

|