Using External Tools
|
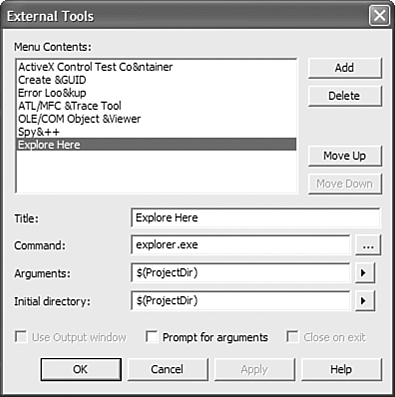
| Even though the Visual Studio .NET IDE contains so many features that you might even start to think it can read your mind and write your code for you, it unfortunately can't. There are some things that are either not built into the IDE by design or are better left to external tools. Many tools are available for your use that are either installed with Visual Studio .NET or are available through third-party developers. It wouldn't be that nice if I devoted large amounts of material talking about a third-party developer tool, so this book will focus on the tools that ship with Visual Studio .NET where appropriate. External tools are only somewhat integrated within the IDE, in that the IDE simply provides a mechanism to launch them using the main menu. You can find a list of installed tools by clicking Tools from the main menu. What you see in that list is only a partial list of the many tools that are provided with Visual Studio .NET. If you're the curious type like me, you've already gone through all the Visual Studio .NET folders and launched every executable file you found to see what it does. If not, you might want to think about doing so. Not only is it useful because you might find a tool that could potentially help you with a project, but it's also extremely fun (don't ask me why). Defining Your Own ToolsOne of the very first things I do whenever I install Visual Studio .NET on a computer is create an Explore Here tool. The Visual Studio .NET IDE enables you to add to the Tools menu by defining external tools. To create an external tool definitionin this case we'll create the Explore Here toolclick Tools, External Tools from the main menu. The External Tools dialog will be displayed as shown in Figure 1.20. You can click on each of the tools listed under the Menu Contents entry to see how it is defined. To create a new tool, click on the Add button. For the Title field, enter Explore Here. In the Command field, simply type in explorer.exe, which is the executable that you want the IDE to launch when the tool is selected from the Tools menu. Click the button containing the right-facing arrow and select Project Directory for the Arguments field. The Initial Directory field also should point to Project Directory, as shown in Figure 1.20. When you are finished, click OK to close the dialog. Now when you select Tools, Explore Here from the main menu, an explorer window will open to the location where your project is located. Figure 1.20. The Tools menu enables you to launch external tools directly from the IDE. You can also add new tools to the menu by selecting External Tools from the Tools main menu item.
|
|