Working with Documents
|
| Although it seems that wizards and their corresponding automatic code generation capabilities decrease the amount of code that you write, they obviously can't write all the code for you. Visual Studio .NET contains many features that enhance the code-writing process. With various code-viewing features placed at your fingertips, writing code has been improved with Visual Studio .NET. In the following sections, you will learn how to enhance the text editors, how to find help where you need it, and how to edit HTML, XML, and binary files. Enhancing the Text EditorThe old adage that states "Time is money" definitely rings true within the software engineering field. Anything that can remove the tedium and nuances of editing source code and enable you to concentrate on the actual code itself will prove helpful. This being the case, the Visual Studio .NET IDE contains several features that aid in writing C# code. Code Outlining in the IDELarge projects can contain large source files. As a file grows, so does the frustration that occurs when you have to navigate to different parts within that file. Outlining helps alleviate this frustration. The structure of a C# source code file is organized based on functional blocks of code. Outlining takes advantage of this by enabling you to contract these blocks in a tree-view fashion, leaving either the first line of the code block (in the case of a conditional block of code), or a block of code containing either a data type declaration or function definition. Figure 1.8 shows a source code file with outlining turned on. As you can see from this figure, outlining enables you to easily view and navigate through your source code. Clicking the plus sign within the tree view expands the block, and clicking the subsequent minus sign for an expanded code block collapses that block. Figure 1.8. Outlining improves your ability to efficiently navigate through large source code files. By default, outlining is turned on for Visual C# .NET source code. To disable outlining for a single file within a single editing session, click Edit, Outlining from the main menu and select an outlining option. If you would rather turn off outlining for all C# source code files, click Tools, Options from the main menu. Expand the Text Editor item located on the left of the Options dialog. Select the C# item and then click on the Formatting option, as shown in Figure 1.9. To turn off outlining, clear the check box labeled Enter Outlining Mode When Files Open. Figure 1.9. Turn on outlining by default by changing Visual Studio .NET options.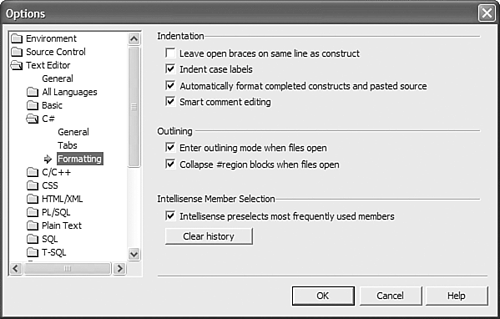 Backward/Forward Navigation Within the IDEIf the Back button on a web browser were a physical button, it would probably have to be replaced more often than you change the oil in your car. Visual Studio .NET takes a feature found within web browsers and applies it to source code editing. As a developer, you have to jump to different places within a source code file. In some instances, you just need to view a small piece of code and then return to the last place you were editing. Backward and forward navigation was designed to support instances like the one just mentioned. When you move your current cursor location within a source file or into a different source file altogether, the place you jumped from is saved into the Visual Studio .NET history buffer. If you need to jump back to the position you came from, you can click the Navigate Backward toolbar button. If you want to jump back several history positions, you can use the drop-down list that is displayed when you click the arrow on the Navigate Backward button, as shown in Figure 1.10. Figure 1.10. Use the Navigate Backward toolbar button to jump to previous positions within your source code.
Using BookmarksBackward and forward navigation is useful, but you might need a little more control and organization when you jump through your source code. Bookmarks enable you to mark a line of code to make it easier to jump back to that location later. Visual C++ 6.0 contained bookmarks, but that implementation was missing one feature that has prevented me from ever using a bookmark. Whenever a bookmark was set, it was immediately lost whenever you closed the source file that the bookmark was set in. Visual Studio .NET has expanded the bookmark feature by adding several new bookmark types as well as adding support for bookmark management via the Task List tool window. Unnamed, or temporary, bookmarks enable you to set a bookmark in a file but only as long as the file is open. As was just mentioned, when an unnamed bookmark is set, it will be removed when the file is closed. There are several ways to set an unnamed bookmark. The easiest way is to make sure that the Text Editor toolbar is visible. The last four icons on that toolbar are used to manage unnamed bookmarks, as shown in Figure 1.11. To enable an unnamed bookmark, click on the solid blue flag icon, which is the first unnamed bookmark icon on the left of the Text Editor toolbar by default. To remove an unnamed bookmark, position your text cursor on the line containing the bookmark and click on the blue flag icon that contains the red X. After an unnamed bookmark has been set, a cyan-colored rounded rectangle appears in the left margin of the source code window, as shown in Figure 1.12. Figure 1.11. You can work with unnamed bookmarks quickly using the Text Editor toolbar.
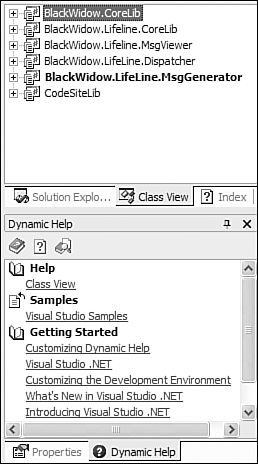
Figure 1.12. Named bookmarks enable you to mark important lines of code so that you can easily jump to that location later even if the source file is closed.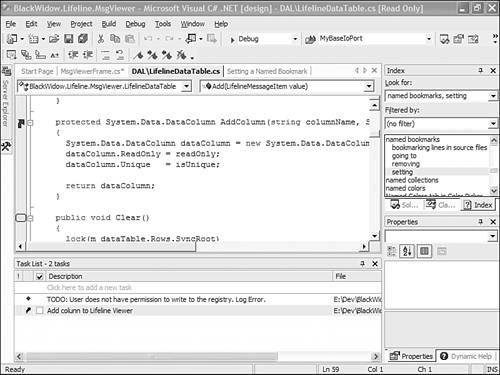 A named bookmark persists even when the source code file that contains the bookmark is closed. The reason that these are referred to as named bookmarks is because of their integration with the Task List tool window. After a named bookmark has been set, it is displayed in the Task List tool window containing the text of the line as the name, the source file the bookmark resides in, and the line number within that source file. Furthermore, the left margin of the source code window displays a blue arrow, as shown in Figure 1.12. To jump to a named bookmark, double-click the Task List entry for that bookmark. If the line of text for a named bookmark isn't descriptive enough, you can click on the item and change the text to better suit your needs, as shown in the second Task List item in Figure 1.12. The last type of bookmark is something that many people will use quite often. In fact, there will probably be times when they use it without even realizing that they're doing so. Many people used to create to-do messages in their code so that they could keep track of tasks in a large project. In C++, the following code snippet illustrates how to create a TODO message: // To use: #pragma TODO("Message") #define __LINE ( __LINE__ ) #define __GETLINE(x) "(" #x ")" #define GETLINE __GETLINE __LINE #define TODO(msg) message ( __FILE__ GETLINE " : TODO: " #msg " " ) Although this is an extremely useful piece of code, there is one glaring problem with it: The TODO message is displayed only when your project is built. TODO messaging has become so standard that it's now integrated into the Visual Studio .NET IDE. However, rather than showing up only when your project is built, it shows up dynamically within the Task List tool window whenever the IDE finds a comment that begins with TODO. Furthermore, you can use several other defined messages, such as HACK and UNDONE. There might be times when you need to add to the list of TODO messages. Thankfully, you can edit the Visual Studio .NET options to add new keywords, which are formally known as comment tokens that the task list will recognize. To add a new token, click on Tools, Options from the main menu. Select Environment, Task List from the list of option headings, as shown in Figure 1.13. To add a new comment token, type the word you want to use in the Name field and click the Add button. You also have the option of setting a priority field. If you set this field, a corresponding icon is placed immediately before the entry within the task list. A high priority item is preceded by a red exclamation point and a low priority item is preceded by a blue down arrow. Normal priority items do not have a corresponding icon. Figure 1.13. You can add new comment tokens by editing the Visual Studio .NET IDE options for the task list.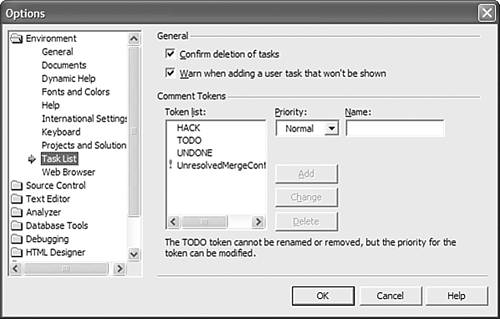 Finding Help Where You Need ItCould you imagine developing an application from scratch without any form of documentation or help from the application programming interface (API) you're working with? Developers need good documentation to get the job done. In fact, when learning a new technology, most programmers turn to sample code, books, magazine articles, and API documentation before they start writing code. This book is a prime example. Visual Studio .NET contains an abundance of useful tools that provide documentation literally at your fingertips. Dynamic HelpDynamic Help is a new feature introduced with Visual Studio .NET that provides context-aware help as you work on your project. By default, the Dynamic Help tool window is located at the bottom right of the IDE, as shown in Figure 1.14. As you work within the IDE using the various tool windows, Dynamic Help constantly changes and provides links to the documentation based on the tool you are currently using. As you work within your source code, the Dynamic Help engine parses the code surrounding the cursor location and provides links to such things as current function calls, parameter information, and relevant samples. Figure 1.14. Dynamic Help displays links that are relevant to what you are working on within the IDE.
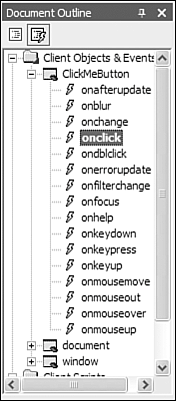
TIP Because it is constantly searching for help every time you press a key on the keyboard, using Dynamic Help requires a PC with a lot of horsepower. Unless you have a machine that is up to the challenge, think twice before leaving the Dynamic Help tab displayed. In fact, even on a machine with a great deal of horsepower, Dynamic Help consumes a lot of memory. Consider not using it all, and for maximum performance, use the MSDN documentation externally. To see Dynamic Help in action, select the Class View tab contained in the docked tabbed group located on the right side of the IDE. As you do this, the Dynamic Help window displays links to information on how to use Class View as you saw in Figure 1.14. Code Comment ReportsAs developers, you are busy writing code and making sure that your program works the way it's supposed to in all environments that it supports. When you're done with a project, it's time to start looking at and adding new features so that your application evolves over time. With all that programming, there's no time to document your modules or custom APIs. However that is not the mindset that you should take. Reading another developer's code can sometimes be difficult, to say the least. What is needed is a way to automatically generate documentation. Automatically generated documentation has generally been provided by third-party vendors, but using and learning the process to hook up these tools can sometimes be complicated. Visual Studio .NET contains a built-in documentation generator that can parse your source code and create documentation in HTML format. You can further enhance this document by using XML style tags within your source code. For instance, to create a description for a function, you can use a <summary> tag immediately before the function name, as shown in the following snippet: // <summary> Method for performing a task on a Test Form. </summary> public void TestForm.PerformTask() { // do something } To generate a code comment report, click Tools, Build Comment Web Pages from the main menu. In the dialog that is shown, you can choose to build documentation for the entire solution or for individual projects within the solution. The page shown in Figure 1.15 was generated for the function in the code snippet you just saw. Figure 1.15. With code comment reports, there's really no excuse not to create documentation for your code now. IntellisenseVisual C++ developers really got excited about Intellisense. There was no more endless pouring through documentation looking for the correct parameters for a function call. You no longer had to tirelessly examine header files for functions contained within code that wasn't documented. Intellisense, by parsing all the source code you work with, creates a database that it uses to resolve references to a variety of coding constructs, such as functions, classes, structs, defined macros, and even interface methods and properties. Whenever you use one of these constructs, Intellisense kicks in as you're editing your source code and displays a small ToolTip containing the correct information for the context you are working in. For example, when you type in a left parenthesis signifying the beginning of a function parameter list, Intellisense displays the function declaration, as shown in Figure 1.16. Figure 1.16. Intellisense can display function parameter lists, class methods, and variables while you're editing your source code so that you don't have to constantly refer to documentation. ToolTips for parameter lists aren't the only thing Intellisense can do, however. Typing in a variable that is a class causes the IDE to drop down a combo box listing all the member variables and functions contained within that class. When you type in the name of a class's member variable, you can place and hold your mouse cursor over that variable and a ToolTip describing the data type of that variable will be displayed after a short period. Editing HTMLOne thing you'll realize, especially when working with the projects in the Internet Programming section, is that the Visual Studio .NET IDE contains an extremely well-done HTML editor. This is no doubt due to the apparent push to web-enable projects of all types. As a Visual C# .NET developer, you will use the HTML editor for a variety of projects, some of which include web services and ASP.NET projects. Before Visual Studio .NET, you had to rely on an external editor to create HTML files. You could open an HTML file within the Visual Studio IDE, but you had to resort to plain text editing with no supporting toolset to help you get the job done. That was fine for developers who claim that Notepad is the best HTML editor. But for people like me, Visual Studio .NET provides tools that enable me to easily work with HTML files. To get a quick feel for HTML editing within the IDE, click File, New, File from the main menu. When the New File dialog is displayed, click on the General category and then select HTML Page from the list of file types contained in the right-side list box. Web Page Design Using the Design ViewThere are two ways to work with an HTML page. You can switch between these two views by clicking the Design and HTML buttons on the bottom right of the HTML view window, as shown in Figure 1.17. Design view enables you to visually construct your HTML page using the web controls found within the toolbox tool window. To create a new control, click the control you want to add from the toolbox and then drag and drop that control onto the HTML page. When the control appears, you can change its properties by using the Properties tool window, which by default is located at the bottom right of the IDE. You can easily select the current HTML page's controls by clicking them with your mouse or by using the Document Outline tool window, as shown in Figure 1.18. If the Document Outline tool window is not visible, click View, Other Windows, Document Outline from the main menu. Figure 1.17. Visual Studio .NET's HTML editor contains many features, such as auto-completion, validation, and event handler script generation for objects.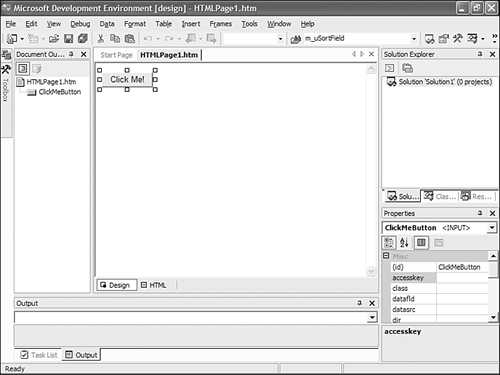 Figure 1.18. The Document Outline tool window enables you to look at your HTML page in a hierarchical fashion. It also supports adding event handlers to the HTML page's controls quickly.
HTML ViewAfter you have finished designing the layout of your HTML page, you can switch to HTML view to work with the HTML text of your web page by clicking the HTML button located at the bottom left of the HTML view window. If the Document Outline tool window is still open, its contents will change from listing only the HTML controls to listing a full tree view of all the document's tags in a hierarchical fashion. Furthermore, the Script Outline button will be enabled. It is located at the top of the Document Outline tool window, as shown in Figure 1.18. The Script Outline view of the Document Outline tool window enables you to easily add event handlers to your document for any of the objects the page refers to. Ensuring HTML CorrectnessThe HTML editor contains several features that assist you in editing the HTML source directly. Whenever you type in the left bracket that signifies the beginning of an HTML tag, a drop-down list displays a listing all the tags that are valid within the context you are working in. Selecting one of these tags will then create the beginning and ending tags and your text cursor will be inserted in between the two. Furthermore, a drop-down list is displayed whenever you start adding attributes to a tag. This list also is context aware and will display a list of valid attributes for only the tag currently being edited. As you're working with the HTML code, the HTML editor is constantly checking your document for correctness. Whenever the editor notices that the document is incorrect, it places a red squiggly line underneath the offending portion of code, as shown in Figure 1.19. When you hover your mouse cursor over that piece of code, a ToolTip displays an error message to explain the error. Figure 1.19. The HTML editor helps you easily spot errors in HTML code by marking the offending code with a red squiggly line and displaying a ToolTip containing an error message when the mouse cursor hovers over it. Editing XMLA few years ago, Extensible Markup Language (XML) was virtually unheard of to the average developer. However, in recent years, it has become one of the most-adopted technologies to date. When working with the various .NET technologies, you will run into many places where XML plays a pivotal role. Everything from data sources and web services to configuration files contains XML as the underlying data mechanism. Just as the HTML editor supported a Design view and an HTML view, the XML editor for Visual Studio .NET contains a Design view and an XML view. When a new XML file is created, however, you will be presented with only the XML view because the editor doesn't know how to visually display the XML data without some extra help. This extra help comes in the form of an XML schema. Visual Studio .NET also contains a schema editor that enables you to both visually create the schema as well as hand-code the schema, if you so desire. In fact, when visually creating the schema, the Toolbox tool window contains all the valid schema design elements that you would need. Adding the schema design elements to your file is a simple matter of dragging and dropping them. Editing Binary FilesIf you've ever had to create your own file format, you no doubt used a binary editor, sometimes known as a hex editor, to view a sample file your application produced. Or if you've ever worked with pointers, especially in the area of string parsing, you stepped through code to see what effect certain lines would have on the contents of your Memory debug window. When viewing binary data, you had to use an external third-party tool to view the data in hexadecimal format. Visual Studio .NET now contains a binary editor that enables you to view any type of binary file and even makes it possible for you to change the values within that file. |
|