Window Management and Customization
|
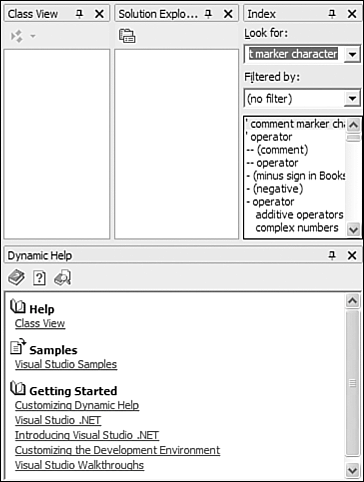
| Before Visual Studio .NET, Visual Basic developers had a drastically different editing environment than Visual C++ developers. Add to that the different environments included within Visual InterDev, and you can see that combining all of these languages into a single IDE would be difficult. This is a primary reason why Visual Studio .NET employs developer profiles. Customized Interfaces with Visual Studio .NET's "Developer Profiles"Immediately afterinstalling Visual Studio .NET, you are presented with the developer profile page within the embedded browser of the IDE, as shown in Figure 1.1. The profile page enables you to choose from a list of preset window layouts based on the type of developer you are. Figure 1.1. You can choose the developer profile you are most comfortable with by changing settings on the Profile page.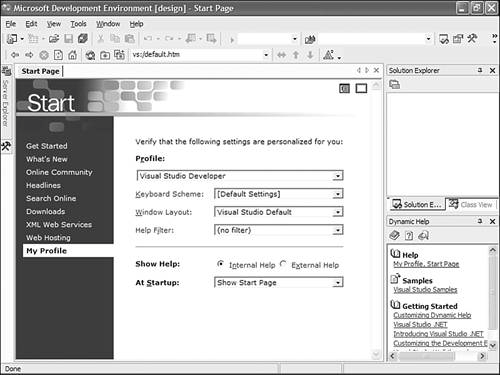 By choosing the Visual C# Developer profile, the window layout will be organized in a way that is most common for C# developers, as shown in Figure 1.2. I, however, will be using the default Visual Studio Developer profile throughout this book. You are free to change what you use; just keep in mind that what you see in the book and what you see within your IDE will be different, although the terminology will be the same. Figure 1.2. If you prefer the same window layout as Visual C#, you can easily customize Visual Studio .NET to suit your needs.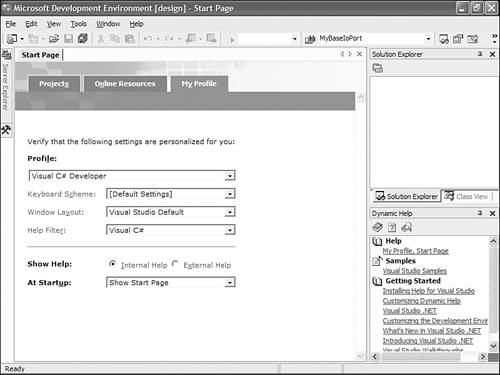 Configuring Keyboard ShortcutsWhen many developers first install Visual Studio .NET, the first thing they want to do is make sure that the keyboard shortcuts and menus work in a way they're familiar with. One thing some Visual C++ 6.0 developers may notice is that the F7 key doesn't build the project. If you really can't get used to the new keyboard layout, but still want to retain the default window layout, you can change the keyboard scheme by selecting Visual C++ 6 (or the language you are comfortable with) from the Keyboard Scheme drop-down list. Likewise, if you prefer the default keyboard scheme but would like to revert back to the window layout from your previous language's IDE, you can choose the window layout you prefer from the corresponding drop-down list. Filtering the MSDN HelpMSDN documentation is a vast library of knowledge, samples, articles, and reference materials. Sifting through this huge collection of information can sometimes be a daunting task. Documentation is extremely helpful, but too much can make searching extremely difficult and unproductive. Help filters can remove documentation from your view so that you minimize and false positive search results. You can specify the Help filter that you might need, but my advice is to not use any filters, at least not yet. You can think of the MSDN documentation as a miniWorld Wide Web on your computer. It comprises hundreds of hyperlinked documents, forming a relationally and hierarchically organized collection of knowledge. What happens when you sit down to look something up on the Internet? You open your browser and immediately a hyperlink to an unrelated story catches your interest. You follow and after skimming it over quickly, another link catches your eye. By the time you know it, you're reading stories about Brazilian cockroaches when all you really wanted to know was the current prices of stocks in your portfolio. Although you won't read about Brazilian cockroaches in MSDN, you will occasionally skim a document that you weren't intending to look for. In doing so, you will learn about some unrelated technology you weren't familiar with before. TIP You can choose to leave the MSDN help filter enabled so that only the exact type of information you are looking for will appear in your results. However, leaving the filter off might prove more useful than you think. While you are looking for a reference to a particular keyword, you might find some information that you will find useful in the future. If you have the spare time to do it, randomly sifting through the MSDN documentation can be enlightening. Maximizing Your Viewable AreaMany developers prefer to have the resolution of their monitor set very high. They do this for one real reason: screen real estate. If you're like many other programmers, you typically have many programs running at one time and continually switch back and forth between them. With a high monitor resolution, you can arrange many windows in a way that enables you to easily view each one; but at lower resolutions, you are usually limited to working with one program at a time. Visual Studio .NET contains many useful features that enable you to effectively organize the child windows of the IDE in such a way that it is possible for you to work efficiently and still have convenient access to the necessary development tools contained within those windows. The source code window is the most important window within the IDE and as such should not be obscured by any supporting tools. If you've ever programmed with Visual C++ 6.0 and entered a debugging session that required the use of many debugging windows, you would almost lose all sight of your source windowespecially on monitors with low resolutions. To solve this problem, Visual Studio .NET employs the use of docking and auto-hiding windows. Using Visual Studio .NET 2003's Dockable WindowsThere are two types of windows within the Visual Studio .NET IDE. The first type is a document window and is considered the centerpiece of your current project. This includes such things as your source code or the current resource that you are editing. The other type of window is used for support and is known as a tool window. It is this type of window that allows docking to the IDE. A window is docked when it fits within a certain area of the IDE like a puzzle piece and does not obscure your current document window. A tool window can be docked on any side of the document window. Open Visual Studio .NET and locate the Solution Explorer window that is currently docked to the right side of the IDE (if your developer profile is currently set to Visual Studio Developer). Right-click on the Solution Explorer window and select the Floating item from the contextual menu, as shown in Figure 1.3. By doing this, you have disabled the docking feature for that window and can now move the window to any location. Note, however, that a floating window can obscure any windows underneath itsuch as your current document window. Figure 1.3. You can change the behavior of windows by right-clicking on the tool window's title bar.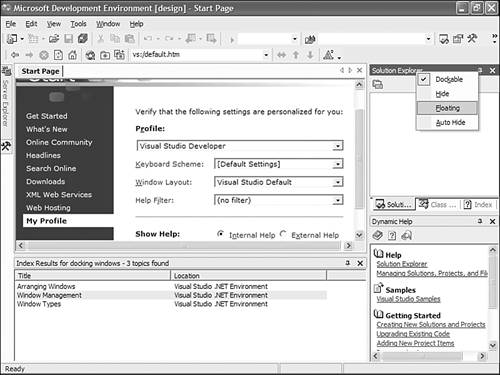 Right-click on the Solution Explorer tool window's title bar again, but this time select the Dockable menu item. You'll notice that even though you changed that window to dockable, it still floats above the other windows. A tool window can be dockable, but that doesn't necessarily mean that it has to be docked to a certain location on the IDE. To dock a tool window, you must drag that window to the location that you want to dock it to. Click on the title bar of the Solution Explorer window and drag it to the right side of the screen again. When you do this, you can see various gray frames that signify where the window will be docked after you've released the mouse button. There are different places within the IDE that a window can be docked. You can dock a tool window to another tool window as shown in Figure 1.4. In that figure, you can see three tool windows docked side by side. You might notice that some tool windows enter into a tabbed layout when they are docked, which is the default docking layout for the Solution Explorer and Class View windows. To add another tool window to a group of tabbed tool windows, drag the title bar of the tool window you want to dock onto the tabs of the group; you will see a new tab created as you do this. You can then drag that tab to specify which location you want the tabbed tool window to occupy when the mouse button is released. Figure 1.4. Visual Studio .NET enables you to dock tool windows in a variety of ways to suit your style.
Auto-Hiding WindowsThe ability to dock windows is a great feature and will help in maximizing your view of the current document window. However, you can achieve more screen real estate by auto-hiding the docked tool windows within the IDE. Auto-hiding works by minimizing a tool window to the edge of the screen when you are not using it. After the tool window has been minimized, it is replaced by a tab with the name of the window and the document window is subsequently expanded to take advantage of the extra space that is available. By default, Visual Studio .NET contains two tool windows that are auto-hidden. If you look at the left side of the IDE, you can see two tabs labeled Server Explorer and Toolbox, as shown in Figure 1.5. If you move your mouse cursor over one of the tabs, the corresponding tool window will be maximized and the document window will adjust accordingly. Figure 1.5. Auto-hidden tool windows increase screen real estate by hiding the window until you need to use it.
To auto-hide a tool window, click the push pin located in the upper-right corner of the tool window. Locate the Server Explorer tool window and if it is not docked to the edge of the IDE, dock it now. When you click on the push pin in the right corner of that window, a couple of things will happen with the window layout. First, the Solution Explorer window is enlarged and fills the entire height of the IDE. Because the window is auto-hidden, it can use that space when it is maximized because that space will normally be used for something else when the tool window is minimized. So, not only do you maximize the document window when a tool window is auto-hidden, you also maximize the space that the tool window occupies when it is active and viewable. TIP You can auto-hide all the current tool windows with just a few clicks. Select Window, Auto Hide All to make all the current tool windows auto-hidden. Take note, however, that there is no corresponding Unhide All feature; you will have to manually unhide each of the tool windows separately. Another action that occurs when you auto-hide a tool window happens if the tool window was part of a tabbed group of docked windows. After you've turned on the auto-hide feature of a tool window within a tabbed group of docked tool windows, the entire group becomes auto-hidden, as shown in Figure 1.6. This might not be what you expected, but you can customize this behavior. Figure 1.6. Auto-hiding a single tool window contained within a group of tabbed docked tool windows auto-hides the entire group.
To change the behavior of auto-hiding a group of tabbed and docked tool windows so that only a single window is auto-hidden, select Tools, Options from the main menu. In the General settings item, which should be selected by default, check the check box labeled Auto Hide Button Affects Active Tab Only, as shown in Figure 1.7. By changing this setting, only the currently active tab will be auto-hidden, rather than the entire group. Figure 1.7. You can change the behavior of auto-hidden windows contained within tabbed groups by changing IDE settings.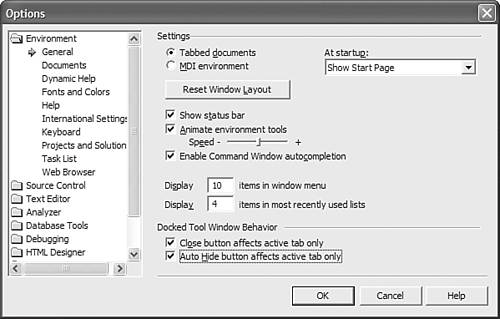 |

|