Publishing ClickOnce Applications
| Writing complex code and dealing with enormous configuration files are not the hardest parts of using ClickOnce deployment. One of the most difficult tasks is in making the decisions that affect how your application is deployed and updated. This section takes you through the process of deciding how you want to publish your application including walking you through publishing a ClickOnce application. You can publish your ClickOnce application in several ways. Each of these options is controlled through various options in the Publish Wizard that is used when you publish your application. Deployment over the Web or Network ShareWhen you know that your customers will have network access to a single deployment location and the logistics burden of distributing a CD is too costly, deploying your application on the web or a network share is an excellent solution. Using this method, the user will navigate to a URL or to a network share and either click a link pointing to a deployment manifest (an XML file containing deployment data related to ClickOnce) or will double-click the deployment manifest file on the share. If the application requires additional security permissions, the user will be prompted to grant those permissions. A huge benefit to this model is that only the required permissions will be granted, unlike Windows Installer, which installs everything with full trust. After the application has been downloaded to the local user's ClickOnce cache, a shortcut to that application will be created on the user's Start menu and will appear in the Add/Remove Programs dialog in the Control Panel. To enable web- or share-based deployment, simply type in a web URL or a file-share path when prompted for the publication location by the Publish Wizard. Deployment on CDIf you need to get your application to users who cannot establish a network connection to the central deployment location or have low-bandwidth connections, you may decide to distribute the application on a CD. At other times you might want to distribute the application on a CD, such as when you don't want the application's original installation source to be available on the Internet. Using the Publish Wizard, you can deploy the application to a CD or to a location that can then be used as an image with which to burn CDs. The end user then installs the application from the CD just like any other Windows application. A shortcut will be added to the user's Start menu and an entry will appear in the Add/Remove Programs dialog in the Control Panel. To use the CD/DVD deployment model within the Publish Wizard, you simply select a location on a disk that will be used for CD imaging when prompted for the publication location by the Publish Wizard. Application Launched Directly from Web or ShareThis model is what many people refer to as the "zero footprint" deployment model. When a user clicks the application link on the web or a network share, the application is installed into the user's ClickOnce cache just like the first (web) deployment model. However, when the application is done running, the application will be removed from the ClickOnce cache. This deployment model does not add an entry to the Add/Remove Programs dialog in the Control Panel, nor does it create a shortcut on the user's Start menu. To use this deployment model, select the "No, this application is only available online" option from the Publish Wizard. This deployment model is ideal for applications that are run from the web but are run infrequently, such as tax software that might only be run once per year. Applications with frequent updates that are activated more often by the user should use the web deployment model instead of the "zero footprint" web launch model. Deploying a ClickOnce ApplicationNow that you have seen the various options available to you for deployment methods using ClickOnce, you can walk through the process of deploying your own ClickOnce application. The first thing you need before you can deploy your application is, of course, an application. This sample uses an application called ClickOnce1. To add to the realism, a Windows Forms Control Library called FormLibrary was created and an AboutBox form was added to that library. Then a reference from ClickOnce1 to FormLibrary was added. Add a menu strip to the main form in the ClickOnce1 application and make one of the menu options launch the About box as follows: FormLibrary.AboutBox1 aBox = new FormLibrary.AboutBox1(); aBox.ShowDialog(); This is to illustrate how dependencies work within a ClickOnce application and to prove that referenced assemblies will indeed be downloaded during the installation process. Make sure that both of your assemblies (ClickOnce1 and FormLibrary) have the same version number, 1.0.0.0. Also make sure that you supply some additional information in the AssemblyInfo.cs file like the publisher name, assembly title, and so on. Because you will eventually want to test how the update feature works, add a few random controls to the main form so that you will have a visual comparison between future versions. Before publication, this application looked like the one in Figure 39.1. Figure 39.1. A sample ClickOnce application. Now you're ready to publish the application. There are a couple of entry points that will launch the Publish Wizard, but this author recommends going into the Publish tab of the Project Properties editor. This gives you a quick overview of publication settings defaults before launching the wizard. Before launching the wizard, click the Options button to see the various publication options that are available to you. Make sure you set the publisher name and the application name and the optional support URL. Also note the handy option, "For CD Installations, Automatically Start Setup When CD Is Inserted." When you're done with the Options dialog, click the Prerequisites button. This dialog allows you to specify all of the prerequisites your application needs to run. The .NET Framework 2.0 Runtime is already selected. One very useful feature is that you can select "SQL Server 2005 Express Edition" and your application will never deploy without first installing SQL Express on the end user's machine. This is unbelievably useful for data-driven ClickOnce applications. One last thing you should do before you publish your application is to decide whether you want to sign the ClickOnce manifests. By using Authenticode technology to digitally sign these XML files, you can attach verifiable proof of the authenticity of the publisher. For testing purposes you can leave this step off. However, in a commercial publication you will want to sign the application manifests as well as the application itself using strong naming. For this sample, the author clicked the Create Test Certificate button just to have a verifiable source with which to test. Note To use manifest signing, Visual Studio 2005 will be invoking the command-line utility SignTool.exe. This tool requires that CAPICOM 2.0 or higher be installed on your machine. To obtain this tool, go to http://www.microsoft.com/downloads/details.aspx?displaylang=en&FamilyID=860EE43A-A843-462F-ABB5-FF88EA5896F6. When you have the tool, you can place it in your system32 directory and register it using the regsvr32.exe command-line utility. Caution Strong naming was used in previous versions of the .NET Framework to verify the authenticity of assemblies downloaded from the Internet or installed from CD. With the built-in ability to automatically update them, you are opening your application to a huge liability if you do not sign both your application assemblies and your ClickOnce manifests. Without this, hackers could obtain access to the distribution location and replace distribution contents with their own malicious files. Your application, not able to verify the source of the updates, would happily download the malicious code. The use of automated updates would allow this malicious code to rapidly travel to your entire installed client base before anyone knew what was happening. Click the Publish Wizard button to launch the ClickOnce Publish Wizard. If you're satisfied with all of the options you have specified, you can simply click the Publish Now button to deploy immediately. The wizard will prompt you for the location (URL/file path) of the publication and the installation footprint options (online only or both online and offline). Assuming everything worked well and the publishing was a success, you should be presented with a web page that looks like the one shown in Figure 39.2. Figure 39.2. Application deployment page created by ClickOnce publication.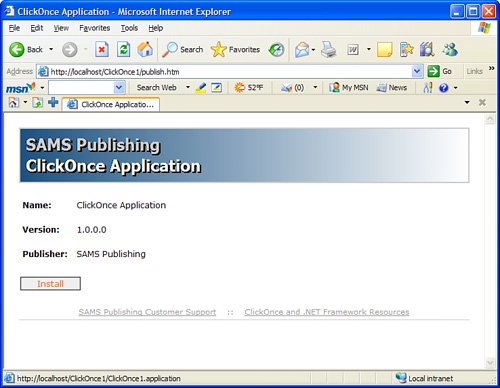 If you hold the mouse pointer over the Install button, you'll see that the link to the installation is actually a link to the application manifest file, ClickOnce1.application. The web deployment location looks like the one shown in Figure 39.3. As you can see, there is a central application manifest file that provides information about the application (as well as an Authenticode signature if the manifest was signed) and an application manifest for each individual version of the application. Figure 39.3. Initial publication of a ClickOnce application to the web.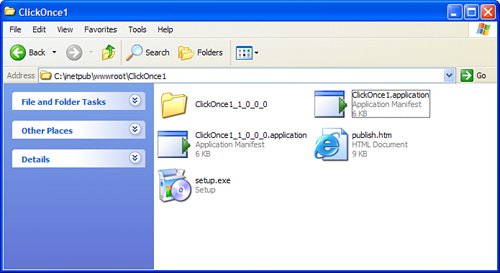 To finish out the deployment of this application, click the Install button. You will see a progress dialog indicating that the application requirements are being validated. Then, if you used a test certificate or no certificate at all, you will see a warning indicating that the publisher cannot be verified. This is just a test, so click Install because you are the publisher. The installation process should be very quick for this application. When it's done, the application runs and you'll see the main form with all of the controls that you added to it. If your sample has the same data as the one this sample has been developing, you will see that the Start menu now has a "SAMS Publishing" group that contains the following two shortcuts: "ClickOnce Application" and "ClickOnce Application Online Support." Note that the icon for the application in the Start menu is the same as the icon you defined in the application settings editor. The online support shortcut appears if you specify a Support URL in the Publish settings tab. The last thing to do before moving on to the section on updating a ClickOnce application is to verify that the application shows up in the Add or Remove Programs dialog in the Control Panel. When you launch the application a second time from the Start menu, the application requirements validation dialog will appear as the application checks the publication location for updates. As you'll see later in the chapter, you can programmatically override this behavior for a smoother and richer experience during this stage. To satisfy your curiosity, shut down the IIS website that hosts the publication location and run the application again. The application will run just fine even though the deployment location is offline. If the deployment location is offline, the application behaves as though there are no new updates. |
EAN: 2147483647
Pages: 298
- Using SQL Data Definition Language (DDL) to Create Data Tables and Other Database Objects
- Working with Queries, Expressions, and Aggregate Functions
- Understanding SQL Transactions and Transaction Logs
- Working with Ms-sql Server Information Schema View
- Repairing and Maintaining MS-SQL Server Database Files