| Overexposed background images and underexposed foreground subjects are a common problem for most amateur photographers. Photoshop Elements provides an elegant tool to help salvage your otherwise perfect compositions. Much like the Levels command, it operates on pixels in specific tonal ranges (either highlights or shadows) while leaving the other tonal ranges alone. A Lighten Shadows slider helps to add detail to areas in shadow, whereas a Darken Highlights slider can add detail to washed-out areas in the background. To improve foreground detail 1. | From the Enhance menu, choose Adjust Lighting > Shadows/Highlights.
The Shadows/Highlights dialog box appears (Figure 3.29).
Figure 3.29. The Shadows/Highlights dialog box. 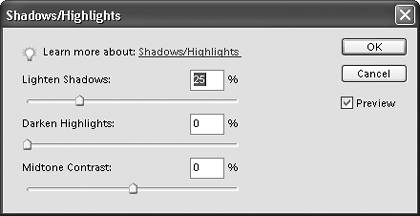
| 2. | In the Shadows/Highlights dialog box, do one or all of the following:
- Drag the Lighten Shadows slider to the right to lessen the effect of the shadows, or to the left to introduce shadow back into the image.
- Drag the Darken Highlights slider to the right until you're satisfied with the detail in the foreground or other brightly lit areas.
- Drag the Midtone Contrast slider to the right to increase the contrast, or to the left to decrease the contrast.
| 3. | Click OK to close the Shadows/Highlights dialog box and apply the changes (Figure 3.30).
Figure 3.30. The top photo is very under exposed in the foreground, so detail in the woman's face is hidden in shadow. In the bottom photo, making adjustments with the Lighten Shadows and the Midtone Contrast sliders selectively brightens and enhances detail in both her face and shirt. 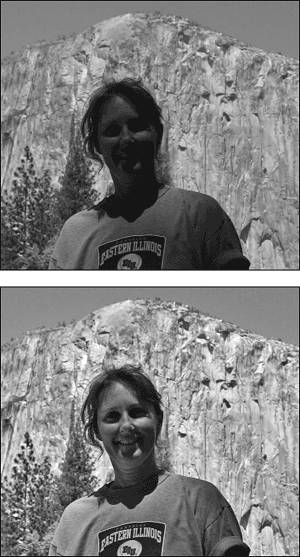
|
 Tips Tips
I've found that in many (if not most) images imported from a digital camera, the Shadows/Highlights dialog box defaults work surprisingly well on their own, requiring just minor slider adjustments. In any case, use the Midtone Contrast slider sparingly. A little goes a long way, and adjustments of more than plus or minus 10% can quickly wash out or flatten an image's details.
To improve background detail 1. | From the Enhance menu, choose Adjust Lighting > Shadows/Highlights.
| 2. | In the Shadows/Highlights dialog box, drag the sliders as described in the preceding procedure until you're satisfied with the contrast and detail in the background or in other brightly lit areas.
| 3. | Click OK to apply the change (Figure 3.31).
Figure 3.31. The top photo suffers from underexposure problems throughout both the foreground and the background. In the bottom photo, making adjustments with all three Shadows/Highlights sliders restores the lost detail in the women's faces and in the background storefronts. 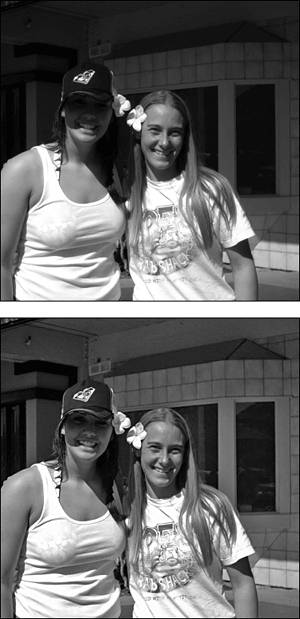
|
Tip Because in the majority of circumstances the Lighten Shadows slider most improves foreground images, whereas the Darken Highlights slider most improves backgrounds, I chose to break the Shadows/Highlights dialog box into two discrete topics. By no means do I want to imply that one setting or the other should be restricted to improving either only the foreground or only the background. Both the Lighten Shadows and Darken Highlights sliders can be used effectively across an entire image.
Image Correction One-Stop Shopping Adobe's Quick Fix window groups a cross-section of some of the more commonly used commands and functions into one convenient, interactive workspace (Figure 3.32). You open the Quick Fix window by clicking the Quick Fix button in the shortcuts bar. You'll see that the Quick Fix window is really its own, self-contained editing environment, with a main image window, a palette well, photo bin, and a small toolset for cropping, zooming, and red-eye correction. From the View drop-down menu, you can choose from a number of before and after image viewing options. From the palette well, you make image adjustments with a group of simple, specialized palettes. Palette sliders help you to correct common problems like lighting, color, and sharpness. In addition, the palettes feature Auto buttons that work just like the Auto commands in the Enhance menu. Each time you make an adjustment or correction, a button on each palette allows you to either accept or cancel the operation. And a handy Reset button above the After image allows you to cancel all the changes you've made, and start over from scratch. Figure 3.32. The Quick Fix dialog box offers a space to perform many common image correction functions. The Tip area in the center of the window provides helpful explanations of each adjustment you select and apply. 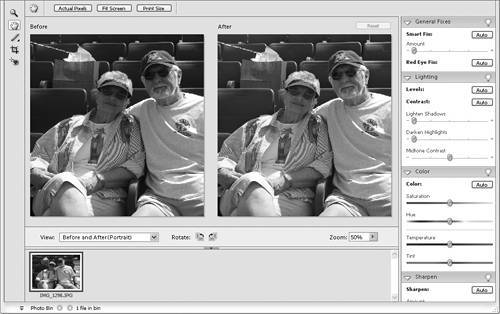
|
|