| Pixel dimensions, image dimensions, and resolution are all adjusted using the Image Size dialog box. You will often capture one image and then use it for different purposes, so it's important to understand how these adjustments affect your image file. For the Web and other onscreen viewing, it's common to adjust the pixel dimensions, or number of pixels, to control the resolution and/or file size of the image. This is known as resampling. The Resample Image check box is probably the most important feature to understand. When this box is checked, the pixel dimensions changethat is, the pixels will increase or decrease in number as the image is resampled (Figure 2.25). When the box is not checked, the pixel dimensions are locked in, and no resampling can occur. You can change the document size (the size the image will print), but the number of pixels in the image and the size that the image displays onscreen will stay the same. Figure 2.25. This image was duplicated (top) then reduced 70% (bottom). Notice in the zoom views that the reduced image isn't as detailed as the original. That's because, even though both have the same number of pixels per inch, the reduced image contains fewer pixels overall. 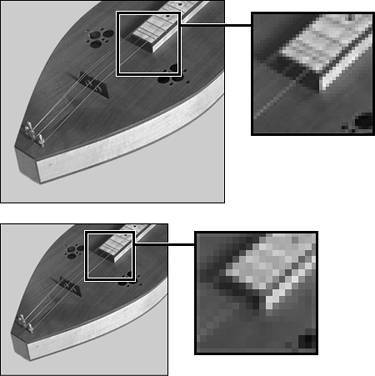
Recommended Resolutions There are no absolute rules for the best resolution to use when scanning your images for the Web or for printing. The best approach is to try a couple of settings, using the following guidelines, and see what works well for your specific situation. Here are some typical situations and recommended resolution ranges: For onscreen viewing of Web images, 72 ppi is a standard and safe resolution. For color images printed on color ink-jet printers, a range of up to 150 ppi is often ideal. The exact resolution will depend on your printer and the type of paper on which you are printing. For color or high-resolution black and white images printed on photo printers, you'll want a resolution between 150 and 300 ppi.
If you want to create higher-quality professional projects, such as magazine or print design work, be aware that Photoshop Elements is not capable of producing CMYK files (the color-separated files used for high-end printing). If you need an image-editing program that can handle these kinds of jobs, you should consider buying the full version of Adobe Photoshop. |
To resize an image for onscreen viewing 1. | From the Image menu, choose Resize > Image Size to open the Image Size dialog box.
| 2. | Make sure the Resample Image box is checked (Figure 2.26), and choose an option from the Resample Image drop-down menu.
Figure 2.26. The Resample Image drop-down menu includes three primary options for specifying how the resampling occurs. 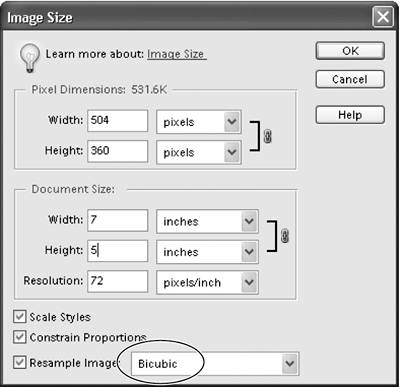
When you resample an image, its pixels are transformed using a process known as an interpolation. Interpolation is a computer calculation used to estimate unknown values based on existing known valuesin this case, pixel color values. So, when you resample an image in Photoshop Elements, its existing pixels are changed using one of three primary interpolation methods (Figure 2.27):
Figure 2.27. You can resample an image using one of three calculation methods: Bicubic (left), Bilinear (center), or Nearest Neighbor (right). Bicubic does the best job at retaining detail and anti-aliasing, whereas Nearest Neighbor creates images with a rougher quality. 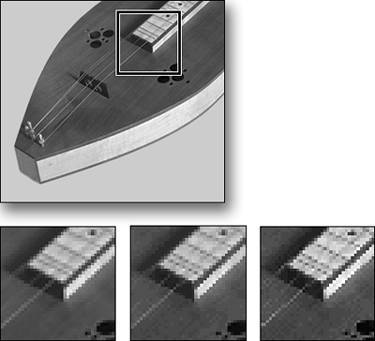
Bicubic is the default option and generally produces the best results and smoothest gradations.
Bilinear produces medium-quality results.
Nearest-Neighbor is the fastest method, but may produce jagged effects.
Two additional Bicubic options are also available: Bicubic Smoother and Bicubic Sharper. Bicubic Smoother can be used when you're increasing the size of an image, or upsampling. Typically, I strongly advise against using upsampling, because there is usually a noticeable loss of image quality and sharpness. But I've found that I can get acceptable results with the Bicubic Smoother interpolation, as long as I don't resize much above 120 percent. Bicubic Sharper can be used when you're reducing the size of an image, or downsampling. Its purpose is to help to retain sharpness and detail; although my success with this option has been mixed.
| 3. | To maintain the current width-to-height ratio, make sure Constrain Proportions is checked.
| 4. | Enter new values in the Pixel Dimensions fields. You can enter values in pixels or as a percentage (Figure 2.28).
Figure 2.28. Pixel dimensions can be entered as pixels or as a percentage. 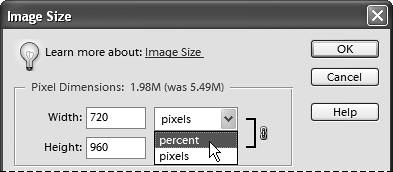
If you choose percent, you can enter a percentage amount in either the Height or Width box to automatically scale the image to that percentage. The new file size for the image is displayed at the top of the dialog box (along with the old file size in parentheses).
| 5. | Click OK to complete the change.
The image is resized larger or smaller, depending on the pixel dimensions or percentage you entered (Figure 2.29).
Figure 2.29. If you want to reduce an image's file size and display size, you can resize it by reducing its pixel dimensions, making it smaller for posting on the Web or emailing to friends. 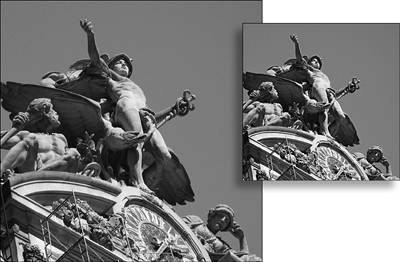
|
 Tip Tip
When you change an image's size by changing its pixel dimensions, you also change its print size (you'll see the change in the width and height dimensions in the Document Size fields of the Image Size dialog box). Although these images are acceptable for onscreen viewing or as quick test prints, you may be disappointed with their printed quality. That's because you discard image information by resampling, and so lose some sharpness and detail. If you're resizing an image mainly for print purposes, see the following topic, "."
Downsampling vs. Upsampling In Photoshop Elements, changing the resolution and/or size of an image by adjusting the number of its pixels is known as resampling. Downsampling, which is the term for decreasing resolution by removing pixels from your photo, is one of the easiest and most common ways to make your files smaller. If you take an 8 x 10 photograph of your grandmother and shrink it to a 4 x 5 image by reducing its pixel count, you've just downsampled it. Photoshop Elements "throws away" unneeded pixels intelligently, with little visible impact on the quality of your image. But upsampling, which is the term for increasing resolution by adding new pixels to your photo, should be avoided whenever possible. If you take a 4 x 5 photograph and try to enlarge it to 8 x 10, Photoshop Elements has to add pixels to your photograph. Since it has to manufacture those pixels out of thin air, they tend to add a ghosted, fuzzy appearance to any hard edgethe overall effect is that your image can look out of focus. Because downsampling rarely detracts from the quality of your images, you should capture all your original files at the highest resolution possible, whether you're scanning an image or snapping a digital photo. |
To resize an image for print 1. | From the Image menu, choose Resize > Image Size.
| 2. | To maintain the current width-to-height ratio, check that the Constrain Proportions option is selected.
| 3. | Uncheck the Resample Image box.
| 4. | Choose a unit of measure (or a percentage) and then enter new values for the width or height in the Document Size portion of the dialog box (Figure 2.30).
Figure 2.30. Enter new width and height values to change an image's print size. 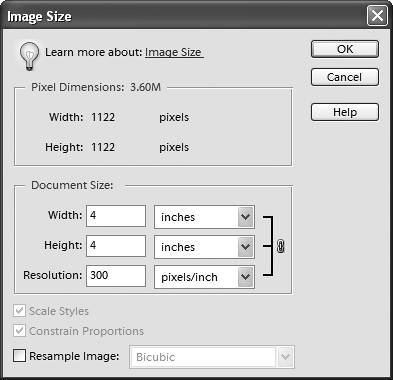
In the Document Size portion of the dialog box, the resolution value will change accordingly. For instance, if you enter width and height values of half the original image size, the resolution value will double, and the image will print clearer and sharper. That's because you're compressing the same number of pixels into a smaller space. So, when scaled at 50 percent, an image 4 inches wide with a resolution of 150 pixels per inch (ppi) will print at 2 inches wide and at a resolution of 300 ppi.
| 5. | Click OK to complete the change.
The image's print size will be changed, but since it still contains the same number of pixels, it will appear to be unchanged on your screen. You can, however, view a preview of the final print size onscreen.
| 6. | From the View menu, choose Print Size.
The image will be resized on your screen to approximate its final, printed size (Figure 2.31).
Figure 2.31. An image can be viewed at an approximation of its final print size, even when its resolution differs from the computer's display. 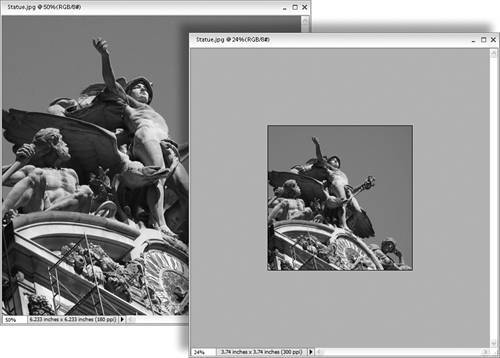
| 7. | From the View menu, choose Actual Pixels, or press Alt+Ctrl+0 to return the display size on your screen to 100 percent.
|
Tip
|