| In Chapter 10, "Preparing Images for the Web," we discussed GIF files, but I decided to wait until this chapter of special techniques to delve into one of the more interesting uses of GIFsanimation. GIF animations are widely used on Web pages as a device to help draw special attention to particular icons, graphics, or logos. But they can also be used as a way to deliver compact little "movies" from a limited number of video images, or from a single still photo. In addition to posting animated GIFs to the Web, you can share them with friends by including them as email attachments. To view your animation, all your recipients need to do is open the GIF file from within their Web browser. Animated GIFs contain a sequence of images that are displayed sequentially, like a flipbook, creating the illusion of motion (Figure 12.57). Like all GIF files, they can be displayed in most Web browsers and have a relatively small file size because of their compression and limited color palette. Figure 12.57. Animated GIFs create the illusion of motion by sequentially displaying a series of frames. 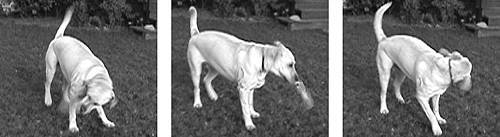
Photoshop Elements creates the individual frames of an animated GIF file from the individual layers in an image file, so you'll need to create your animation in a file with multiple layers. The bottom layer on the Layers palette is always the first frame of the animation, so you'll build your animated GIF file from the bottom up (Figure 12.58). (See the color plate section of this book for full-color images from this animated GIF tutorial.) Figure 12.58. The bottom layer of the Photoshop Elements Layers palette becomes the first frame of an animated GIF file. 
To prepare a layered file for animation 1. | Open all of the images you want to use as frames for your animated GIF file.
| 2. | Select the image that you want to use as the first frame of the animated GIF file (Figure 12.59).
Figure 12.59. Collect all of the files you want to use to build your animation; then choose the image file that you want to use as the first frame. 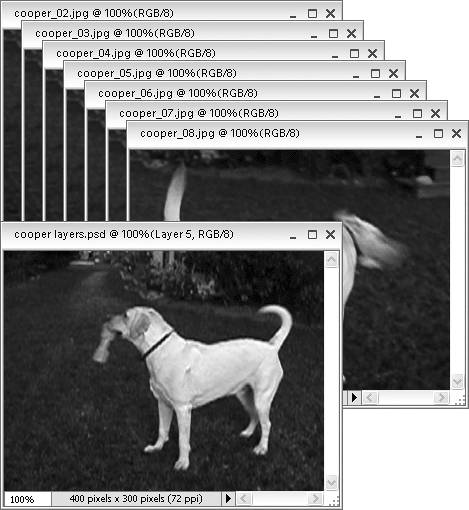
| 3. | Choose File > Save As and save the image as a Photoshop Elements file with a new name.
This will be the layered "source" file for creating your animated GIF.
| 4. | Click to select the image window of the image that you want to use as the next frame in your animation; then, from the Select menu, choose All, or press Ctrl+A.
| 5. | From the Edit menu, choose Copy, or press Ctrl+C.
| 6. | Select the image with the first frame; then, from the Edit menu, choose Paste, or press Ctrl+V.
The second image is pasted on top of the first image and is represented by a new layer on the Layers palette (Figure 12.60).
Figure 12.60. When you paste a selection into an image, it creates a new layer on the Layers palette. 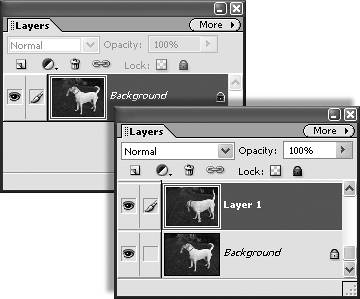
| 7. | Repeat steps 4 through 6 for each additional frame, continuing to add layers to the first image.
| 8. | Save your image.
|
 Tip Tip
To create an animated GIF 1. | Open the layered file you've built as the source for your animation.
(If you don't have a layered file ready, see the preceding task, "To prepare a layered file for animation.")
| 2. | From the File menu, choose Save for Web, or press Alt+Shift+Ctrl+S to open the Save for Web dialog box (Figure 12.61).
Figure 12.61. Open the Save for Web dialog box to make additional changes to your animated GIF file. 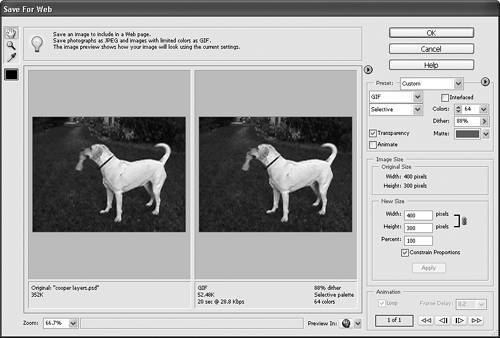
| 3. | Choose GIF in the Preset area of the dialog box; then select the Animate check box (Figure 12.62).
Figure 12.62. Select a GIF setting; then click the Animate check box. 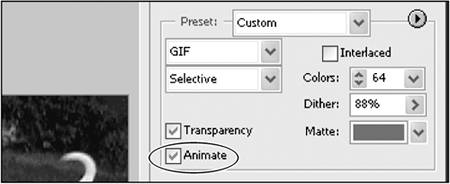
| 4. | Click the Play button to move the animation one frame forward (Figure 12.63).
Figure 12.63. Click the Play button to step through the frames of your animation, one frame at a time. 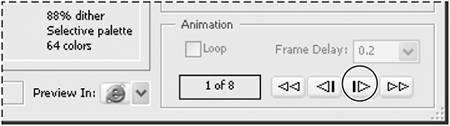
You can use the Play button and the other control buttons to step through the animation, but the animation will not show in real time.
| 5. | In the Animation section of the dialog box, set the options for frame delay and looping (Figure 12.64).
Figure 12.64. You can choose to have your animation loop, so that it will play continuously, over and over again. 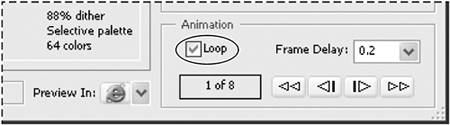
Frame delay sets the amount of time that each frame is displayed before the next frame appears. You can set the frame delay for as short as one-tenth of a second and as long as 10 seconds.
When the Loop check box is selected, your animation will play continuously. If Loop is not checked, your animation will play once through all of its frames and then stop.
| 6. | Click the Preview In button to view the animated GIF file in a Web browser (Figure 12.65).
Figure 12.65. When you click the Preview In button, a Web browser opens and plays the animated GIF file. 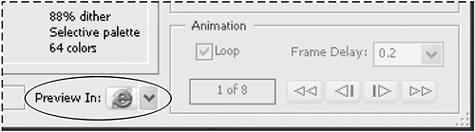
You may need to return to Photoshop Elements and adjust your settings and preview again. When you are satisfied, close the browser.
| 7. | Still in the Save For Web dialog box, click the OK button.
The Save Optimized As dialog box opens.
| 8. | In the Save Optimized As dialog box, type a new name for your animation and verify that GIF is selected for the optimization format.
| 9. | Choose a location for your file, then click Save.
The Save Optimized As and Save For Web dialog boxes automatically close, and your animated GIF is saved to the location you specified.
|
Animating GIF Images from Video Files One way to create frames for an animated GIF file is to use frames you've captured from a video file. You can use Photoshop Elements to capture individual frames from video, combine them in a single layered file, and then convert the layers to an animated GIF by following the steps in this section. (For detailed information on capturing frames from video footage, see "Importing Images from Cameras and Scanners" in Chapter 2, "Creating and Managing Images.") Many digital cameras also have the ability to capture short movies, so even if you don't have a video camera, you may still be able to gather digital video. Check the specifications and documentation that came with your camera. |
Creating motion from a still image Another method for creating the illusion of motion in Photoshop Elements is to start with a single still image, duplicate the image onto a series of separate layers, and then slightly shift each layer either horizontally or vertically. When saved as an animation, it will appear as if a camera is slowing panning through a scene. You've probably seen this technique used in documentaries, where for lack of film or video footage, the camera pans slowly over an archival photograph. In this example, we'll shift successive frames horizontally to create the illusion of panning past a ship at rest in a harbor. You can use this same technique with photos of large family groups or any other instance when you want to control exactly where your viewer's attention is drawn. This technique can be particularly effective when used along with the wide panoramic images you create using Photomerge Panorama. To mimic camera movement in an animated GIF file 1. | Open the image you want to use as the source file for your animation.
| 2. | Create a new file with either the width or height dimensions (or both) smaller than those of your source image.
Since we'll be panning from side to side across our image, we've made the width of our new file about half that of the source image (Figure 12.66).
Figure 12.66. Start with a source image that is larger than the final size of the animated GIF image. 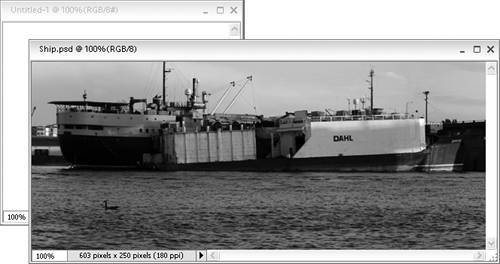
| 3. | Drag the large image into the file you just created (Figure 12.67).
Figure 12.67. Drag the larger source image into the final animated GIF project image window. 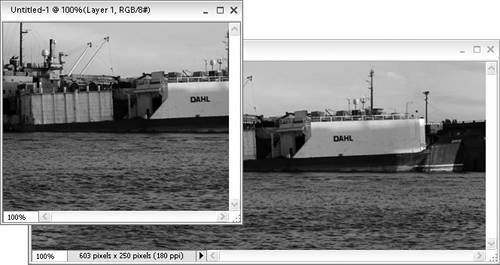
A new layer is created on the Layers palette.
| 4. | On the Layers palette, drag the background layer to the trash (Figure 12.68).
Figure 12.68. Delete the background layer by dragging it to the Delete Layer icon on the Layers palette. 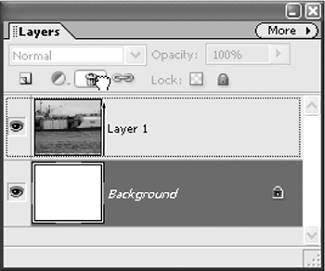
The new image layer becomes the only layer in the file.
Remember that the bottom layer always becomes the first frame of an animated GIF file. Since the first layer in any new file is empty, we've deleted it so as not to include a blank frame in our animation.
| 5. | Select the Move tool and drag the image to compose your first frame.
In this example, I dragged the image all the way to its left edge, since I want to create the illusion of panning from left to right (Figure 12.69).
Figure 12.69. Position the first (bottom) image layer for the first frame of your animation. 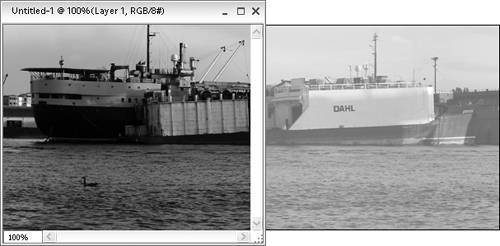
Notice that even though you can see only a portion of the original, source image, it's all still there, hidden outside the borders of the image window.
| 6. | On the Layers palette, drag the layer to the Create a New Layer icon.
A duplicate of the new, first layer is created (Figure 12.70).
Figure 12.70. Duplicate the bottom image layer to create an image for the second frame of your animation. 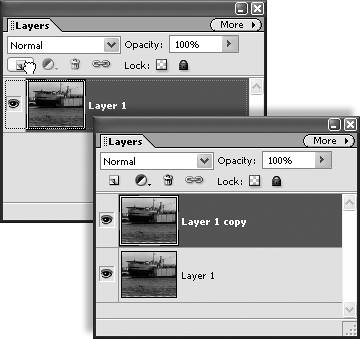
| 7. | With the Move tool still selected, move the new layer a little to the left in the image window.
A portion of the image that had been hidden beyond the right edge of the image window comes into view, and a portion originally visible disappears beyond the left edge (Figure 12.71).
Figure 12.71. Move the new layer in the image window. Since the layer is larger than the final image size, it still contains information beyond its frame. 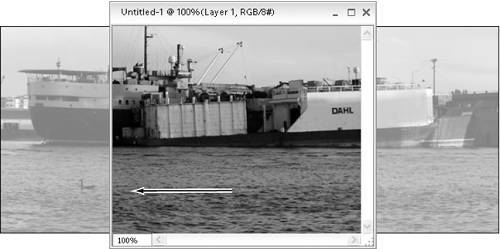
| 8. | On the Layers palette, drag the new top layer onto the Create a New Layer icon; then drag this new layer a little farther to the left in the image window.
Continue to repeat the process, creating successive layers and gradually moving the image through the image window (Figure 12.72).
Figure 12.72. Create as many layers as you need. Each layer will become a frame in the animated GIF file. 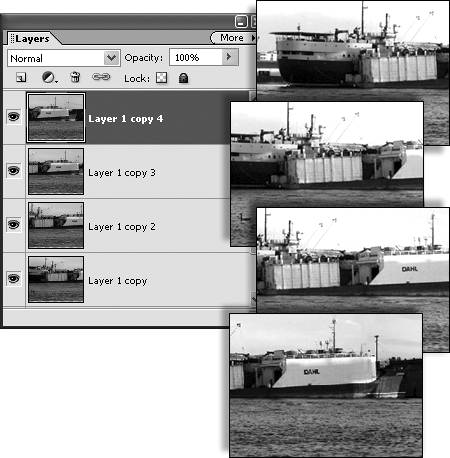
| 9. | Choose File > Save for Web and follow steps 3 through 9 from the "To create an animated GIF" task earlier in this chapter.
|
|