10.3. Blend Modes Blend modes, as the name implies, identify different ways that one movie clip blends into everything below it. Although not really a bitmap rendering effect, blend modes are typically discussed alongside the other topics in this chapter because they are deeply rooted in the bitmap-editing world. Flash blend modes are similar in most ways to the blending modes in Photoshop, for example. In reality, the main vector renderer handles Flash blend modes, so they don't require runtime bitmap caching. There are approximately a dozen blend modes in Flash, including the likely familiar Darken, Multiply, Lighten, Screen, Overlay, and Hard Light, among others. In this project, you'll focus on the Darken blend mode. 10.3.1. Using the Properties Panel Using the interface to enable a movie clip's blend mode couldn't be simpler. Just select a movie clip and then select a blend mode from the menu in the lower-right corner of the Properties panel, as seen in Figure 10-10. Figure 10-10. Detail of the Properties panel showing the Darken blend mode applied to a movie clip 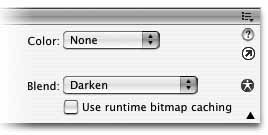
Here's an example: Create a new movie and save it as blend_modes.fla in the 10 folder of your working directory. Import city.jpg and position it at (0, 0) on the Stage. Import hero.jpg and position it at approximately (50, 20) on the Stage. Your file should now look like Figure 10-11. Select the hero bitmap and convert it to a movie clip. Blend modes cannot be used on bitmaps. With the movie clip still selected, go to the Properties panel and choose the Darken blend mode. Your hero should now look like he's leapt from the top of a skyscraper, as in Figure 10-12. That's it! Save your work.
Figure 10-11. The normal state of a JPEG when layered on top of another JPEG 
Figure 10-12. The same JPEG as seen in Figure 10-12, but inside a movie clip with the Darken blend mode applied 
| Loops | Loops are ActionScript structures that make it easy to do things more than once. For example, if you wanted to duplicate a movie clip 10 times, using a brief loop would prevent the need to repeat the necessary code 10 times in a script. There are a few kinds of looping structures available in Flash, but you will look at two here. The first is a specific part of ActionScript called the for loop. The for loop just says, "Repeat something a specific number of times." Think of a real-life example: how do you go about saying your name three times? Most people start by saying their names once. But how do you know you haven't said your name three times already? Obviously, your thinking process tells you that you haven't yet said your name, but cognitive reasoning is not part of computer programming. The computer can't make that kind of determination without information. So, thinking like a computer, how do you do you go about saying your name three times? To create the loop itself, you first need an initial value, stored in a variable of some kind. Remember, you have said your name zero times. Next, you need a test that will tell you, when it fails, that you can stop saying your name. You must say your name three times. Is zero less than three? Yes, then continue with the loop. Finally, you need to increment your initial value to count along with your progress. After you've said your name once, add one to the initial value. Therefore, you've said your name one time. Once you have the loop set up, the task you are repeating goes inside the loop structure. You'll see the syntax in a moment, but first, how do you get out of the loop? The looping process continues until you've said your name the third time, right? Not exactly. You actually need to attempt to say your name a fourth time before the aforementioned test will fail. You've said your name three times. Is three less than three? No. You're now finished with the loop, so stop saying your name. The ActionScript for this example looks like this (saying your name will be represented by the trace command): for (var i:Number = 0; i < 3; i++) {; trace("your name"); } //your name //your name //your name
In this syntax: for tells the ActionScript compiler which kind of loop to use. var i:Number = 0 starts your variable with an initial value of zero. The semicolons allow the execution of more than one instruction on a single line. i < 3 is the test that, if passed, allows the loop to continue. i++ is equivalent to i = i + 1, which just increments the counter variable until the loop fails. The content of the loop structure, the trace command, is executed with each successful iteration of the loop.
If you want to use static data typing (almost always a good idea), you can tell the ActionScript compiler that the i variable should hold a number. This way, if you choose to use i inside the loop, you can be sure your code will complain if you end up with a type mismatch error. For example: for (var i:Number = 0; i < 3; i++) {; trace(i * 3); } //0 //3 //6
Loops are very fast and very powerfulthey can even be too powerful. A loop is one of the most processor-intensive code structures in ActionScript. Make sure you have a quick way out of a loop, because an infinite loop (a loop with no method of exit) can crash your application. (Flash has a nice way of warning you about this possibility, asking you if you want to abort a troublemaking script. If you ever see this warning dialog, always heed its advice. Abort the script and look for your problem.) While a loop is executing, little can be going on at the same time. Therefore, sometimes you want the effect of a loop, without actually using an ActionScript structure to achieve your goal. Enter the second type of loop you'll look at in this text: the simple enterFrame loop. This is not a part of the ActionScript lexicon, but it is a nice alternative when you don't wish to use the other type of loop, the for loop. All you need to do is combine an enterFrame event handler with a conditional: var x:Number = 0; this.onEnterFrame = function():Void { if (x < 3) { trace("your name"); x++; } }; //your name //your name //your name
In this case, x starts at zero, and the timeline in which this code appears proceeds with a natural frame advance. The conditional checks if x is three yet; if not, Flash traces "your name", increments the value of x, and starts the process over again. When x becomes three, the conditional fails and the trace ceases. Unlike with a loop, however, this will continue for as long as the playhead is in this frame. The trace won't occur once x becomes three, but the conditional will continue to evaluate and fail. Depending on the complexity of your code, this can affect performance. However, if this is the only task required of your enter-Frame event handler, you can use ActionScript to delete it, thereby removing the drain on your resources. To do this, use the delete command, which will delete most any object. If you rewrite the code just a bit, the enterFrame handler will be deleted when x reaches three: var x:Number = 0; this.onEnterFrame = function():Void { if (x == 3) { delete this.onEnterFrame; } else { trace("your name"); x++; } };
If you need additional information on any part of this discussion, reread the following sidebars: "Semicolon;" (Chapter 3); "Event Handlers" (Chapter 4); "Functions" (Chapter 5); "Movie Clip Event Handlers" (Chapter 6); and "Variables and Scope," "Conditional Statements," and "Operators" (all Chapter 7). |
10.3.2. Using ActionScript Hold on to your hats, because using ActionScript to assign blend modes…is as easy as using the interface. One line of ActionScript is all that is required: Select the hero movie clip and use the Properties panel to set the blend mode back to Normal. While in the Properties panel, give the clip an instance name of hero_mc. Add a layer at the top of the timeline called actions, and add the following script in frame 1 of that layer: hero_mc.blendMode = "darken";
Save your work and test your movie.
Easy, right? You can also specify blend modes using integers. This is less descriptive, but helpful when stepping through a numeric loop or working with existing integers. A special bonus file called blend_modes_all.fla has been included on the CD in the 10 folder. It uses ActionScript to move 12 multicolored stars over a gray gradient background. Each time you click the mouse, it will cycle through, and display, each blend mode. This allows you to see how each blend mode will affect underlying art.
Note: It is difficult to represent these effects in black and white screen shots, and without changing the blend modes on the fly. Therefore, this is bound to be confusing without seeing the sample in action. It would be a good idea to run the demo movie before proceeding.
For example, watch how Lighten, Darken, Multiply, and Screen each work when moving from the light gray to dark gray background. Also, watch how Add and Subtract mix star colors, and how Invert affects both the background and other stars. Some blend modes are Flash-specific and require a little explaining. For instance, the Layer blend mode was created to get around a side effect of applying alpha color transforms to nested bitmaps within a movie clip. Normally, the parent transform is errantly applied to each bitmap individually, despite the fact that you applied the transform to the parent movie clip, not its contents. This causes some unpredictable mixing within the clip. If the new Layer blend mode is applied to the parent clip before the transform, the individual nested bitmaps will be composited first, and the alpha color transform will be applied to the movie clip uniformly. To see this in action, watch the clips that have three colored child stars. The Layer blend mode is also very valuable when fading in a movie clip that has layered bitmaps and movie clips within it. Using this mode, all elements within the fading clip will be treated as one when it comes to the fade. Similarly, Alpha and Erase are a bit difficult to see in a simple demo. Again, these effects work only on children with alpha data, within a parent movie clip. In this case, the effect is clearest when applied to bitmaps inside the child movie clips. When the Alpha effect is applied to an interior movie clip, it will attempt to extract the alpha data from that movie clip and apply it to any underlying movie clips. Erase is similar, but it will invert the alpha data first. The trick is, the Stage must remain opaque. So, Alpha and Erase will not work when applied to a movie clip in the root timeline. To see these effects in action, look at the two stars that appear to be fragmented. Open them up. In reality, there are two stars within these parent clips: star3 uses Erase on its second star, and star9 uses Alpha on its second star. This will be clearer if you watch the demo movie in action. Also, the demo movie combines many skills you've learned throughout this book, and it is heavily commented. Set aside a time to look through the code and understand how it works. 10.3.3. What's Next? Flash's runtime compositing has never been more powerful. With blend modes and filter effects at your disposal, you can create dynamic visual layouts that would have been very difficult or impossible to create previously. Remember, however, that these features come at a sacrifice to performance, so don't use them carelessly, or without testing. Think of blend modes and filter effects as having a similar effect as vector scaling and opacity, discussed earlier in this book. All of these features can be taxing on your computer's processor, so look at your files on a variety of machines to make sure you are happy with the playback of your projects. Before moving on, try a variety of filter effects and blend modes. Look through the code in the bonus blend_modes_all.fla file and try to understand how it works. Pay particular attention to the loop code, as you have not focused on that prior to this chapter. Finally, try to create some demanding animations and see how much faster they will play with runtime bitmap caching enabled. Remember to avoid scaling and rotating for a fair comparison, as these transformations largely negate the gains provided by the feature. Now it's time to move on to text. In the next chapter, you will: Learn about different text element types, including text that is equivalent to graphics, text that can be programmed, and text that can be entered by the user Work with fonts resident in your computer's operating system, as well as custom fonts that can be embedded for platform and machine independence Learn how to author text in HTML format and which HTML tags are supported by Flash Learn how to apply Cascading Style Sheets to HTML text Discover how to use Flash 8's new text-rendering engine, including new formatting and anti-aliasing options
|