7.2. Frame-by-Frame Animation Typically, frame-by-frame animation techniques are reserved for things like precise positioning and character animation. However, you can also use frame-by-frame techniques for quick and simple animations, including text effects. 7.2.1. The Cascading Text Effect In this segment of the project, you'll make the ad headline appear one character at a time, fading in and zooming from 200% to actual size. Done quickly, this is a simple but eye-catching effect: Add a layer above the shape tweens and below the actions, and call it headline. In frame 30, add a keyframe. Use the Text tool to create a headline centered within the space above the house outline: 3 BEDROOM, 2-1/2 BATH: $450K. Be sure the text is selected, and convert it to a movie clip using F8. Call the movie clip headline. Double-click the movie clip to edit its contents.
Inside your movie clip, you have one line of text on one layer in a single frame. To generate the cascading text effect, the characters need to tween in, so each one needs to be on its own layer. Use Flash's Break Apart command to split the text into individual characters that can be manipulated as separate elements: With the text selected, choose Modify  Break Apart to separate the characters in the text. Each character now has its own bounding box and can be treated as an individual graphic, as shown in detail view in Figure 7-5. Break Apart to separate the characters in the text. Each character now has its own bounding box and can be treated as an individual graphic, as shown in detail view in Figure 7-5. Figure 7-5. Before (above) and after (below) breaking apart the line of text 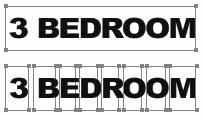 With all the characters selected, use the Modify  Timeline Distribute to Layers menu command. This will create a new layer for each character. Timeline Distribute to Layers menu command. This will create a new layer for each character. After you're done, swap out the duplicate characters with the first symbols. Select the second O in BEDROOM and click the Swap button in the Properties panel. The other symbols you've created will be visible. Select the O symbol. It will replace the duplicate in the exact same position, and you will have eliminated one unnecessary symbol from your timeline. Repeat step 4 for the duplicated 2 and B. Now that you've removed the unneeded symbols from the timeline, you can remove them from the Library. To be sure you haven't made a mistake, select Update Use Counts from the Library's Options menu. (Alternatively, Keep Use Count Updated can be enabled to always show the usage of each Library element.) In the Library column marked Use Count (you may have to widen your Library panel to see it), you should see a zero. If not, check to make sure you've correctly swapped your symbol instances. When the unwanted symbols all show zero use counts, you can delete them. As a last step, name your layers to match the symbol names. Save your work. Your file should now look like animated_ad_02.fla
Now that you have symbols in discrete layers, you can finish the tweens: Reopen the headline movie clip and select frame 5 in all the layers by clicking and dragging vertically down the layers. Press F6 to create a keyframe. Move the playhead to the first frame. You want to select the first frame only, in all the layers. In one motion, starting with the top layer, click and drag down through all the layers to select all the characters on the Stage. You will know if you did this correctly because only the first keyframe will appear selected in the timeline, in all the layers. Since you want to scale and fade in each character, you need to give the first keyframe of each letter an alpha of 0 and a scale of 200. While all the characters remain selected, use the Window Transform command to open the Transform panel. In the first two fields, for horizontal and vertical scale, enter a value of 200%. Note: Like most programs, Flash allows you to scale horizontally (also known as _xscale) and vertically (otherwise known as _yscale). In the Transform panel, these properties are set using the first two fields. Double-headed arrows indicate which field is horizontal and which is vertical. You can manipulate each value independently or, with the Constrain option, together.
The last thing to do while the characters are still selected is to choose the Alpha color effect from the Color menu in the Properties panel and change the setting to 0. This will make it look like all the characters have disappeared. However, you can see that they are still selected, so you know only the alpha value for each has changed. Finally, select the first frame in all the layers by again clicking and dragging vertically down the layers. With all the frames selected, choose Motion from the Tween menu in the Properties panel. Add an actions layer and place a stop() action in the last frame. Save your work and compare your file with animated_ad_04.fla.
In just a few steps, you've created a motion tween that fades and scales each of the 24 characters. However, the animation is so quick that it doesn't look very impressive. The characters aren't coming in one at a time, as intended. To accomplish this, stagger the tweens like you did in your first animation in Chapter 3: Reopen the headline movie clip. Shift-select all of the frames in the second letter layer (the B in BEDROOM). Once they're selected, click and drag them two frames to the right with your mouse. Figure 7-6. A timeline detail for the cascading text effect 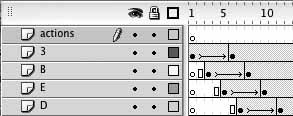 Do the same thing with the second letter in BEDROOM (E), dragging the frames of that layer four frames to the right. The idea is that each successive layer will be staggered two frames to the right, as seen in the detail in Figure 7-6. When you are finished, add frames to all but the last layer, making the frame count consistent for all the layers. Finally, move the stop() action in the actions layer to the last frame. Save your work and test your movie. Compare your file to animation_ad_05.fla.
7.2.2. Text effects with dynamic text To perform certain text effects, such as rotating text, the outline of the font must be available at runtime. Static text will be converted to vectors for you, so you don't have to worry about it. However, in the future you will want to use ActionScript to control text or allow the user to type in text. In these cases, fonts must be embedded to maintain their visual appearance. This will increase .swf download size, but you can try to minimize this effect. (Device fontsthose available on the system at runtimewon't work because the outline information for these fonts isn't available to Flash at runtime.) Here's how to embed a font:
Note: Static text and embedded fonts maintain font appearance at runtime, but not during authoring. Temporary font substitution will occur if you try to edit a file without the needed fonts. Since you must be able to edit the sample code provided on the CD, the text has been broken apart into shapes for consistency. However, this is not necessary in your own development.
Start with a dynamic or input text field, and use any font you like, including bold or italic, if required. Click the Embed button in the Properties panel to open the Character Embedding dialog. (If you don't see the Embed button, make sure your text field's type is set to Dynamic Text, not Static Text.) In the dialog, multiple-select the ranges of characters you want to embed.
Try to resist embedding the entire font, as this dramatically increases file size. If you know for sure that only a few characters will be used, such as in a headline that reads "FLASH!," you can even embed only those characters using the field at the bottom of the dialog. 7.2.3. Onion Skinning When using frame-by-frame animation, particularly if you are positioning items by hand in each frame, it can really help to enable onion skinning. Onion skinning is a term that describes the ability to see frames before and after the current frame, in varying degrees of opacity, as if each frame had been drawn on the translucent skin of an onion. Onion skinning is most useful when you are looking at an animation of sequential frames where only the current frame is visible and must be aligned to adjacent frames. Seeing translucent frames before and after the current frame allows you to manipulate art placement to your liking. If you also enable the Edit Multiple Frames option, you'll even be able to adjust more than one frame at a time. Figure 7-7. A timeline detail illustrating onion skinning 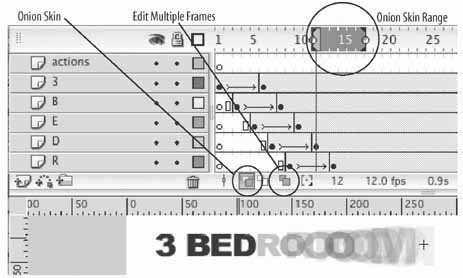
In the context of this project, Figure 7-7 shows five future frames at one particular point in the animation. The Onion Skin option is enabled at the bottom of the timeline. The onion skin range of frames, displayed before and after the current playhead position, is adjusted in the numbered frame bar above the timeline. |