| The problem areas of AAA on PIX firewall and FWSM can be categorized as follows based on their implementations: Firewall management with AAA troubleshooting Cut-Through Proxy with AAA troubleshooting Extended authentication (X-Auth) for IPsec VPN with AAA troubleshooting
The sections that follow discuss these problem areas. Firewall Management with AAA Troubleshooting You can connect to the PIX firewall in several ways to configure or monitor the PIX firewall. You can get CLI access to the PIX firewall for configuration and monitoring purpose in the following ways: Using Console Console port is ready to be used on the PIX firewall as soon as you power on the PIX firewall. You do not need any configuration on the PIX firewall. Using Telnet If you want to remotely manage the PIX firewall using Telnet, you can do so on all interfaces except the outside interface. For Telnet access to the outside interface, you must configure IPsec to include IP traffic that is generated by the PIX firewall, and enable Telnet on the outside interface. Using SSH SSH can be configured instead of Telnet for secured access to the PIX firewall. We recommend that you manage PIX firewall with SSH instead of Telnet. Additionally, managing PIX Firewall from an outside network with Telnet is not possible, as Telnet is not allowed to the outside interface. Although it is possible to get around the problem by terminating a VPN tunnel on the outside interface, SSH is the preferred method to manage the PIX firewall from the outside. Using Telnet over IPsec As mentioned before, Telnet is not allowed to the outside interface of the PIX firewall because of security reasons. So if you really need to Telnet to the outside interface, the only way to accomplish that is by creating an IPsec tunnel to the outside interface and then allowing the Telnet to the outside interface. PDM/ASDM/Firewall MC/Security Monitor Connection between the Management Software (PDM/ASDM/Firewall MC) and the Monitoring Software (Security Monitor) takes place using HTTPS (http/SSL). You need to configure a web server and generate a certificate to allow the HTTPS connection to the firewall.
Once the connection parameters are configured on the firewall, you can add security to the connection by configuring AAA, which provides per-user control for the connections. This section presents the configuration and troubleshooting setup as follows: Login Authentication Issues This section delves into the details of both login authentication and troubleshooting. Before you attempt to enable authentication, you should configure the authentication and be sure that it works with the basic login credentials without configuring AAA. This section explains the following topics in detail: Configuring basic authentication with different communication methods on the Firewall Configuring local user database authentication Configuring external AAA server authentication Configuring a fallback method for authentication Troubleshooting login authentication
Configuring Basic Authentication with Different Communication Methods on the Firewall Before you configure local user database or AAA for login authentication on the PIX firewall, be sure that you can connect to the PIX firewall with the Basic Login credentials. For login and enable authentication, you can use passwd to configure login password, and enable password to configure enable authentication. The following list of configuration methods on the PIX Firewall details the configuration for basic authentication for these different connection methods: Basic Authentication for Telnet on the PIX firewall To turn on Telnet on the PIX firewall, you must use the telnet command. Example 10-3 shows how to turn on telnet on the PIX firewall for 192.168.1.0 network to the inside interface of the PIX firewall. Example 10-3. Shows How to Configure Telnet Access to the PIX Firewall PIX# configure terminal ! Set login password with the following command. If you want to set encrypted ! password you must provide 16 bytes string. PIX(config)# passwd cisco12345678912 encrypted ! The following command will set up the enable password on the PIX firewall. PIX(config)# enable password cisco76687463274 encrypted ! The following command allows 192.168.1.0 network to be able to telnet to the ! inside interface on the PIX firewall PIX(config)# telnet 192.168.1.0 255.255.255.0 inside ! Following command is used to verify that the telnet is enabled. PIX(config)# show running-config telnet 192.168.1.0 255.255.255.0 inside PIX(config)#
|
Basic Authentication for SSH connection on the PIX firewall SSH requires that an RSA key be created on the PIX firewall. To create an RSA key, you must have Data Encryption Standard (DES) or 3DES features turned on (this can be verified with the show version command). If you do not have the DES/3DES feature enabled, you need to send an e-mail to licensing@cisco.com with your show version output and request for a DES/3DES activation key. Then you can insert the key into the PIX with the activation-key command. Use crypto key generate rsa general-keys to generate the RSA key on the PIX Firewall, and execute the SSH command to allow the addresses that can SSH into the PIX Firewall. Example 10-4 shows a sample configuration for turning on SSH on the PIX firewall. Example 10-4. Sample Configuration SSH on the PIX Firewall PIX# configure terminal ! Set login password with the following command. If you want to set encrypted ! password you must provide 16 bytes string. PIX(config)# passwd cisco12345678912 encrypted ! The following command will set up the enable password on the PIX firewall. PIX(config)# enable password cisco76687463274 encrypted ! Following two lines are needed to generate the RSA key PIX(config)# hostname PIX PIX(config)# domain-name cisco.com ! The following command will remove the existing key from the PIX. PIX(config)# crypto key zeroize rsa ! Generate the key with the following command PIX(config)# crypto key generate rsa general-keys ! Save the RSA key with the following command PIX(config)# write memory ! Turn on and allow the SSH connection from 192.168.1.0/24 network with the ! following commands PIX(config)# ssh 192.168.1.0 255.255.255.0 inside PIX(config)# ssh timeout 60 PIX(config)# exit ! Save the configuration with the following command PIX# write memory PIX#
|
After successful configuration of SSH on the PIX firewall, you may use an SSH client (for example, putty.exe, which can be downloaded freely from the Internet by searching with the string "putty.exe") to connect to the PIX firewall. If the firewall gives you the option of accepting a certificate, then the PIX firewall is configured correctly for SSH. When asking for a username, enter pix as username and for the password enter the password configured on the PIX firewall. For enable access, just enter the enable password configured on the PIX. Basic Authentication for VPN connection to allow Telnet to the outside interface of the PIX firewall with Basic Authentication You need to configure Remote Access VPN using IPsec protocol to allow the Telnet access from outside to the outside interface of the PIX firewall. Refer to Chapter 7, "Troubleshooting IPsec VPN on PIX Firewalls" for details on Remote Access VPN configuration using IPsec. Then, following the procedure explained earlier under "Basic Authentication for Telnet on the PIX Firewall," allow the Telnet access to the IP address assigned by the PIX to the VPN client. As the IP address is assigned from the pool, we recommend that you add the pool with the Telnet command to allow access. Here is an example to illustrate the point. Assume that you have an IP Pool defined for the VPN traffic with network address 192.168.1.0, so that the VPN client will get one of the IP addresses from this pool (It could be any IP address from the pool). Therefore, you need to include this network with the telnet command as follows: PIX(config)# telnet 192.16.1.0 255.255.255.0 outside Basic Authentication for PDM/ASDM/Firewall MC/Security Monitor Access (HTTPS) For PDM/ASDM/Firewall MC/Security Monitor access, you need to configure a web server on the firewall and generate a certificate for the HTTPS connection. Example 10-5 shows how to configure HTTPS on the firewall. Example 10-5. Configuring HTTPS on the PIX Firewall PIX# configure terminal ! Turn on the web server with the following command. PIX(config)# http server enable ! Allow the network that can connect to the web server using ASDM/Firewall MC or ! Security Monitor PIX(config)# http 192.168.1.0 255.255.255.0 inside PIX(config)# exit ! Save the configuration with the following command PIX# write memory PIX#
|
Regardless of the type of method you choose to connect to the PIX firewall for management purposes, it is strongly recommended that you control access to the PIX with AAA as covered in the section that follows. Configuring Local User Database Authentication If you want to configure per user authentication for login, you have the option to configure this per-user authentication with the local user database on the PIX firewall. Work through the following steps for configuring local user database authentication: Step 1. | Configure local user database with the username command as follows:
PIX(config)# username superuser password cisco privilege 15 PIX(config)# username basicuser password cisco123 privilege 5 PIX(config)#
| Step 2. | By default, the local user database is configured on the PIX firewall and identified as LOCAL. Verify the statistics of the local user database with the following command:
PIX(config)# show aaa-server LOCAL
| | | Step 3. | Turn on Authentication for different connection types (Telnet, SSH, console and so on) to use the LOCAL user database with the following command:
PIX(config)# aaa authentication {serial | enable | telnet | ssh | http} console server-tag [ LOCAL ]
For example, if you want to turn on SSH authentication to use local user database, you can use the following command:
PIX(config)# aaa authentication ssh console LOCAL
With the above configuration, you can log in to PIX using the SSH protocol with username as superuser and basicuser.
|
Configuring External AAA Server Authentication As mentioned before, the local user database is not very scalable when there are a large number of users to manage. Therefore, you must use an external AAA server for the central point of user management. Configuring an external AAA server-based authentication for login requires configuring both an AAA server and the PIX firewall. Work through to following steps to accomplish this task: Step 1. | Configure AAA Server for user setup and AAA client configuration.
Before you turn on AAA for the login on the PIX firewall, you must configure the AAA server. The term Cisco Secure Access Control Server (CS ACS) is used throughout this chapter for the AAA server. Work through the following steps to configure the Cisco Secure ACS Server:
- a. Define the PIX firewall as an AAA ClientThe PIX firewall must be defined as an AAA client on the AAA server for the PIX to be able to connect to the AAA server to send authentication requests. On CS ACS, go to Network Configuration > Click on Network Device Group (if NDG is configured) > Add Entry> Give an AAA client name for PIX, define the IP address of the PIX, and the shared secret key. For Authenticating Using, select TACACS+ (Cisco IOS) for TACACS+ or RADIUS (Cisco IOS/PIX) for RADIUS authentication.
- b. Create UsersGo under User Setup and add a user. You do not need a special configuration for simple login authentication. Assign the user to a specific group.
| | | Step 2. | Define communication parameters for the AAA server on the PIX firewall.
To define the AAA server, you need to define the type of protocol you want to use (RADIUS or TACACS+), the IP address of the AAA server, and optionally a shared secret key. We recommend strongly that you use the complex shared secret key for better security. See Example 10-6 for both RADIUS and TACACS+ server definitions on the PIX firewall.
Example 10-6. Defining AAA Server ! Following two lines define a AAA server with TACACS+ protocol. Note that ! MY_TACACS is the tag for the AAA server and has to be match (case sensitive) ! on both lines. PIX(config)# aaa-server AuthTacacs protocol tacacs+ PIX(config)# aaa-server AuthTacacs host 192.168.1.5 cisco timeout 5 ! The following two lines define a AAA server with RADIUS protocol PIX(config)# aaa-server AuthRadius protocol radius PIX(config)# aaa-server AuthRadius host 192.168.1.10 cisco timeout 5 PIX(config) exit PIX#
|
| Step 3. | Turn on AAA for Login Authentication.
Commands for turning on authentication are slightly different for different methods of login to the PIX firewall. For example, to enable authentication for SSH using TACACS+ protocol, use the following command:
PIX(config)# aaa authentication ssh console AuthTacacs
To use the RADIUS server, use the following command:
PIX(config)# aaa authentication ssh console AuthRadius
When users use SSH to access the PIX with the preceding command turned on, they are prompted for username and password, which is defined on the AAA server. It is important to note that console is the keyword that tells the PIX that authentication is for an administrative connection. Console authentication is turned on by the keyword serial.
|
Caution While adding authentication statements, always have a connection open to the PIX in the event that backing out the commands is necessary. Additionally, do not save the configuration unless you thoroughly test your AAA configuration so that if you are locked out, you need only perform a reboot to return your original configuration.
Configuring Fallback Method for Authentication Beginning with PIX version 6.3.4, you can configure a local user database as a fallback method in case the AAA server is unavailable. Fallback method is available to use only with the local user database. To configure fallback, you need to combine the procedure for authentication using both the AAA server and the local user database. For example, to turn on fallback for SSH connection to the firewall, use the following command: PIX(config)# aaa authentication ssh console AuthTacacs LOCAL
With the preceding configuration, if the TACACS+ server is unavailable, the local user database will be used for SSH authentication. Note that if multiple TACACS+ servers are defined with the AuthTacacs server tag, the firewall will try all TACACS+ servers in the list before it uses the local user database. If a fallback method is used, you need to configure the AAA server that is used as a primary method for authentication with proper parameters on the firewall. For example, if the fallback method is used, you might not want to increase the maximum failed attempts to a high number, because that could delay the authentication if the AAA server is down. Following is a list of options available for configuring different parameters for the AAA server: Max-failed-attempts This is the maximum number of AAA requests attempted to each server within an AAA server group. The parameter must be within [1-5] inclusive. The default value is 3. PIX(config)# [no] aaa-server AAA-Server-Tag max-failed-attempts number Deadtime Deadtime is the number of timeout minutes for declaring an AAA server group as unresponsive. The parameter must be within [0-1440] inclusive. The default value is 10. PIX(config)# [no] aaa-server AAA-Server-Tag deadtime minutes
Note The AAA fallback is available only for administrative session traffic authentication and command authorization, not for cut-through proxy or x-auth traffic.
Troubleshooting Login Authentication Before delving into the details of troubleshooting authentication problem for SSH, Telnet and other types of connections, it is worth of going through a debug output for a successful user authentication, which is shown in Example 10-7. Example 10-7. Successful User Authentication for SSH Session with Output from the debug aaa authentication and debug tacacs Commands PIX(config)# logging console debugging PIX(config)# debug aaa authentication PIX(config)# debug tacacs ! Following lines show the SSH connection is allowed and username prompt is sent to the ! user PIX# Jul 25 2005 02:23:49 : %PIX-6-609001: Built local-host outside:10.25.136.50 Jul 25 2005 02:23:49 : %PIX-6-609001: Built local-host NP Identity Ifc:172.16.172.164 Jul 25 2005 02:23:49 : %PIX-6-302013: Built inbound TCP connection 5849 for outside:10.25.136.50/3455 (10.25.136.50/3455) to NP Identity Ifc:172.16.172.164/ 22 (172.16.172.164/22) Jul 25 2005 02:23:49 : %PIX-7-710001: TCP access requested from 10.25.136.50/3455 to outside:172.16.172.164/ssh Jul 25 2005 02:23:49 : %PIX-7-710002: TCP access permitted from 10.25.136.50/3455 to outside:172.16.172.164/ssh PIX-A# ! Username and the password information is received and sent to the AAA server PIX-A# JReceived response from kodom, session id 2147485136 Making authentication request for host 171.69.89.217, user kodom, session id: 2147485136 mk_pkt - type: 0x1, session_id: 2147485136 ul user: kodom Tacacs packet sent Sending TACACS Start message. Session id: 2147485136, seq no:1 Received TACACS packet. Session id:537906095 seq no:2 ! Asking for the password from the user 25 tacp_procpkt_authen: GETPASS Authen Message: Password: Processing challenge for user kodom, session id: 2147485136, challenge: Password: Received response from kodom, session id 2147485136 Making authentication request for host 171.69.89.217, user kodom, session id: 2147485136 mk_pkt - type: 0x1, session_id: 2147485136 mkpkt_continue - response: *** Tacacs packet sent Sending TACACS Continue message. Session id: 2147485136, seq no:3 Received TACACS packet. Session id:537906095 seq no:4 ! The following line indicates the successful user authentication tacp_procpkt_authen: PASS TACACS Session finished. Session id: 2147485136, seq no: 3 2005 02:24:03 : %PIX-6-609001: Built local-host outside:171.69.89.217 Jul 25 2005 02:24:03 : %PIX-6-302013: Built outbound TCP connection 5850 for outside:171.69.89.217/49 (171.69.89.217/49) to NP Identity Ifc:172.16.172.164/ 1374 (172.16.172.164/1374) Jul 25 2005 02:24:03 : %PIX-6-109005: Authentication succeeded for user 'kodom' from 10.25.136.50/0 to 172.16.172.164/22 on interface outside ! Shows the login is permitted to the PIX Jul 25 2005 02:24:03 : %PIX-6-605005: Login permitted from 10.25.136.50/3455 to outside:172.16.172.164/ssh for user "kodom" Jul 25 2005 02:24:03 : %PIX-6-302014: Teardown TCP connection 5850 for outside:171.69.89.217/49 to NP Identity Ifc:172.16.172.164/1374 duration 0:00:00 bytes 108 TCP FINs Jul 25 2005 02:24:03 : %PIX-6-609002: Teardown local-host outside:171.69.89.217 duration 0:00:00 PIX#
|
Work through the following steps to troubleshoot authentications problem with login: | | Step 1. | Turn off AAA for login.
If the login is not working for SSH, console, PDM/ASDM, Firewall MC and so on, when AAA is configured, turn off AAA and configure the Basic Login credential to ensure that the problem is not with the connection method configured. For example, if SSH is configured with AAA on the PIX, turn off AAA for SSH and check to see if you can log in with the basic login credentials. Your host IP address might not be configured as the allowed host. If not, you might get the following message in the syslog:
315001: Denied SSH session from 50.1.1.1 on interface outside
Then find out if the 50.1.1.1 address is allowed on the PIX with the following command:
PIX# show ssh 192.168.1.0 255.255.255.0 inside PIX#
As you can see, 192.168.1.0 is the only network allowed from which you can use SSH to log in to the PIX firewall. To add the 50.1.1.1 address for an SSH connection, you can use the following command:
PIX# configure terminal PIX(config)# ssh 50.1.1.1 255.255.255.255 outside PIX(config)# exit PIX#
| Step 2. | Check for a bad Username/Password on the AAA Server.
If the authentication is working with basic login credentials, turn AAA back on, and check to see if the user is entering the correct username and password. Example 10-8 shows an example of authentication failure either because of the wrong username or a bad password.
Example 10-8. Authentication Failure for SSH Connection PIX# debug aaa authentication PIX# debug tacacs Sending TACACS Continue message. Session id: 2147485138, seq no:3 ! A failed message indicates either username or password is not correct. Received TACACS packet. Session id:1969178652 seq no:4 tacp_procpkt_authen: FAIL TACACS Session finished. Session id: 2147485138, seq no: 3 25 2005 06:11:03 : %PIX-6-609001: Built local-host outside:171.69.89.217 PIX#
|
| | | Step 3. | The AAA server is not responding.
Authentication might fail if the AAA server is down, which will result in the messages shown in Example 10-9.
Example 10-9. Error Message Received in the Syslog When the AAA Server Is Down PIX# debug aaa authentication PIX# debug tacacs JReceived response from kodom, session id 2147485144 Making authentication request for host 171.69.89.217, user kodom, session id: 2147485144 umk_pkt - type: 0x1, session_id: 2147485144 user: kodom l Tacacs packet sent 2Sending TACACS Start message. Session id: 2147485144, seq no:1 ! Following message indicates PIX is unable to make authentication request to ! the AAA server. TACACS Request timed out Received response from kodom, session id 2147485144 Making authentication request for host 171.69.89.217, user kodom, session id: 2147485144 PIX#
|
| Step 4. | Configure Network Access Restrictions on the AAA server.
Network Access Restrictions (NAR) is a filtering mechanism on the AAA server that takes place during the authentication. Nothing special needs to be configured on the firewall. On the AAA server, for example on Cisco Secure ACS, you can configure NAS (PIX, routers and so on) to allow or deny users from accessing the NAS. Set this up under Group Settings as either Denied Calling/Point of Access Locations or Permitted Calling/Point of Access. If the authentication is failing even after defining the correct username and password, ensure that authentication is not failing due to NAR configuration on the AAA server.
|
Enable Authentication This section explains how to configure and troubleshoot Enable authentication with various methods. Configuring Enable Authentication Enable password authentication can be performed one of the following ways: 1. | Enable Authentication with Enable Password.
By default, enable password is none (meaning no password is required) on the firewall, and has a privilege level of 15. So if you do not have any configuration for the enable authentication, the enable password none is used, unless you define one or more enable passwords. You can assign different privilege levels (1-15) to the enable password.
When the users enter into enable mode with a specific level (for example enable 10) the enable password configured for that specific level must be used. For example, if enable password is configured on the firewall with the enable password cisco level 10 command, then the user must enter into the enable mode with the Firewall> enable 10 command, not with the Firewall> enable command. Be sure to create an enable password with privilege level 15.
Following is the syntax to define enable password on the firewall:
PIX(config)# enable password password [level level] [encrypted]
To remove enable password, use the following command:
PIX(config)# no enable password level level
| | | 2. | Enable authentication with the local user database.
If you perform login authentication with the local user database, then be sure to assign a privilege level to the user. The same password and the privilege level will be provided to the user for enable access. If you perform login authentication with the AAA server, but enable authentication with the local user database, then be sure to configure the same username defined on the AAA server and assign a password for the user that will be used for enable access. This password can be different than the login password defined on the AAA server. A user can be created with a different privilege level with the following command:
[View full width] PIX(config)# username {name} {nopassword | password password [encrypted]} [privilege  priv_level]} priv_level]}
To remove the user, use the following command:
PIX(config)# no username [name]
To turn on authentication for the enable authentication with the local user database, use the following command:
PIX(config)# aaa authentication enable console LOCAL
| | | 3. | Enable authentication with the external AAA server.
If the enable authentication is performed using RADIUS protocol, the enable password is the same as the login password, and the privilege level 15 is assigned for all users. In essence, enable authentication with the RADIUS protocol does not add any additional security for the enable access.
To configure enable authentication with the RADIUS protocol, use the following command:
PIX(config)# aaa authentication enable console AuthRadius
Here the AuthRadius is the radius server tag.
We recommend strongly that you configure enable authentication with TACACS+ protocol. As with TACACS+, you can define a separate enable password, assign privilege levels to the user, and control what commands users can execute in a more granular fashion than for a local user database. You must configure both TACACS+ server and the firewall to configure enable authentication.
On the firewall, you need the following command to turn on enable authentication with TACACS+ protocol:
PIX(config)# aaa authentication enable console AuthTacacs
Work through the following steps to configure the Cisco Secure ACS server for the enable password configuration:
- a. On CS ACS GUI, go to Interface Configuration > Advanced TACACS+ Settings. Check Advanced TACACS+ Features in Advanced Configuration Options and click Submit. This makes the Advanced TACACS+ Settings visible under the user configuration.
- b. Go to User Setup, then either create a new user or edit an exiting user. In the User Setup page, check the radio button for Max Privilege for any AAA Client, and select the level to 15 from the drop-down box next to it under Advanced TACACS+ Settings. Also under TACACS+ Enable Password, choose the password you want to use for enable password. Then click Submit.
Note Unlike working with a router, you cannot take the user directly to the privilege mode based on the privilege level. The privilege level is assigned based on the enable privilege level. So, the user always will be taken to the user mode and based on the enable level, will be assigned to a certain level. | 4. | Use the fallback method for enable authentication.
Just as with authentication, if you want to use the local user database as a fallback method for enable authentication, use the following command:
PIX(config)# aaa authentication enable console AuthTacacs LOCAL
If the AAA server is unavailable, you can gain access to the enable mode with the password defined for the user you have used to login to the PIX. So it is critical that you configure at least one user with privilege level 15 and turn on the fallback method for the login authentication also.
|
Troubleshooting Enable Authentication Troubleshooting steps for enable password authentication are almost same as those discussed for Login Authentication. Example 10-10 shows a successful enable password authentication with TACACS+ protocol: Example 10-10. Successful User Authentication with TACACS+ Protocol PIX# debug aaa authentication PIX# debug tacacs ! By now the user authentication is successful, hence rest of the debug output if for ! enable authentication only. PIX# Jmk_pkt - type: 0x1, session_id: 2147485158 user: kodom Tacacs packet sent Sending TACACS Start message. Session id: 2147485158, seq no:1 Received TACACS packet. Session id:1036787635 seq no:2 tacp_procpkt_authen: GETPASS Authen Message: Password: ! Same username as login is used with the enable password defined for the user uProcessing challenge for user kodom, session id: 2147485158, challenge: Password: mk_pkt - type: 0x1, session_id: 2147485158 mkpkt_continue - response: *** Tacacs packet sent Sending TACACS Continue message. Session id: 2147485158, seq no:3 Received TACACS packet. Session id:1036787635 seq no:4 ! Shows successful enable password authentication tacp_procpkt_authen: PASS TACACS Session finished. Session id: 2147485158, seq no: 3 l 25 2005 07:01:31 : %PIX-6-609001: Built local-host outside:171.69.89.217 PIX#
|
Additional information that is important and specific to enable password authentication is as follows: Under Advanced TACACS+ Settings of User Profile, or under Enable Option of Group profile, be sure "No enable Privilege" is not checked. You must assign privilege level 15. Otherwise, enable authentication will fail. If login is done externally with an AAA server but enable authentication is performed locally, be sure the user name matches between the AAA server and the local user database. If a separate password is used for enable authentication, be sure you are entering the password correctly. If the external database is configured on the Cisco Secure ACS server for enable password, change it to use the same password as login to see if the external server is causing the problem. If you find it is an external database issue, investigate the issue on the AAA server (refer to Chapter 13, "Troubleshooting Cisco Secure ACS on Windows" for details). If enable password is configured locally with different privileges, be sure that you are authenticating enable password with that specific privilege level. For example, if the enable password is at level 10, configure, then be sure to go into enable mode by typing enable 10 not just enable.
Command Authorization With the blessings of privilege levels, you can control the commands users can execute on the firewall after the enable authentication with the local user database. If TACACS+ is used, more granular command authorization is possible with the TACACS+ server. This section explains how to control command authorization for different methods of authentication for enable access: Command Authorization based on Enable Password Privilege level Command Authorization using local user database Command Authorization using an external AAA server
Command Authorization Based on Enable Password Privilege Level As discussed before, you can configure multiple enable passwords with different privilege levels locally. Every command on the PIX firewall has a privilege level assigned. If you authenticate enable access with a password that has the same or higher privilege level than the level of the command, that command will be allowed. For example, if your enable password is defined as cisco3, which has level 3, you can execute every command that is at level 0. You must have the authorization turned on to use a local user database with the following command to control the command execution; otherwise, you will be able to execute all commands regardless of the privilege level assigned to you. Command Authorization Using Local User Database Command authorization done locally on PIX Firewall is based on privilege level. There are 16 privilege levels in PIX Firewall. Two of them are set to the defaults 0 and 15. Anything from 1 to 14 has the same sets of commands that the privilege level 0 has. Every command has a predefined privilege level and most of them are at level 15. However, it is possible to change the command privilege level from higher to lower. For instance, show running-config is a level 15 command, and it is possible to bring this down to level 10. So, a user with level 10 or above can execute this command. Users with levels lower than 10 will not be able to execute a level 10 command. Example 10-11 walks you through the privilege level concept and different commands available with local database command authorization. The example also shows how to turn on command authorization with the following command: PIX(config)# aaa authorization command LOCAL
Example 10-11. Privilege Level Command Execution and How to Turn on Command Authorization Based on the Privilege Level PIX# configure terminal ! Create a user with privilege level 15 named superuser PIX(config)# username superuser password cisco123 privilege 15 ! If you want some users to be able to execute subset of all the commands available on ! the PIX, you must create user in a lower level than 15. User alice is created with the ! privilege level 10 below. PIX(config)# username alice password cisco privilege 10 ! As most of the commands are at level 15 by default, you have to move some commands down ! to level 10 so that "alice" can issue them. In this instance, you want your level 10 ! user to be able to issue the show clock command, but not to reconfigure the clock. PIX(config)# privilege show level 10 command clock ! You must also allow the users to be able to logout even if the user is at level 1. As ! the level 10 should be able to execute any commands available between level 0-9, it ! makes sense to assign this command to level 1. PIX(config)# privilege configure level 1 command logout ! You will need the user to be able to issue the enable command (the user will be in ! level 1 when attempting this). PIX(config)# privilege configure level 1 mode enable command enable ! By moving the disable command to level 1, any user between levels 2-15 can get out of ! enable mode. PIX(config)# privilege configure level 1 command disable ! With the above setup if the user alice telnets in and go into enable mode with the same ! password, then alice with the assigned to privilege 10 which will have same command ! access as level 1. PIX# show curpriv Username : alice Current privilege level : 10 Current Mode/s : P_PRIV ! At this point, open up another telnet and login to the PIX with superuser that has ! privilege level 15 so that you can use that window for configuration changes and ! modification. PIX# show curpriv Username : superuser Current Privilege level : 15 Current Mode/s : P PRIV ! Once logged in with superuser and verifying the privilege level, turn on command ! Authorization as follows. PIX(config)# aaa authorization command LOCAL ! On the other window login to the PIX with username alice that has privilege level 10 ! and execute show xlate that should fail. Show clock should be successful. PIX# show clock 19:18:53.026 UTC Sun Jan 9 2005 PIX# show xlate Command authorization failed PIX#
|
Command Authorization Using an External AAA Server Command Authorization with the local user database is not scalable. Hence, with a larger user database, you should consider implementing command authorization using an external AAA server. Command Authorization is possible with TACACS+ protocol but not with the RADIUS protocol. Command authorization by TACACS+ is based on submitting the entire command expression to a TACACS+ server for authorization before execution. While this section deals only with command authorization for a TACACS+ server, a local user database as discussed in the preceding section will be used as a fallback method. Note that fallback using a local user database is possible only with PIX Version 6.3.4 and above. Configuring command authorization with the external TACACS+ server is a two-step process: configuring the TACACS+ server, and configuring PIX Firewall. Work through the steps that follow to configure an ACS in Windows for command authorization: Step 1. | Authentication must be working before performing command authorization. To perform command authorization with CS ACS, go to Interface Configuration > TACACS+ (Cisco). Check Shell (exec) for user and/or group and click Submit. This will make the shell command authorization settings visible under the user (or group) configuration.
| | | Step 2. | Go to User Setup and create a user who has permission to execute any commands on the firewall. For example, give this username superuser, and assign this user to a group name.
| Step 3. | Go to Group Setup, and select the group name where username superuser is assigned from the drop-down box and click on Edit Settings.
| Step 4. | In the Group Setting page, permit unmatched Cisco IOS commands.
| Step 5. | For the other users, select Group Settings, find the desired group from the drop-down box, and click Edit Settings.
| Step 6. | Go to Shell Command Authorization Set, check the Command button, and enter login. Select Permit, under Unlisted Arguments. Repeat these processes for the logout, enable, and disable commands.
| Step 7. | Go to Shell Command Authorization Set, check the Command button, and enter show. Under Arguments enter permit clock, and select deny for Unlisted Arguments. Refer to Figure 10-1 for the configurations of steps 4 and 5.
Figure 10-1. Command Authorization Setup on the ACS Server 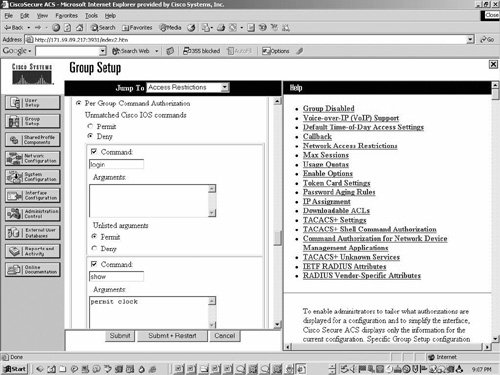
| Step 8. | Click Submit.
|
Once you are finished with the Cisco Secure ACS server configuration, you need to configure PIX Firewall for command authorization. Example 10-12 shows the configuration needed on the PIX firewall to turn on command authorization. Example 10-12. AAA Configuration Needed for the Authorization with TACACS+ Server and Local User Database as a Fallback Method PIX# configure terminal ! Assuming that the AAA-server is configured with AAA server name tag TACSERVER, ! following statements will enable telnet and enable authentication with tacacs+ server, ! and Local user database is configured as backup. PIX(config)# aaa authentication telnet console TACSERVER LOCAL PIX(config)# aaa authentication enable console TACSERVER LOCAL ! Following line will turn on authorization with tacacs+ server and local user database ! as fall-back method. PIX(config)# aaa authorization command TACSERVER LOCAL PIX(config)#
|
Troubleshooting Steps To troubleshoot command authorization, run the following commands: PIX# debug aaa authorization PIX# debug tacacs
Before you look at some of the possible causes of failure, go through Example 10-13 for a successful command authorization using tacacs+ protocol: Example 10-13. Command Authorization in Action for Administrative Session PIX# debug aaa authorization PIX# debug tacacs Jul 25 2005 07:09:36 : %PIX-7-111009: User 'kodom' executed cmd: show running-config Jmk_pkt - type: 0x2, session_id: 2147485175 mkpkt - authorize user: kodom ! Configure terminal is what entered in PIX CLI, and they are sent to the AAA server with ! command "configure" and argument "terminal" as you can see in the following lines. cmd=configure ucmd-arg=terminal Tacacs packet sent Sending TACACS Authorization message. Session id: 2147485175, seq no:1 Received TACACS packet. Session id:243213034 seq no:2 ! Following two lines indicate success of command authorization tacp_procpkt_author: PASS_ADD tacp_procpkt_author: PASS_REPL TACACS Session finished. Session id: 2147485175, seq no: 1 l 25 2005 07:09:40 : %PIX-6-609001: Built local-host outside:171.69.89.217 Jul 25 2005 07:09:40 : %PIX-6-302013: Built outbound TCP connection 5918 for outside:171.69.89.217/49 (171.69.89.217/49) to NP Identity Ifc:172.16.172.164/ 1425 (172.16.172.164/1425) Jul 25 2005 07:09:40 : %PIX-5-111007: Begin configuration: console reading from terminal Jul 25 2005 07:09:40 : %PIX-5-111008: User 'kodom' executed the 'configure terminal' command. PIX#
|
Command authorization might not work due to one or more of the following reasons: If the authorization does not work at all, be sure that authorization is turned on with the following command: aaa authorization command TACSERVER LOCAL If authorization is performed with the local user database, be sure that the command is at the same or at a lower privilege level than the user's privilege. Otherwise, you need to log in as admin user with privilege level 15 to bring the privilege level down to the user level. If authorization is turned on with the TACACS+ protocol, run debug aaa authorization and debug tacacs to find out how the command is sent out to the AAA server. Revise the AAA server group profile configuration to ensure that the command and arguments are match the permit as you see it in the debug on the PIX firewall. If expected permit commands are denied, and vice versa, revise the logic of the commands, and correct if needed.
Accounting Beginning with PIX Version 7.0, Accounting for firewall administrative sessions is possible. Previously it was only available with the syslog. To enable accounting for a special connection type, use the following command: [View full width] Firewall(config)# [no] aaa accounting http | serial | telnet | ssh | enable console AAA-Server-Tag
You can enable accounting for capturing and sending the command executed on the firewall with the following command: Firewall(config)# [no] aaa accounting command [privilege level] AAA-Server-Tag
Refer to Table 10-8 for an explanation of the arguments of the accounting command. Table 10-8. Keywords for the AAA Accounting Command Shown for Admin SessionKeywords | Meaning |
|---|
AAA-Server-Tag | This is the AAA sever name tag. | Accounting | Enable or disable accounting services. | http | Enable or disable the generation of accounting records for HTTP connection. | Serial | Enable or disable the generation of accounting records for console session. | telnet | Enable or disable the generation of accounting records for Telnet connection. | SSH | Enable or disable the generation of accounting records for SSH connection. | Enable | Enable or disable the generation of accounting records for enable authentication. | Console | Indicates that accounting records will be generated for administrative session via different connection types. | Command | Enable or disable the generation of accounting records to record each command that is entered on the firewall. | Privilege Level | If specified, the privilege level indicates the minimum level that must be associated with a command to generate an accounting record. The default privilege level is 0, which means that every command executed on the firewall will generate accounting records. |
If you are having problem with accounting, run the following debug commands on the PIX firewall: PIX# debug aaa accounting PIX# debug radius
or, PIX# debug tacacs
Information can be shown either on the console or syslog. If Cisco Secure ACS is used as an external AAA server, you can view accounting records by clicking the Reports and Activity button. Then click TACACS+ Accounting or RADIUS Accounting. All accounting reports are in comma-separated value (.csv) format and can be displayed in a web browser. Cut-Through Proxy Authentication You can configure the firewall to force the users to authenticate before connections are permitted. After successful user authentication, the user's authentication status is cached to permit subsequent connections from the same IP address from where the initial connection authenticated user initiated. The firewall functions as an authentication proxy for the subsequent connections. Subsequent connections simply "cut through" the firewall very efficiently. That's why this feature is called Cut-Through Proxy. While firewall can intercept all types of IP traffic, it can authenticate only the FTP, Telnet, SSH, HTTP, and HTTPS protocols traffic because of the authentication scheme available for these protocols. Note that Figure 10-2 will be used for the remainder of the chapter as the AAA for Management and Cut-Through Proxy. Figure 10-2. A Typical Setup for AAA for Management and Cut-Through Proxy Setup 
If the cut-through proxy authentication is enabled on the firewall, when the user connections go through the firewall, they are intercepted by AAA, and the firewall presents a username/password prompt. How a user provides a username and password differs as follows: For Telnet/SSH The user sees a username prompt, and then a request for a password. If authentication (and authorization) is successful at the firewall, the user is prompted for username and password by the destination host beyond. With Telnet/SSH, the username/password needs to be entered twiceonce for the firewall, and once for the end host. For FTP The user sees a username prompt first and then the password. The user needs to enter local_username@remote_username for username and local_password@remote_password for password. The firewall sends the local_username and local_password to the AAA server and authenticates the user. If authentication (and authorization) is successful at the firewall, the remote_username and remote_password are passed to the destination FTP server beyond. With FTP, you have the option to enter the username/password once. For HTTP/HTTPS The user sees a window displayed in the browser requesting username and password. If authentication (and authorization) is successful, the user arrives at the destination website beyond.
Authentication for Cut-Through Proxy Cut-Through Proxy authentication can be performed by either of the following methods: The sections that follow go through the configuration of these two methods, followed by the troubleshooting steps for Cut-Through Proxy Authentication. Cut-Through Proxy Authentication with Local User Database To configure cut-through proxy with the local user database, you need to configure the local user database with the following command on the firewall: [View full width] PIX(config)# username {name} {nopassword | password password [encrypted]} [privilege priv_level]}
To remove a user, use the following command: PIX(config)# no username [name]
You can turn on the authentication for the connections going across the firewall with one of the following ways: 1. | Using the include/exclude option
The matching criteria are added to the firewall configuration using an include statement which will trigger the authentication. Exclude is used to exclude the traffic from exemption of cut-through proxy authentication. Use the following syntax to turn on authentication for different types of connection using a LOCAL user database:
[View full width] Firewall(config)# aaa authentication {include | exclude} service if_name local_ip local_mask [foreign_ip foreign_mask] server_tag
The service can be http/https/telnet/ssh/ftp. It is possible to define these services as tcp/80, tcp/443, tcp/23, tcp/21, and so on. However, remember that not every protocol has native support for interactive authentication capability. For instance, you can define a service as tcp/25 for SMTP, but as the SMTP does not have the interactive native support for an authentication scheme, the packet for the mail traffic will simply be dropped, unless you authenticate from the mail server, and PIX caches the user information for the mail server IP. This can be accomplished with Virtual Telnet, which is discussed in detail in the Case Studies section of this chapter.
if_name in the command indicates the location from which the traffic will be initiated and intercepted by the firewall. Local_ip and local_mask indicate the source IP address of the packet, and the foreign_ip and foreign_mask define the destination address and mask of the traffic. For the inbound traffic, if you have the static defined for the destination IP address, the foreign_ip is the actual server IP on the inside network, not the translated IP that is seen on outside for a specific server or network. For example, if the server on the inside has an IP address of 10.1.1.50, which is translated with an external IP address of 200.1.1.50, then you should use the untranslated address 10.1.1.50, not the translated address 200.1.1.5 in the AAA statement, when you turn on authentication, authorization or accounting.
server_tag for the local user database is always LOCAL, and this is configured within the software.
|
Example 10-14 shows how to turn on authentication for both inbound and outbound traffic using the local user database. Example 10-14. Turning on Cut-Through Proxy Authentication With Include/Exclude Option Using Local User Database ! Configure local user database with the following command first. Simple username ! and unsecure password is used for demonstration purpose only. You should choose ! secure password and different username Firewall(config)# username cisco password cisco privilege 15 ! The following static is for destination address translation for the inbound ! traffic, and source address translation for the outbound traffic. Firewall(config)# static (inside,outside) 200.1.1.0 10.1.1.0 netmask 255.255.255.0 ! Following command will turn on cut-through proxy authentication for all inbound ! TCP traffic Firewall(config)# aaa authentication include tcp/0 outside 0.0.0.0 0.0.0.0 0.0.0.0 0.0.0.0 LOCAL ! Following statement will exclude exemption for cut-through proxy for only for ! server 10.1.1.100 that is on inside. Note carefully that even though the ! translated IP address for the 10.1.1.100 is 200.1.1.100, this translated IP is ! not used. Firewall(config)# aaa authentication exclude tcp/0 outside 0.0.0.0 0.0.0.0 10.1.1.100 255.255.255.255 LOCAL ! The following command enables cut-through proxy authentication for the outbound ! http traffic. Firewall(config)# aaa authentication include http inside 0.0.0.0 0.0.0.0 0.0.0.0 0.0.0.0 LOCAL Firewall(config)#
|
2. | Using access-list
With the include/exclude option, you can turn on cut-through proxy authentication that is based only on source and destination IP and the service type. However, this does not allow authenticating the traffic based on source/destination port information. With access-list, you have this flexibility. Using ACL, you can define your traffic based on 5-tuples: source and destination address and port, and the service type. Then apply the ACL with the authentication statement by using the following command:
Firewall(config)# aaa authentication match acl_name if_name server_tag
Example 10-15 shows how to turn on cut-through proxy authentication using ACL.
Example 10-15. Turning on Cut-Through Proxy Authentication with ACL Option Using Local User Database ! Configure local user database and the statics using the following commands Firewall(config)# username cisco password cisco privilege 15 Firewall(config)# static (inside,outside) 200.1.1.0 10.1.1.0 netmask 255.255.255.0 ! Define two ACLs one for inbound traffic and one for outbound traffic Proxy ! authentication Firewall(config)# access-list inbound deny tcp any host 10.1.1.100 Firewall(config)# access-list inbound permit ip any any Firewall(config)# access-list outbound permit tcp any any eq www ! Now apply both of the ACLs with the following two statements to turn on cut- ! through proxy authentication for traffic in both direction that meet the ACL ! criteria. Firewall(config)# aaa authentication match inbound outside LOCAL Firewall(config)# aaa authentication match outbound inside LOCAL Firewall(config)#
|
|
A local user database is not scalable for a large network. An external AAA server must be configured to address the scalability issue, which we discuss next. Cut-Through Proxy Authentication Using RADIUS or TACACS+ Protocol The configuration on the firewall to turn on cut-through proxy authentication is very similar to that of a local user database, which is discussed in the preceding section. The only exception is the server-groupinstead of using LOCAL, a server group for either RADIUS or TACACS+ protocol must be defined. Before you attempt any configuration on the firewall for cut-through proxy, we recommend strongly that you configure the AAA server first. Work through the following steps to configure the Cisco Secure ACS Server so that Firewall can use it for authentication purposes: Step 1. | Log in to the CS ACS GUI
| Step 2. | Define Firewall as an NAS on the CS ACS Server. To accomplish this, go to Network Configuration, click on the Network Device Group (if the Network Device Group option is turned on), then click on Add Entry for adding an AAA client. In the Add AAA Client window, define the AAA Client Hostname, AAA Client IP Address, and the Key that will be defined on the Firewall for authentication. Select TACACS+ (Cisco IOS) or RADIUS (Cisco IOS/PIX) protocol from the drop-down list of Authenticate Using drop-down box. If you want to use both TACACS+ and RADIUS protocol, be sure to use a different name for the AAA clients.
| Step 3. | Go to User Setup and add a user. Map the user to a specific group on the Cisco Secure ACS Server.
| Step 4. | Edit the group that the users are mapped to by going to Group Setup. For the TACACS+ protocol, you do not need any special settings for the group. However, if you use RADIUS protocol, check the [006] Service-Type check box under IETF RADIUS Attributes and select Login from the drop-down box next to it.
| Step 5. | Click on the Submit+Restart button.
|
Once AAA server configuration is complete, work through the following steps to configure firewall: | | Step 1. | Define the AAA server.
You need to define communication parameters for the AAA server to configure on the firewall. First, define the server tag name and identify TACACS+ or RADIUS protocol with the following commands:
Firewall(config)# aaa-server AuthTacacs protocol tacacs+ Firewall(config)# aaa-server AuthRadius protocol radius
Once the name is defined and you have chosen a specific protocol, define the communication details such as IP address and shared secret key of the AAA server by using the following command:
Firewall(config)# aaa-server AuthTacacs (inside) host 192.168.1.5 cisco Firewall(config)# aaa-server AuthRadius (inside) host 192.168.1.5 cisco
| Step 2. | Turn on cut-through proxy Authentication.
Just as with the local user database, the cut-through proxy authentication can be turned on either with the include/exclude option or with the access-list option. Example 10-16 shows how to turn on authentication for both inbound and outbound traffic using the TACACS+ protocol.
Example 10-16. Turning on Cut-Through Proxy Authentication with Include/Exclude Option Using TACACS+ Protocol ! The following static is for destination address translation for the inbound ! traffic, and source address translation for the outbound traffic. Firewall(config)# static (inside,outside) 200.1.1.0 10.1.1.0 netmask 255.255.255.0 ! Following command will turn on cut-through proxy authentication for all inbound ! TCP traffic Firewall(config)# aaa authentication include tcp/0 outside 0.0.0.0 0.0.0.0 0.0.0.0 0.0.0.0 AuthTacacs ! Following statement will exclude exemption for cut-through proxy for only for ! server 10.1.1.100 that is on inside. Note carefully that even though the ! translated IP address for the 10.1.1.100 is 200.1.1.100, this translated IP is ! not used. Firewall(config)# aaa authentication exclude tcp/0 outside 0.0.0.0 0.0.0.0 10.1.1.100 255.255.255.255 AuthTacacs ! The following command enables cut-through proxy authentication for the outbound ! http traffic. Firewall(config)# aaa authentication include http inside 0.0.0.0 0.0.0.0 0.0.0.0 0.0.0.0 AuthTacacs Firewall(config)#
|
If you want to accomplish the task shown in Example 10-17 with the access-list, follow the procedure it demonstrates.
Example 10-17. Turning on Cut-Through Proxy Authentication with ACL Option Using RADIUS Protocol Firewall(config)# static (inside,outside) 200.1.1.0 10.1.1.0 netmask 255.255.255.0 ! Define two ACLs one for inbound traffic and one for outbound traffic Proxy ! Authentication Firewall(config)# access-list inbound deny tcp any host 10.1.1.100 Firewall(config)# access-list inbound permit ip any any Firewall(config)# access-list outbound permit tcp any any eq www ! Now apply both of the ACLs with the following two statements to turn on cut- ! through proxy authentication for traffic in both direction that meet the ACL ! criteria. Firewall(config)# aaa authentication match inbound outside AuthRadius Firewall(config)# aaa authentication match outbound inside AuthRadius Firewall(config)#
|
|
Troubleshooting Cut-Through Proxy Authentication You must ensure that the connection across the firewall works before turning on cut-through proxy authentication. Once cut-through proxy authentication is turned on and if authentication fails, you need to enable logging with debug level turned on (see the "Syslog" subsection under the section entitled "Diagnostic Commands and Tools"). You need to run debug aaa authentication, and debug radius or debug tacacs to find out the details on authentication failure for the cut-through proxy authentication. If the syslog does not provide the cause of failure, you need to analyze the log on the AAA server. For details on how to analyze the log on the CS ACS server, refer to Chapter 13, "Troubleshooting Cisco Secure ACS on Windows." Before delving into the details of the different issues with cut-through proxy authentication, this section first examines the look of a successful cut-through proxy authentication in the syslog. Example 10-18 shows a successful cut-through proxy authentication for inbound traffic authentication using TACACS+ protocol initiating the packet from 50.1.1.1 to inside 192.168.1.2 (20.1.1.102) and vice versa (see Figure 10-2). Example 10-18. Successful Authentication for TACACS+ (Inbound) PIX# logging monitor debug Jul 25 2005 07:33:51 : %PIX-6-609001: Built local-host outside:50.1.1.1 Jul 25 2005 07:33:51 : %PIX-6-609001: Built local-host inside:192.168.1.2 Jul 25 2005 07:33:51 : %PIX-6-302013: Built inbound TCP connection 5947 for outside:50.1.1.1/11003 (50.1.1.1/11003) to inside:192.168.1.2/23 (192.168.1.2/23) Jul 25 2005 07:33:51 : %PIX-6-109001: Auth start for user '???' from 50.1.1.1/11003 to 192.168.1.2/23 Jul 25 2005 07:33:55 : %PIX-6-609001: Built local-host outside:171.69.89.217 Jul 25 2005 07:33:55 : %PIX-6-302013: Built outbound TCP connection 5949 for outside:171.69.89.217/49 (171.69.89.217/49) to NP Identity Ifc:172.16.172.164/ 1428 (172.16.172.164/1428) Jul 25 2005 07:33:57 : %PIX-2-109011: Authen Session Start: user 'kodom', sid 34 ! Following message indicates successful user authentication. Jul 25 2005 07:33:57 : %PIX-6-109005: Authentication succeeded for user 'kodom' from 50.1.1.1/11003 to 192.168.1.2/23 on interface outside Jul 25 2005 07:33:57 : %PIX-6-302014: Teardown TCP connection 5949 for outside:171.69.89.217/49 to NP Identity Ifc:172.16.172.164/1428 duration 0:00:01 bytes 107 TCP FINs PIX#
|
For additional details of a successful cut-through proxy authentication, refer to Example 10-19. Example 10-19. Successful Cut-Through Proxy Authentication with Debug AAA Authentication And Debug Tacacs PIX# debug aaa authentication PIX# debug tacacs JReceived response from , session id 2147485179 Making authentication request for host 171.69.89.217, user , session id: 2147485179 ! Username challenged sent to the end user Processing challenge for user , session id: 2147485179, challenge: Please enter your username and password: Username: ul 25 2005 07:39:59 : %PIX-6-302013: Built inbound TCP connection 5960 for outside:50.1.1.1/11004 (50.1.1.1/11004) to inside:192.168.1.2/23 (192.168.1.2/23) Jul 25 2005 07:39:59 : %PIX-6-109001: Auth start for user '???' from 50.1.1.1/11004 to 192.168.1.2/23 Jul 25 2005 07:40:00 : %PIX-7-711002: Task ran for 130 msecs, process = dbgtrace JReceived response from kodom, session id 2147485179 Making authentication request for host 171.69.89.217, user kodom, session id: 2147485179 mk_pkt - type: 0x1, session_id: 2147485179 user: kodom Tacacs packet sent ! Sending the start packet to the AAA server Sending TACACS Start message. Session id: 2147485179, seq no:1 Received TACACS packet. Session id:1683598253 seq no:2 ! Getting password here. tacp_procpkt_authen: GETPASS Authen Message: Password: Processing challenge for user kodom, session id: 2147485179, challenge: Password: ul 25 2005 07:40:03 : %PIX-6-609001: Built local-host outside:171.69.89.217 Jul 25 2005 07:40:03 : %PIX-6-302013: Built outbound TCP connection 5962 for outside:171.69.89.217/49 (171.69.89.217/49) to NP Identity Ifc:172.16.172.164/ 1429 (172.16.172.164/1429) Received response from kodom, session id 2147485179 JuMaking authentication request for host 171.69.89.217, user kodom, session id: 2147485179 mk_pkt - type: 0x1, session_id: 2147485179 mkpkt_continue - response: *** Tacacs packet sent Sending TACACS Continue message. Session id: 2147485179, seq no:3 Received TACACS packet. Session id:1683598253 seq no:4 ! Following message indicates a successful cut-through proxy authentication tacp_procpkt_authen: PASS user: kodom authenticated, session id: 2147485179 TACACS Session finished. Session id: 2147485179, seq no: 3 l 25 2005 07:40:07 : %PIX-2-109011: Authen Session Start: user 'kodom', sid 35 Jul 25 2005 07:40:07 : %PIX-6-109005: Authentication succeeded for user 'kodom' from 50.1.1.1/11004 to 192.168.1.2/23 on interface outside Jul 25 2005 07:40:07 : %PIX-6-302014: Teardown TCP connection 5962 for outside:171.69.89.217/49 to NP Identity Ifc:172.16.172.164/1429 duration 0:00:04 bytes 107 TCP FINs PIX#
|
Following is a list of some possible causes of cut-through proxy authentication problems: Incorrect username or bad password User authentication might fail due to an incorrect username or bad password. In either case, the user will see the following message after getting three opportunities to enter the username and password. Error: Max number of tries exceeded. Example 10-20 shows syslog for authentication failure with TACACS+ protocol for inbound traffic. Example 10-20. Syslog Message for Bad Authentication (Username or Password) TACACS+ (Inbound) PIX(config)# logging monitor debugging PIX-A# Jul 25 2005 07:48:16 : %PIX-6-302013: Built inbound TCP connection 5981 for outside:50.1.1.1/11006 (50.1.1.1/11006) to inside:192.168.1.2/23 (192.168.1.2/23) Jul 25 2005 07:48:16 : %PIX-6-109001: Auth start for user '???' from 50.1.1.1/11006 to 192.168.1.2/23 Jul 25 2005 07:48:20 : %PIX-6-609001: Built local-host outside:171.69.89.217 Jul 25 2005 07:48:20 : %PIX-6-302013: Built outbound TCP connection 5983 for outside:171.69.89.217/49 (171.69.89.217/49) to NP Identity Ifc:172.16.172.164/ 1433 (172.16.172.164/1433) Jul 25 2005 07:48:24 : %PIX-6-302014: Teardown TCP connection 5983 for outside:171.69.89.217/49 to NP Identity Ifc:172.16.172.164/1433 duration 0:00:03 bytes 108 TCP FINs Jul 25 2005 07:48:30 : %PIX-6-609001: Built local-host outside:171.69.89.217 Jul 25 2005 07:48:30 : %PIX-6-302013: Built outbound TCP connection 5984 for outside:171.69.89.217/49 (171.69.89.217/49) to NP Identity Ifc:172.16.172.164/ 1434 (172.16.172.164/1434) Jul 25 2005 07:48:32 : %PIX-6-302014: Teardown TCP connection 5984 for outside:171.69.89.217/49 to NP Identity Ifc:172.16.172.164/1434 duration 0:00:01 bytes 107 TCP FINs Jul 25 2005 07:48:39 : %PIX-6-609001: Built local-host outside:171.69.89.217 Jul 25 2005 07:48:39 : %PIX-6-302013: Built outbound TCP connection 5985 for outside:171.69.89.217/49 (171.69.89.217/49) to NP Identity Ifc:172.16.172.164/ 1435 (172.16.172.164/1435) ! Following failed message indicates a failure with either username/password. Jul 25 2005 07:48:41 : %PIX-6-109006: Authentication failed for user 'kodom' from 50.1.1.1/11006 to 192.168.1.2/23 on interface outside Jul 25 2005 07:48:41 : %PIX-6-302014: Teardown TCP connection 5985 for outside:171.69.89.217/49 to NP Identity Ifc:172.16.172.164/1435 duration 0:00:01 bytes 109 TCP FINs Jul 25 2005 07:48:42 : %PIX-6-302014: Teardown TCP connection 5981 for outside:50.1.1.1/ 11006 to inside:192.168.1.2/23 duration 0:00:25 bytes 374 TCP FINs PIX#
|
Communication Problem between PIX and AAA Server Several conditions might be considered communication problems between the PIX and AAA Server: - PIX may not have proper routing. Execute ping from the PIX to verify. - PIX has connectivity, but TACACS+ or RADIUS protocols might be blocked by a firewall between PIX and the AAA server. - The shared secret might be a mismatch between the PIX and AAA Server. - PIX might not be defined as the AAA client on the AAA Server.
Under any of these circumstances, PIX might be unable to send the authentication information to the AAA server, and this will result in authentication failure. The user sees a username, then a password, then RADIUS server failed, and then finally Error: Max number of tries exceeded. See Example 10-21 to see the syslog message when TACACS+ is used for inbound authentication, and the authentication fails. Example 10-21. Syslog Message When PIX Has Communication Problem with AAA Server PIX(config)# logging monitor debug PIX-A# Jul 25 2005 07:55:12 : %PIX-6-302013: Built inbound TCP connection 5987 for outside:50.1.1.1/11007 (50.1.1.1/11007) to inside:192.168.1.2/23 (192.168.1.2/23) Jul 25 2005 07:55:12 : %PIX-6-109001: Auth start for user '???' from 50.1.1.1/11007 to 192.168.1.2/23 Jul 25 2005 07:55:16 : %PIX-6-609001: Built local-host outside:171.69.89.217 Jul 25 2005 07:55:16 : %PIX-6-302013: Built outbound TCP connection 5989 for outside:171.69.89.217/49 (171.69.89.217/49) to NP Identity Ifc:172.16.172.164/ 1436 (172.16.172.164/1436) Jul 25 2005 07:55:16 : %PIX-6-302014: Teardown TCP connection 5989 for outside:171.69.89.217/49 to NP Identity Ifc:172.16.172.164/1436 duration 0:00:00 bytes 0 TCP Reset-O ! Following message indicates server is unavailable Jul 25 2005 07:55:16 : %PIX-6-109002: Auth from 50.1.1.1/11007 to 192.168.1.2/23 failed (server 171.69.89.217 failed) on interface outside Jul 25 2005 07:55:16 : %PIX-6-609001: Built local-host outside:171.69.89.217 Jul 25 2005 07:55:16 : %PIX-6-302013: Built outbound TCP connection 5990 for outside:171.69.89.217/49 (171.69.89.217/49) to NP Identity Ifc:172.16.172.164/ 1437 (172.16.172.164/1437) PIX#
|
User's Account Locked Out If you configure a lockout feature on the AAA server after a certain number of failed authentication attempts, the user account will be locked out. Hence, subsequent authentication requests will fail. Re-enable the user account so that it can authenticate. User reached the MAX session limit If you have a session limit configured on the AAA server, be sure that you do not exit more often than the number of times that is configured for simultaneous authentication for a specific user or a group. User Reaches the Proxy Limit If you have too many simultaneous connection requests, you may run short of the proxy limit, which is by default 16. So, if a user makes 17 connection requests at the same time across the firewall, one connection will not be authenticated and the connection will be dropped. You can disable proxies by using the disable parameter. To return to the default proxy-limit value (16), use the no form of this command. aaa proxy-limit proxy_limit aaa proxy-limit disable no aaa proxy-limit
Authorization for Cut-Through Proxy To control the resources users may access once they are authenticated, you need to implement authorization. On the other hand, if you want to allow authenticated users to perform all operations, then authentication is sufficient. Authorization can be performed either with the TACACS+ or RADIUS protocol. Even though a PIX firewall supports a local user database for cut-through proxy authentication, it does not support authorization. Authorization for a cut-through proxy is implemented differently using TACACS+ and RADIUS protocols due to the different nature of the protocols. Authentication and authorization are performed separately in TACACS+, whereas in RADIUS both authentication and authorization are performed together. Therefore, command authorization is possible with TACACS+, but not with RADIUS. When an end user who is going through the firewall tries to Telnet/FTP/HTTP/HTTPS to an IP address of a server, the packets are intercepted and authenticated, and then the Telnet/FTP/HTTP/HTTPS are sent to the AAA server as commands, and the IP address after that goes as arguments to the TACACS+ server for the command authorization. For example, if the user enters http 192.168.1.105 on the browser, after successful user authentication, if the authorization is turned on for HTTP traffic for the specific destination, the firewall will send http as a command and 192.168.1.105 as an argument to the TACACS+ server for command authorization. Authorization can be performed for any type of pass-through IP traffic across the firewall. For example, if you want to authorize the SMTP mail traffic, you can perform authentication from the main server using Telnet/FTP/HTTP/HTTPS, which will cause the firewall to cache the IP address of the mail server. Then, if the authorization is turned on for the mail server using tcp/25 as the service, mail traffic will be authorized. On the TACACS+ server, you need to ensure that tcp/25 is configured as the command and the destination IP address (not the mail server IP address) is configured as argument. If you want to have more granular control with authorization, configure an access-list on the firewall and then download the name of the access-list from the TACACS+ server. Support for ACL for command authorization is introduced in PIX Firewall Version 5.2. Authorization with RADIUS protocol for the pass-through traffic is only possible via ACL, which will be discussed in the coming section. Note To implement authorization for HTTP in an enterprise network, use URL filtering software such as Websense, N2H2, and so on. AAA Authorization implementation for HTTP authorization is limited based on the IP address not on the DNS, or other important criteria that these URL filtering servers offer.
Configuration steps for the cut-through proxy authorization are discussed in next two sections. Configuring Cut-through Proxy Authorization using the TACACS+ Protocol The cut-through proxy authorization configuration discussed in this section is based on Figure 10-2. Configuring cut-through proxy authorization using the TACACS+ protocol is a two-step process: configuring user and group profiles with command authorization on the TACACS+ server, and enabling authorization on the firewall. For this configuration, Cisco Secure ACS on Windows is used. It supports the TACACS+ protocol. Work through the steps that follow to configure the Group Profile on the ACS on Windows for Authorization. To illustrate this better, assume that you want the user to be able to use Telnet to access 20.1.1.100, use FTP to access 20.1.1.101, and use HTTP to access any website. Step 1. | Assume that PIX already was added as NAS during authentication configuration earlier on the CS ACS using TACACS+.
| Step 2. | Select Group Setup from the Navigation bar on the left side, choose the Group on the next window, and click on Edit. This is the group to which the end users belong that need to be authenticated by the firewall.
| Step 3. | On the Group Setup page, Choose TACACS+ from the Jump To drop-down box. That will take you to the TACACS+ configuration section of the page.
| Step 4. | Check Shell Exec, and under Shell Command Authorization Set, choose the Per Group Command Authorization button.
| Step 5. | Click Deny unmatched IOS commands.
| Step 6. | Check the Command check box. In the text box next to the command check box, enter telnet as the command, and in the Arguments: rectangle box, enter permit 20.1.1.100 as argument. Finally, choose Deny for Unlisted arguments.
| Step 7. | Click on the Submit + Restart button to restart the CS ACS services.
| Step 8. | To allow the FTP access to 20.1.1.101, follow steps 6 and 7. Instead of using telnet as a command, use ftp, and for argument use 20.1.1.101.
| Step 9. | To allow HTTP access to all sites, in the command text box, enter http, leave the arguments rectangle box blank, and for the Unlisted arguments, choose permit.
| Step 10. | Finally, click the Submit+Restart button.
| Step 11. | If you want to have more granular control using an access-list, define an ACL on the PIX firewall but do not apply this ACL on any interface. Check the Access control list box, and fill in the number (for example, access-list 115 is defined)
| Step 12. | Click the Submit+Restart button.
|
When you are finished with the CS ACS configuration, the next step is to enable authorization on the firewall as shown in Example 10-22. Example 10-22. Turning on Authorization for Cut-Through Proxy PIX# configure terminal ! Following three lines will turn on authorization for inbound traffic (telnet/http/ftp) ! using TACACS+ protocol. This is the only syntax available prior to PIX firewall version ! 5.2. The same syntax can be used on the latest version of PIX as well. PIX(config)# aaa authorization include telnet outside 0.0.0.0 0.0.0.0 0.0.0.0 0.0.0.0 AuthInbound PIX(config)# aaa authorization include http outside 0.0.0.0 0.0.0.0 0.0.0.0 0.0.0.0 AuthInbound PIX(config)# aaa authorization include ftp outside 0.0.0.0 0.0.0.0 0.0.0.0 0.0.0.0 AuthInbound ! If you are running PIX version 5.2 and above, it is strongly recommended to use the ! following syntax. The same ACL 101 that was created for earlier can be applied for the ! authorization as well. Hence, you just need to turn on authorization with the ACL 101 ! earlier created to turn on authorization for cut-through proxy. PIX(config)# aaa authorization match 101 outside AuthInbound ! If you want to have more granular control for instance you want to control the traffic ! based on 5-tuple of the connection source/destination port, source/destination IP ! address and the protocol. Define ACL 115 with along with the authorization line defined ! earlier. Do not apply the ACL on any interface. PIX(config)# access-list 115 permit tcp any host 50.1.1.1 eq telnet PIX(config)# access-list 115 permit tcp any host 50.1.1.1 eq www PIX(config)# access-list 115 permit tcp any host 50.1.1.1 eq ftp PIX(config)# access-list 115 deny tcp any host 30.1.1.1 eq www PIX(config)# access-list 115 deny tcp any host 30.1.1.1 eq ftp PIX(config)# access-list 115 deny tcp any host 30.1.1.1 eq telnet PIX(config)# exit PIX#
|
Caution In Example 10-22, both ways to enable authorization for cut-through proxy are shown. Use either method, but not both. Otherwise, undesirable results will occur.
Troubleshooting Cut-Through Proxy Authorization using the TACACS+ Protocol Most authorization problems for the cut-through proxy using the TACACS+ protocol arise because of a lack of understanding and misconfiguration. Careful review of the configuration of both the firewall and the AAA server can eliminate many problems. However, logs and debug commands available on the firewall, and the log on the Cisco Secure ACS software, can help you to nail down any problem. It's important to learn how to use the log and the debug/show command efficiently. It is equally important to be extremely familiar with the AAA server log. Refer to Chapter 13, "Troubleshooting Cisco Secure ACS on Windows" for details on how to use the logging capability on Cisco Secure on Windows software. By now, you should be familiar with how to turn on the syslog in the debug level. Therefore, go through the debug level log for a successful user authorization session and become comfortable with it, so that you can easily identify a deviation when authorization does not work under a specific condition. Example 10-23 shows syslog when user authentication and authorization is successful. Example 10-23. Syslog for a Successful Authentication and Authorization Using the TACACS+ Protocol PIX(config)# logging monitor debugging Jul 25 2005 08:10:32 : %PIX-6-302013: Built inbound TCP connection 5995 for outside:50.1.1.1/11008 (50.1.1.1/11008) to inside:192.168.1.2/23 (192.168.1.2/23) Jul 25 2005 08:10:32 : %PIX-6-109001: Auth start for user '???' from 50.1.1.1/11008 to 192.168.1.2/23 Jul 25 2005 08:10:35 : %PIX-6-609001: Built local-host outside:171.69.89.217 Jul 25 2005 08:10:35 : %PIX-6-302013: Built outbound TCP connection 5997 for outside:171.69.89.217/49 (171.69.89.217/49) to NP Identity Ifc:172.16.172.164/ 1440 (172.16.172.164/1440) Jul 25 2005 08:10:37 : %PIX-2-109011: Authen Session Start: user 'kodom', sid 36 ! Following line indicates authentication is successful Jul 25 2005 08:10:37 : %PIX-6-109005: Authentication succeeded for user 'kodom' from 50.1.1.1/11008 to 192.168.1.2/23 on interface outside Jul 25 2005 08:10:37 : %PIX-6-302013: Built outbound TCP connection 5998 for outside:171.69.89.217/49 (171.69.89.217/49) to NP Identity Ifc:172.16.172.164/ 1441 (172.16.172.164/1441) Jul 25 2005 08:10:37 : %PIX-6-302014: Teardown TCP connection 5997 for outside:171.69.89.217/49 to NP Identity Ifc:172.16.172.164/1440 duration 0:00:02 bytes 107 TCP FINs Jul 25 2005 08:10:37 : %PIX-6-302013: Built outbound TCP connection 5999 for outside:171.69.89.217/49 (171.69.89.217/49) to NP Identity Ifc:172.16.172.164/ 1442 (172.16.172.164/1442) Jul 25 2005 08:10:37 : %PIX-6-302014: Teardown TCP connection 5998 for outside:171.69.89.217/49 to NP Identity Ifc:172.16.172.164/1441 duration 0:00:00 bytes 87 TCP FINs ! Following line indicates authorization is successful Jul 25 2005 08:10:37 : %PIX-6-109007: Authorization permitted for user 'kodom' from 50.1.1.1/11008 to 192.168.1.2/23 on interface outside Jul 25 2005 08:10:37 : %PIX-6-302014: Teardown TCP connection 5999 for outside:171.69.89.217/49 to NP Identity Ifc:172.16.172.164/1442 duration 0:00:00 bytes 101 TCP FINs PIX#
|
Now that you are familiar with a successful user authentication and authorization, go through Example 10-24, which shows an example of user authorization failure with TACACS+ protocol, but of successful authentication. Example 10-24. Syslog for Successful Authentication with Authorization Failure Using the TACACS+ Protocol PIX(config)# logging monitor debugging Jul 25 2005 08:15:47 : %PIX-6-302013: Built inbound TCP connection 6009 for outside:50.1.1.1/11009 (50.1.1.1/11009) to inside:192.168.1.2/23 (192.168.1.2/23) Jul 25 2005 08:15:47 : %PIX-6-109001: Auth start for user '???' from 50.1.1.1/11009 to 192.168.1.2/23 Jul 25 2005 08:15:50 : %PIX-6-609001: Built local-host outside:171.69.89.217 Jul 25 2005 08:15:50 : %PIX-6-302013: Built outbound TCP connection 6011 for outside:171.69.89.217/49 (171.69.89.217/49) to NP Identity Ifc:172.16.172.164/ 1443 (172.16.172.164/1443) Jul 25 2005 08:15:53 : %PIX-2-109011: Authen Session Start: user 'kodom', sid 37 ! Authentication is successful. Jul 25 2005 08:15:53 : %PIX-6-109005: Authentication succeeded for user 'kodom' from 50.1.1.1/11009 to 192.168.1.2/23 on interface outside Jul 25 2005 08:15:53 : %PIX-6-302013: Built outbound TCP connection 6012 for outside:171.69.89.217/49 (171.69.89.217/49) to NP Identity Ifc:172.16.172.164/ 1444 (172.16.172.164/1444) Jul 25 2005 08:15:53 : %PIX-6-302014: Teardown TCP connection 6011 for outside:171.69.89.217/49 to NP Identity Ifc:172.16.172.164/1443 duration 0:00:03 bytes 107 TCP FINs Jul 25 2005 08:15:53 : %PIX-6-302013: Built outbound TCP connection 6013 for outside:171.69.89.217/49 (171.69.89.217/49) to NP Identity Ifc:172.16.172.164/ 1445 (172.16.172.164/1445) Jul 25 2005 08:15:53 : %PIX-6-302014: Teardown TCP connection 6012 for outside:171.69.89.217/49 to NP Identity Ifc:172.16.172.164/1444 duration 0:00:00 bytes 87 TCP FINs ! Authorization is failing for telnet session. Jul 25 2005 08:15:53 : %PIX-6-109008: Authorization denied for user 'kodom' from 50.1.1.1/11009 to 192.168.1.2/23 on interface outside Jul 25 2005 08:15:53 : %PIX-6-302014: Teardown TCP connection 6013 for outside:171.69.89.217/49 to NP Identity Ifc:172.16.172.164/1445 duration 0:00:00 bytes 101 TCP FINs Jul 25 2005 08:15:54 : %PIX-6-302014: Teardown TCP connection 6009 for outside:50.1.1.1/11009 to inside:192.168.1.2/23 duration 0:00:06 bytes 170 TCP FINs (kodom) PIX#
|
The log in Example 10-24 shows that authorization failed for the specific IP and port on the outside interface of the firewall. To understand why, analyze the log on the AAA server. For your setup, you are using Cisco Secure ACS as an AAA server. So, go under "Reports and Activity" and then "Failed Attempt," and find out how the commands are parsing to the AAA server from the firewall. Get the syntax from there and apply the same command and argument on the Group setup. Following are some important points to check to ensure that authorization is configured correctly: Verify that Shell/Exec is turned on under the TACACS+ Settings of the Group profile to which the user belongs. Check that the ACL tag defined on the TACACS+ server matches the one defined on the PIX firewall. Ensure that traffic is allowed on the ACL that is defined on the PIX firewall, and that the tag is downloaded to the PIX firewall. Define the complete syntax of the commands when defining command authorization. If authorization fails, look under the Reports and Activity section for the failed attempt and find out how the commands are sent to the Cisco Secure ACS server. Based on this information, be sure to permit the commands and the arguments. Configure the authorization to intercept the traffic for authorization on the PIX firewall. Otherwise, the authorization may be skipped. For the inbound cut-through proxy, define the local IP address as the destination, not the translated IP in the include/exclude statement. Define the authorization traffic for authentication, because authorization traffic will be denied if authentication is not performed on the traffic.
Configuring Cut-through Proxy Authorization using the RADIUS Protocol As the RADIUS protocol cannot perform command authorization, it must rely on the access-list to control the traffic going across the firewall. Whereas the TACACS+ protocol can implement authorization using an access-list in addition to command authorization, ACL usage for controlling traffic is very limited; only downloading the ACL name/number is possible. ACL usage to control the traffic using the RADIUS protocol is very flexible. In addition to having the ability to download the ACL name from the RADIUS server, it is also possible to define and download the contents of the ACL using the RADIUS protocol. The following list explains methods available to implement authorization with ACL using the RADIUS protocol: Downloading the name of the ACL from RADIUS Server Defining access-lists on the firewall without applying any interface Defining the ACL number under the user profile on the RADIUS server Upon successful authentication, downloading the number from the AAA server to activate the ACL for controlling users' access to different network resources.
Note Unlike TACACS+, you do not need to enable authorization on the firewall to download the ACL from the RADIUS Server. This is because the ACL name or the content of the ACL is downloaded from the RADIUS Server as part of the Access Accept packet of the RADIUS Protocol. There is no need to turn on authorization.
On the Cisco Secure ACS Server, access-list name or number can be defined in one of the two following ways. Using vendor-specific Attribute Beginning with PIX Firewall Version 5.2, you can define the ACL using the vendor-specific attribute. A vendor-specific attribute for the ACL can be set under the Group setup by checking the box 009\001 AV_Pair (vendor-specific), and defining acl=115 in the Cisco/RADIUS rectangular box. Using Standard IETF attribute Beginning with PIX Version 6.0.1, the ACL name/number can be defined using a standard Internet Engineering Task Force (IETF) RADIUS attribute 11 (Filter-Id). Access-list 115 needs to be defined on the firewall. Downloading the contents of the ACL from the RADIUS Server If you have a large number of ACLs to manage for different users, the number of ACLs can outgrow the capacity of the memory of the firewall. In addition, if you have more than one firewall using the same policy to control the traffic, every firewall must be locally configured with the same ACL. So the authorization implementation defining the ACL on the firewall may not be scalable. To address this issue, you can define the ACL content on the AAA server and then download the ACL based on user authentication to one, or more than one, firewall. You must be running PIX Firewall Version 6.2 or above to implement this feature.
Note Downloading contents of the ACL from the AAA server is not possible with the TACACS+ protocol. With TACACS+, only downloading the ACL name or number is possible, as discussed before.
You can define the ACL on the Cisco Secure ACS server in one of the following ways: Using a Vendor-Specific Attribute You can use a Cisco vendor-specific attribute to define the ACL that may be downloaded to the firewall. To set this up on the CS ACS Server, edit the group to which the users belong, and go under RADIUS (Cisco IOS/PIX) settings. Choose the [009\001] cisco-av-pair check box, and define the contents of the ACL that is displayed in a rectangular box, as shown in Figure 10-3, to allow only Telnet access and deny all other traffic. ip:inacl#=permit tcp any any eq telnet ip:inacl#=deny ip any any Figure 10-3. Defining ACL Using the Cisco IOS/PIX RADIUS Attribute. 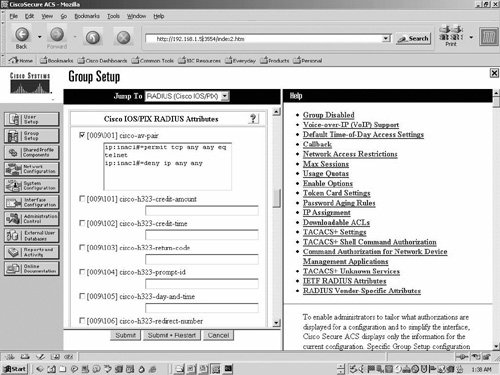 Finally click the Submit + Restart button. Using Shared Profile Components If you have multiple groups that require the same ACL to be applied, defining the same ACL for different groups is not a very scalable solution. Beginning with Cisco Secure ACS 3.0, you can configure a Shared Profile Component, which is a template for the ACL that can be applied to different user groups. Note Configuring a Shared Profile component may not be possible with RADIUS servers from other vendors. Defining a Shared Profile Component is possible only if you are running Cisco Secure ACS version 3.0 and above.
Before you can configure a Shared Profile Component on the CS ACS, you must enable that option. Go to the Interface Configuration > Advance Options page. Then check either the User-Level Downloadable ACLs or Group-Level Downloadable ACLs checkbox or both checkboxes, based on your requirements. Finally, click on Submit. Next you need to define the Shared Profile Component (ACL template), which can be mapped to different groups. To accomplish this task, click on Shared Profile Components, then Downloadable IP ACLs, and then Add. This will display the Downloadable IP ACLs window, where you need to define the Name and, optionally, Description. To define ACL contents for this ACL, click on Add, which will bring up the Downloadable IP ACL Content page (see Figure 10-4), where you need to provide a Name. In the ACL Definitions rectangle box, define the actual ACE in the ACL which follows the same syntax as the extended ACL of the firewall. For example, to allow only Telnet traffic, the syntax for the ACL Definitions will resemble the following: Permit tcp any any eq telnet Figure 10-4. Shared Profile Components for Downloadable IP ACL Configuration  Click the Submit button of the Downloadable IP ACL Content page, which will bring you back to the Downloadable IP ACLs page. Here be sure that the newly created ACL Contents selects the proper firewall (NAS) for the Network Access Filtering. If you choose not to filter it based on a specific firewall, choose All-AAA-Clients, which is selected by default. Once the downloadable IP ACL is configured, you can apply this to as many users' groups as you want. To apply Downloadable IP ACL, go to Group Setup >. Select the Group, and then click on Edit Settings, which will display the Group Setup page. In the Group Setup page, from the Jump To drop-down box, choose Downloadable ACLs, which will take you to the Downloadable ACLs settings. Check the Assign IP ACL: checkbox, and from the drop-down box next to it, choose the Downloadable IP ACL name you have just created. Then click the Submit+Restart button. Firewall Configuration If you have configured the access-group command to apply ACLs to interfaces, be sure to use the per-user-override keyword. Otherwise, traffic for a user session must be permitted by both the interface ACL and the user-specific ACL. With the per-user-override keyword, the user-specific ACL determines what is permitted, not the interface ACL. The complete syntax for the access-group with the per-user-override argument is as follows: access-group access-list {in | out} interface interface_name [per-user-override]
Troubleshooting Cut-Through Proxy Authorization using the RADIUS Protocol To determine the currently authenticated users, the host IP to which they are bound, and any cached IP and port authorization information, use the show uauth command as follows: PIX# show uauth [username]
If you do not specify a username, all authenticated users' information will be displayed. Example 10-25 shows the output of the show uauth command when no user is authenticated. Example 10-25. Output of the show uauth Command With No Users Authentication PIX(config)# show uauth Current Most Seen Authenticated Users 0 0 Authen In Progress 0 1 PIX(config)#
|
When a user is authenticated, user authentication and authorization information can be found with the show uauth command, as shown in Example 10-26. Example 10-26. Output of the show uauth Command When Users Are Authenticated/Authorized PIX# show uauth Current Most Seen Authenticated Users 1 1 Authen In Progress 2 3 user 'kodom' at 192.168.2.2, authorized to: port 192.168.1.2/telnet absolute timeout: 0:05:00 inactivity timeout: 0:00:00 PIX-A# Jul 25 2005 09:03:19 : %PIX-7-111009: User 'enable_3' executed cmd: show uauth PIX#
|
Once you verify the user authentication, the next step is to verify whether the ACL tag is downloaded correctly to the PIX firewall. If PIX is configured with an ACL (not applied to any interface) and if the ACL tag is downloaded from the AAA server upon successful user authentication, the ACL should be applied for the authenticated users. This can be verified with the command shown in Example 10-27. Example 10-27. show access-list Command Output After Successful Download of ACL Name/Number for Allowing Telnet PIX# show access-list access-list AAA-user-cse; 2 elements access-list AAA-user-cse permit tcp any any eq telnet (hitcnt=1) access-list AAA-user-cse deny ip any any (hitcnt=0) PIX#
|
If the ACL content is downloaded from the RADIUS Server, the downloaded ACL looks like that shown in Example 10-28. Example 10-28. Output of the show access-list Command When the Content of the ACL Is Downloaded to the PIX from the RADIUS Server PIX# show access-list access-list #ACSACL#-PIX-cse_access_list-3cff1bb3; 2 elements access-list #ACSACL#-PIX-cse_access_list-3cff1bb3 permit tcp any any eq telnet (hitcnt=1) access-list #ACSACL#-PIX-cse_access_list-3cff1bb3 deny ip any any (hitcnt=0) 111009: User 'enable_15' executed cmd: show access-list PIX#
|
If the show uauth or show access-list command does not show you the output as expected, you can run the debug and analyze the log to see the reason for failure on the PIX firewall as on the Cisco Secure ACS Server. Example 10-29 shows the syslog for user authentication for only Telnet access and denial of other traffic when ACL content is downloaded from the CS ACS to the PIX firewall. Example 10-29. PIX Debugs for a Valid Authentication and Downloaded Access List PIX# show log . . . . . . 305011: Built dynamic TCP translation from inside: 192.168.1.2/11063 to outside:40.1.1.1/1049 109001: Auth start for user '???' from 192.168.1.2/11063 to 40.1.1.1/23 109011: Authen Session Start: user 'cse', sid 10 109005: Authentication succeeded for user 'cse' from 192.168.1.2/11063 to 40.1.1.1/23 on interface inside 302013: Built outbound TCP connection 123 for outside: 40.1.1.1/23 (40.1.1.1/23) to inside: 192.168.1.2/11063 (20.1.1.1/1049) (cse) . . . . . . PIX#
|
Following are some of the causes for an authorization failure with the RADIUS protocol for a cut-through proxy connection: Override keyword is missing from the access-group statement If you have an access-group applied on the interface, you need to ensure that you have the override optional argument configured in the access-group statement. Otherwise, traffic must be allowed by both interface ACL and per-user ACL configured on the PIX firewall. The syntax for the access-group statement is as follows: access-group access-list {in | out} interface interface_name [per-user-override] There is a mismatched ACL Name/Number between the PIX and CS ACS If you have configured the access-list on the PIX firewall, or the ACL name is defined on the AAA server, ensure that the names match each other. The name is case sensitive. Otherwise, the proper ACL will not be applied for the user traffic, which might result in unexpected behavior.
Accounting for Cut-Through Proxy You can use the following syntax to configure accounting for cut-through proxy connection: [no] aaa accounting {include | exclude} service interface-name local-ip local-mask foreign-ip foreign-mask server-tag
For example, to turn on accounting for all inbound traffic, you may execute the following command: PIX(config)# aaa accounting include any outside 0.0.0.0 0.0.0.0 0.0.0.0 0.0.0.0 AuthInbound
However, it is recommended to use the following syntax to configure cut-through proxy accounting: PIX(config)# [no] aaa accounting match acl-name interface-name server-tag
The following command shows how to turn on accounting for all inbound traffic using ACL. PIX(config)# access-list 150 permit ip any any PIX(config)# aaa accounting match 150 outside AuthRadius
If the accounting does not work as expected, you need to analyze the log on both the PIX firewall and on the AAA server. You need to first examine the debug output of the following command to see if the PIX is generating the accounting packets correctly or not: PIX# debug aaa accounting
Additionally, to see the interaction of accounting records from the PIX firewall to AAA server, you can use either of the following commands depending on the type of protocols you are using: PIX# debug radius PIX# debug tacacs
If the accounting appears to be working correctly on the PIX firewall, you can analyze the log on the AAA server to see if the problem is with the AAA server. If Cisco Secure ACS is used for AAA, refer to "Troubleshooting Cisco Secure ACS on Windows" for additional details. Extended Authentication (X-Auth) Issues for Remote Access VPN Connection Extended Authentication (X-Auth) is an enhancement of IKE version 1 for a Remote Access VPN connection that allows performing both user and group authentication. When X-Auth is configured on the PIX firewall (FWSM does not support VPN), users are prompted to enter username and password, which is either locally stored in the PIX firewall or in any external database, such as Cisco Secure ACS, ACE Server, NT domain and so on. Extended authentication is performed after IKE phase 1 and before phase 2. In phase 1, group authentication takes place, then X-Auth is performed. Right after X-Auth, if authentication is successful, mode configuration takes place, where PIX Firewall pushes configuration parameters for VPN clients, such as DNS Server IP, WINS Server IP, and so on. Beginning with PIX Firewall Version 5.2, X-Auth includes support for access-list which allows you to control what traffic needs to be encrypted and what traffic should be transmitted in clear text. The minimum VPN client version requirement is 2.5. This feature is called split-tunneling. If you have a requirement to allow the VPN client to connect to the internal network of the VPN Gateway using the secured tunnel, but want the rest of the traffic to go to the Internet in clear text from the VPN client, you need to configure split-tunneling. Beginning with PIX Firewall Version 6.2, the download of access-control lists (ACLs) from an AAA server to the PIX firewall is supported. This enables the configuration of a per-user ACL on an AAA server to provide per-user ACL authorization. It is then downloadable through the AAA server to the PIX firewall. This feature is supported for RADIUS servers only, not with TACACS+ servers. Configuration Steps With PIX Firewall versions earlier than 7.0, to apply x-auth, use the following command: [no] crypto map map-name client [token] authentication aaa-server-name [LOCAL]
With username, you can define local users on the PIX firewall. To use the local user database, use the key word LOCAL. Otherwise, define a AAA server and assign the same name defined in the preceding command. Beginning with PIX Version 7.0, you can define attributes for users who are locally created on the PIX firewall. Work through the steps that follow to configure the X-Auth for PIX Version 7.0 and above. | | Step 1. | Create the local user database and define the attributes for the user as shown in Example 10-30.
Example 10-30. Creating a Local User Database PIX(config)# username laurie nopassword privilege 15 PIX(config)# username laurie attributes ! DefaultGroupPolicy will be applied to this user PIX(config-username)# vpn-group-policy DefaultGroupPolicy ! Following are to set up the timeout values PIX(config-username)# vpn-idle-timeout 10 PIX(config-username)# vpn-session-timeout 120 ! This user will create IPSec tunnel PIX(config-username)# vpn-tunnel-protocol IPsec PIX(config-username)# exit PIX(config)# exit PIX#
|
To remove all attributes for a specific user, use the following command:
PIX(config)# no username laurie attributes
To remove a specific user, use the following command:
PIX(config)# no username laurie
To clear the username database from the firewall, use the following command:
PIX(config)# clear config username username cisco1 password jmINXNH6p1BxUppp encrypted privilege 15 PIX#
| | | Step 2. | Create a new tunnel group that supports IPsec remote access tunnels as shown in Example 10-31. Here you can specify whether you want to use the local user database or the external AAA server. Be sure that the external AAA server is configured before you attempt to define an AAA server.
Example 10-31. Creating a Tunnel Group of IPsec Remote Access PIX(config)# tunnel-group tungrp1 type ipsec-ra ! Now enter the general-attributes mode to define the AAA server. PIX(config)# tunnel-group tungrp1 general-attributes ! The following lines will turn on both authentication and authorization using ! local user database. PIX(config-general)# authentication-server-group LOCAL PIX(config-general)# authorization-server-group LOCAL ! Instead of using local user database, if you want to use RADIUS protocol, use ! the following commands to turn on authentication/authorization and accounting. ! Note that for authentication and authorization using RADIUS protocol is done ! in the same packet. So no need to have the authorization statement to turn on ! authorization. Authentication statement is sufficient. PIX(config-general)# authentication-server-group AuthRadius PIX(config-general)# accounting-server-group AuthRadius PIX(config-general)# exit ! If you want to assign IPSec specific attribute you can execute the following ! command which will provide you with the IPSec related attributes. PIX(config)# tunnel-group tungrp1 ipsec-attributes PIX(config-ipsec)#
|
Now to remove all general attributes for this tunnel group:
PIX(config)# no tunnel-group tungrp1 general-attributes
To remove our tunnel-group specifically by name:
PIX(config)# clear config tunnel-group tungrp1
To clear the tunnel-group database:
PIX(config)# clear config tunnel-group
| Step 3. | For accounting to work correctly, configure the following two commands:
PIX(config)# sysopt connection permit-ipsec PIX(config)# sysopt ipsec pl-compatible
|
Troubleshooting Techniques Troubleshooting AAA for the Remote Access VPN is very similar to of the troubleshooting described in the sections entitled "Firewall Management with AAA Troubleshooting" and "Cut-Through Proxy with AAA Troubleshooting," with some exceptions. As the connection type is VPN using IPsec, in addition to AAA troubleshooting, you also need to troubleshoot the VPN problem. To debug Remote Access VPN, you may want to refer to Chapter 7, "Troubleshooting IPsec VPN on PIX Firewalls." Following are the two commands that you need to use to troubleshoot IPsec VPN issues: PIX# debug crypto ipsec 5 PIX# debug crypto isakmp 5 PIX# debug crypto engine 5 PIX#
To troubleshoot AAA issues for the VPN connection, look at the log on VPN Client Log Window, debug on the PIX firewall, and the log on the AAA server. To turn on logging to the debug level on the VPN client, go to Start > Programs > Cisco Systems VPN Client > VPN Client. Then click on Log Settings and set User Authentication log to High. It is recommended that you also set all other classes to high if the tunnel is failed and you are uncertain about the reason of failure. Refer to Chapter 7, "Troubleshooting IPsec VPN on PIX Firewalls." To turn on debug level syslogging, refer to the "syslog" subsection of section entitled "Diagnostic Commands and Tools" in this chapter. Run the following command to get details about AAA problems: PIX# debug aaa authentication PIX# debug aaa authorization PIX# debug aaa accounting PIX# debug aaa vpn 5 PIX# debug radius
If you have authentication problems with the external RADIUS server, you might want to turn on local user database authentication to eliminate the possibility that the external AAA server is causing the problem. If local user database authentication works well, you need to analyze the log on the AAA sever. For Cisco Secure ACS troubleshooting, you need to analyze the package.cab file, which is discussed in Chapter 13, "Troubleshooting Cisco Secure ACS on Windows." |