Network Load Balancing
Network Load Balancing clusters are a feature of all versions of Windows 2000 Server and Windows Server 2003. This section details the specific configuration used as a role change or switch process for highly available SQL Servers or Analysis Servers, which might be different from how other programs utilize Network Load Balancing.
| More Info | For a basic look at Network Load Balancing, read Chapter 3. You can also find much more information on Network Load Balancing at the Cluster Technologies Community Center at http://www.microsoft.com/windowsserver2003/community/centers/clustering/default.asp. This site covers Windows NT 4.0, Windows 2000 Server, and Windows Server 2003. If you want direct access to white papers in the Community Center, they can be found at http://www.microsoft.com/windowsserver2003/community/centers/clustering/more_resources.asp#NLB. |
General Network Load Balancing Best Practices
This section describes some best practices and necessary information you need to know about Network Load Balancing:
-
You can have up to 32 nodes in a Network Load Balancing cluster.
-
There is the potential that Network Load Balancing can flood the ports with network traffic if you have a heavily used implementation. You must monitor this carefully . Windows Server 2003 introduces Internet Group Membership Protocol (IGMP) support, which limits flooding to only the ports used that have Network Load Balancing nodes. This allows non “Network Load Balancing nodes to not be affected by Network Load Balancing traffic. All other computers and servers can see the Network Load Balancing clusters, but no longer need to worry about the extra traffic.
-
Setting multicast increases the traffic generated by Network Load Balancing. Use unicast mode instead.
-
Network Load Balancing can be implemented over VLANs. This might also help segment the network traffic generated by Network Load Balancing to reduce flooding.
-
Network Load Balancing can work with one or two network cards. Two are not required, but you might want to consider two network cards if you are using unicast, because each node will have the same IP address, making them look identical from a network perspective.
-
All nodes need to be set to the same mode: unicast or multicast.
-
You can mix Windows 2000 Server and Windows Server 2003 servers in a Network Load Balancing cluster. However, if you are mixing versions, you might not be able to use things like IGMP support, which is a new feature of Windows Server 2003.
-
You can only bind Network Load Balancing to multiple network cards in Windows Server 2003. This is not possible in Windows 2000 Server.
-
Network Load Balancing does not support Windows Internet Name Service (WINS) resolution.
-
Network Load Balancing does not support dynamic DNS. You will have to add the name of the Network Load Balancing cluster to any DNS server if you are using name resolution.
-
If you are using remote administration of Network Load Balancing, UDP ports 1717 and 2504 are used. You should use Network Load Balancing Manager, and not a remote WLBS command, in Windows Server 2003.
-
You will need dedicated IP addresses for each node as well as for the Network Load Balancing cluster itself.
-
All nodes need to be in the same subnet.
-
All clients and servers accessing the Network Load Balancing cluster need to be in the same subnet.
-
You can use fault-tolerant network adapters (sometimes known as NIC teaming) with Network Load Balancing. For support information, consult Knowledge Base article 278431, INFO: Using NIC Teaming Adapters with Network Load Balancing May Cause Network Problems.
Implementing Network Load Balancing for SQL Server “Based Architectures
There are two scenarios in which you can employ Network Load Balancing with your SQL Servers. One is for load balancing read-only (no writes from applications or clients at all) databases; the other is using it as the front mechanism hiding a server name change in a disaster recovery scenario for log shipping, Analysis Services, or replication.
| On the CD | For a worksheet to fill in for your Network Load Balancing cluster configuration, see NLB_Cluster_Configuration_Worksheet.doc. |
| More Info | If you want to do an unattended install of Network Load Balancing, it is possible under Windows Server 2003. See the white paper at http://www.microsoft.com/technet/treeview/default.asp?url=/technet/prodtechnol/windowsserver2003/deploy/confeat/nlbclust.asp for details. |
Configuring the Network Cards
To configure your network cards, follow these steps:
-
Log on to the server as someone with administrator privileges who can configure Network Load Balancing.
-
Right-click My Network Places, and select Properties.
-
In the Network Connections window, select the network card that you wish to assign Network Load Balancing to. This should be on an externally facing network. You should also rename this network card to something such as Public Network. This can be done by selecting it, right-clicking, and selecting Rename. For the other network card, you should rename it something like Private Network to designate that it is the dedicated network between the servers participating in Network Load Balancing.
-
Select the Public Network network card, right-click it, and select Properties.
-
Select Internet Protocol (TCP/IP) and click Properties. Set the static IP address of the card to a valid IP address on the externally facing network. Click OK.
-
Click OK to close the Properties dialog box for the public network.
-
In the Network And Dial-Up Connections window, select the private network, right-click it, and select Properties.
-
Select Internet Protocol (TCP/IP) and click Properties. Set the static IP address of the card to a valid IP address (such as 10.0.0.1) on the internal-only network. Click OK.
-
Click OK to close the Properties dialog box for the private network.
-
Repeat this process for all nodes in the Network Load Balancing cluster.
Configuring Network Load Balancing for Use with SQL Server
To use Network Load Balancing with SQL Server, you must adhere to all of the following guidelines:
-
Two network cards must be installed in each computer. One of these cards must be dedicated to a private network that is not routable from the public network, similar to that of a server cluster.
-
Network Load Balancing is installed on only the externally facing adapter.
-
TCP/IP is the only network protocol present on the cluster adapter. Do not add any other protocols (such as IPX) to this adapter.
-
Only unicast is supported. If only one network adapter is used, no intercluster communications can occur.
-
For a switch situation (not read-only load balanced SQL Servers), all hosts are set to not start automatically. This ensures that, in the event of a switch, the nodes are not available. You must manually start Network Load Balancing.
-
In dual- homed configurations, network adapters are nonroutable to each other.
On the CD For instructions on configuring Network Load Balancing for use when facilitating a server change for log shipping, replication, and Analysis Services, see the file Installing_NLB_For_A_Server_Switch.doc. For instructions on configuring Network Load Balancing for load balancing read-only SQL Servers, see the file Installing_NLB_For_ Read_Only_SQL_Servers.doc.
Starting Network Load Balancing on the Primary
With Windows 2000 Server, to start Network Load Balancing on the first node, open a command window and type wlbs start , as shown in Figure 5-23. If this is a read-only load balanced use of SQL Server, execute this on each node.
Figure 5-23: Starting NLB under Windows 2000 Server.
Under Windows Server 2003, select the node in Network Load Balancing Manager, right-click the node, select Control Host, and then select Start. You can also accomplish this by selecting the Host menu, Control Host, and then Start. Once started, Network Load Balancing Manager should look like Figure 5-24.
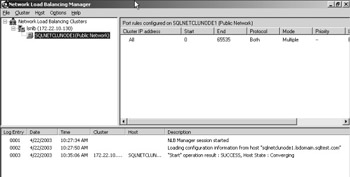
Figure 5-24: Starting NLB under Windows Server 2003.
Verifying a Network Load Balancing Cluster
Once you install your configuration, you need to verify it is working properly.
Switch Method
To verify a Network Load Balancing cluster using the switch method, follow these steps:
-
In the command window on each node, type wlbs display for Windows 2000 Server. You should see a message about your current Network Load Balancing parameters. If this is Windows Server 2003, you should also see a message reflecting the fact that Network Load Balancing has been started in Network Load Balancing Manager.
-
Type the command ping w.x.y.z where w.x.y.z is the IP address of your Network Load Balancing cluster. This should be successful. Repeat this step from client machines, other servers, and other nodes to ensure connectivity.
-
If you are resolving by name, type the command ping nlbname where nlbname is the name of your Network Load Balancing server. This should be successful. Repeat this step from client machines, other servers, and other nodes to ensure connectivity. Only perform this step if you have manually added your NLB cluster to DNS.
-
On your first node s SQL Server, create a database with one table and one column with a unique value.
-
On the other nodes, repeat Step 4 but add another unique value to the instance on that server and use the same name to create the database.
-
Open Query Analyzer from anywhere . When connecting to the SQL Server, use the Network Load Balancing cluster name or the Network Load Balancing cluster IP address.
-
Query for the unique record. Currently, it should get that value from the first node.
-
In the command window for the first node, type the command wlbs drainstop using Windows 2000 Server, or using Windows Server 2003, select the node, right-click it, and select Control Host, and then Drainstop. This clears all connections to that node.
-
To verify that the process is done, type wlbs query in Windows 2000 Server or look at the status window in Network Load Balancing Manager to ensure that everything is okay with Network Load Balancing.
-
In the command window of the next node, type wlbs start under Windows 2000 or use Network Load Balancing Manager under Windows Server 2003 to start Network Load Balancing on the new node.
-
Reissue your query to see that the unique value of the second node is displayed.
-
Repeat Steps 6 “11 for each subsequent node.
Read-Only SQL Servers
To verify a Network Load Balancing cluster for a read-only SQL Server, follow these steps:
-
In the command window on each node, type wlbs display . You should see a message about your current Network Load Balancing parameters. If this is Windows Server 2003, use Network Load Balancing Manager to check the status and parameters for Network Load Balancing.
-
Type the command ping w.x.y.z where w.x.y.z is the IP address of your Network Load Balancing cluster. This should be successful. Repeat this step from client machines, other servers, and other nodes to ensure connectivity.
-
If you are resolving by name, type the command ping nlbname where nlbname is the name of your Network Load Balancing server. This should be successful. Repeat this step from client machines, other servers, and other nodes to ensure connectivity.
-
On your first node s SQL Server, create a database with one table and one column with a unique value.
-
On the other nodes, repeat Step 4 but add another unique value to the instance on that server and use the same name to create the database.
-
Open Query Analyzer from anywhere. When connecting to the SQL Server, use the Network Load Balancing name or the Network Load Balancing IP address.
-
Query for one of the unique records.
-
Reissue your query to see that the unique value of another node is displayed. With enough refreshes, you should eventually see all unique values.
-
Repeat Steps 6 “8 for each subsequent node.
Adding a Network Load Balancing Cluster to DNS
Once your Network Load Balancing cluster is installed, there are a few remaining tasks to perform. You need to add your Network Load Balancing cluster name manually to DNS. Depending on your DNS vendor, this procedure will vary. After you configure your Network Load Balancing cluster, you must manually update DNS to resolve the cluster name. Network Load Balancing does not utilize dynamic DNS updates when it is configured. You might also need to add it to the reverse lookup zone of your DNS as well.
Configuring Logging for Network Load Balancing Manager
When you are using Network Load Balancing Manager, you can log all commands issued to a log file. This creates a permanent record of all Network Load Balancing commands issued. To configure this option, perform the following steps:
-
Start Network Load Balancing Manager.
-
From the Options menu, select Log Settings.
-
In the Log Settings dialog box, shown in Figure 5-25, select the Enable Logging check box. In the Log Filename text box, enter the name and path of the log file. If you do not specify a path name, the file is created in the C:\Documents and Settings\ username directory, where the username is the name of the person currently logged into the server. Click OK.
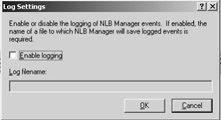
Figure 5-25: Log Settings dialog box.
Uninstalling Network Load Balancing
Under Windows Server 2003, in Network Load Balancing Manager, select the cluster name in the upper left pane. From the Cluster menu, select Delete, or right-click the cluster name and select Delete. You are then asked if you want to remove Network Load Balancing from all nodes, as shown in Figure 5-26. Click Yes.
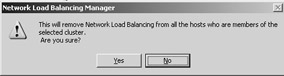
Figure 5-26: Removing NLB confirmation.
When you are finished, the log entries in Network Load Balancing Manager should appear similar to the ones shown in Figure 5-27.
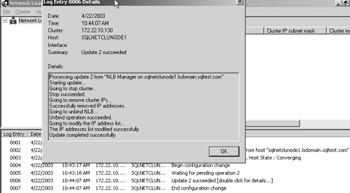
Figure 5-27: Network Load Balancing Manager after removing Network Load Balancing.
EAN: 2147483647
Pages: 137
- ERP Systems Impact on Organizations
- The Second Wave ERP Market: An Australian Viewpoint
- The Effects of an Enterprise Resource Planning System (ERP) Implementation on Job Characteristics – A Study using the Hackman and Oldham Job Characteristics Model
- Distributed Data Warehouse for Geo-spatial Services
- Intrinsic and Contextual Data Quality: The Effect of Media and Personal Involvement