Basic 3D Rotation using Scaling
A lot of fake 3D rotation effects involve scaling. Here's the simplest way to achieve this effect using tweening:
-
Start a new movie (CTRL/CMD+N) and set the stage size to 400x300px and the frame rate to 24 fps, as you did in the previous example.
-
Select a stroke and fill color of your liking ”we've chosen black for the stroke and orange ( #FF6600 ) for the fill. Now draw a circle using the Oval Tool (O), remembering to hold down the SHIFT key to constrain it to a circle.
-
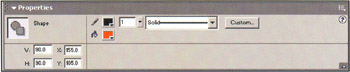
Using the Arrow Tool (V), double-click on the fill of your circle to select both the fill and the stroke and, using the Property Inspector, set both the width (W) and height (H) of your shape to 90:
-
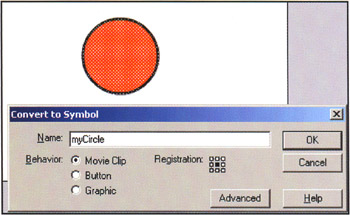
With both the fill and stroke of your circle still selected, convert it to a movie clip symbol by pressing F8, and call it myCircle .
-
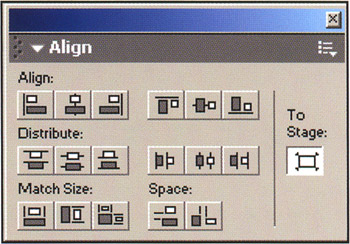
With your newly created instance of the myCircle symbol selected on stage, open up the Align panel if it isn't already showing ( Window > Align or CTRL/CMD+K). Click the To Stage button to align your movie clip in relation to the stage and click the Align horizontal center and Align vertical center buttons to center your circle on the stage.
-
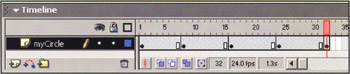
In the timeline, rename the default layer 1 to myCircle and then, in turn , click on frames 8, 16, 24, and 32 in the timeline and press F6 (or Insert > Keyframe ) for each one to create five keyframes in total. Your animation will last 32 frames and, at 24 fps, it will take a little over 1 second.
-
Now click on the frame 8 to select the myCircle movie clip and, holding down the SHIFT key to ensure that the movie clip moves in increments of 10 pixels instead of 1, press the right arrow key 12 times to move the circle toward the right edge of the stage.
-
Click on frame 24 and repeat the instructions in step 7, but this time in the opposite direction to bring the circle near the left edge of the stage. If you drag the playhead all the way through your animation at this point, you should see the circle start in the center, jump to the right, jump back to the center, jump to the left and, finally, jump back to the center again.
-
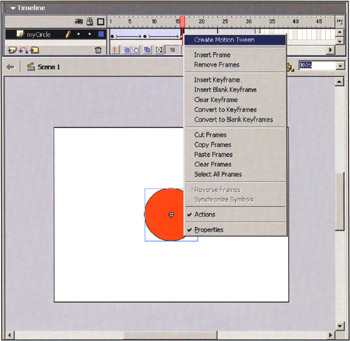
To smooth out the motion, you need to create motion tweens between the keyframes. To do this, right-click (CTRL+click on a Mac) on each of the keyframes and select Create Motion Tween from the context-sensitive menu:
-
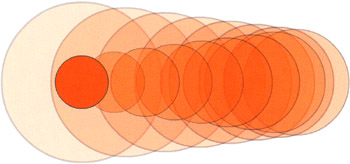
If you test the movie at this point, you should see the circle animate from one side of the stage to the other and return to rest in the middle. Let's now add some 3D magic! As always, this is going to involve some scaling. Click on frame 8 and select Modify > Transform > Scale And Rotate... (CTRL/CMD+ALT/OPT+S). Leaving the Rotation setting at zero, enter 66 for the Scale setting and click OK .
-
Next click on frame 16 and repeat the instructions in step 10. This time, however, set the Scale setting to 33%. Finally, click on frame 24 and, once again, set the scale to 66%.
-
Now test the movie ( Control > Test Movie or CTRL/CMD+ENTER) and you should see the circle appear to rotate around the y-axis. There are two problems with the animation at this point. First, it appears to stop slightly when it reaches the end of the animation, before looping around. Second, the transitions from one quadrant of the animation to the next are too abrupt. You'll fix these next.
-
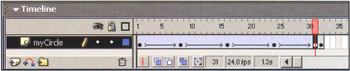
The first issue arises because the last leg of the animation contains an extra frame: the last keyframe loops back to the first keyframe and the circle is in exactly the same position in both, leading to it appearing to halt momentarily as the animation loops . The way to fix this is to select the frame immediately before the last keyframe (frame 31 here) and make it into a keyframe. So click on frame 31 and press F6:
-
Now all you need to do is remove the keyframe on frame 32. To do this, click on frame 32 and select Insert > Remove Frames (SHIFT+F5). Why anyone would put an option that begins with Remove under a menu called Insert is beyond us! Perhaps this is why we use keyboard shortcuts almost exclusively in Flash and why we've taken care to include them in these examples ”they will save you a lot of time and mousing around in the long run. Additionally, you can access many options in Flash by using the right-click/CTRL-click context-sensitive menus .
-
If you test the movie at this point, you should see that steps 13 and 14 have fixed the first issue and that the animation loops perfectly . Now let's tackle the second issue: the abrupt change of directions. These happen because you aren't easing your tweens.
Yes, ladies and gentlemen, you need to ease your tweens. Easing refers to the acceleration of motion in our animations. When you ease in from a keyframe, the motion in your animation gradually speeds up as it gets further away from the keyframe. Conversely, when you ease out from a keyframe, the motion in your animation gradually slows down as it approaches the next keyframe. Easing is central to both traditional animation and animation with Flash. Using a combination of easing in and out, you can create all sorts of effects.
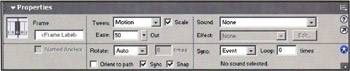
For this example's purposes, you're going to alternately Ease In and Ease Out of your keyframes. This will create a sort of gravity at these points, smoothing out the motion and lending some added authenticity to your effect. To start off, click on frame 1 and set the Ease value for the keyframe to 50 using the Property Inspector.
-
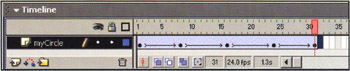
Repeat by setting the Ease value at -24 for frame 8, 50 for frame 16, and -50 for frame 24. Leave the Ease value for frame 31 at .
-
Test the movie (CTRL/CMD+ENTER) and you should notice that the motion appears smoother. This finished example can be found in the sample files as basic_tweened_rotate.fla . Experiment with some other ease settings to see how they affect the motion, trying to get the change of directions as smooth as possible.