3D Scaling Text with Atmospheric Perspective
Although the crux of this chapter concerns manipulating scale to create 3D effects, there are other important aspects besides the size of objects that will affect the realism of your 3D scenes. These are factors that have been observed on Earth, where the atmosphere interferes with and degrades our vision. Specifically, atmospheric interference causes our eyes to see objects that are far away with less contrast, detail, and focus than those that are close by. Leonardo da Vinci called this "the perspective of disappearance." You may have seen this effect used many times under the guise of the popular 3D scaling text effect. Due to the computational and bandwidth costs of blurring objects in Flash, you are going to simulate loss of contrast, detail, and focus in a different way: by manipulating the opacity, or alpha property, of the text along with its scale.
-
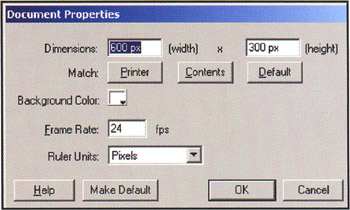
Create a new movie (CTRL/CMD+N), and then click the Size button in the Property Inspector to bring up the Document Properties box. Now set the stage size to 600x300px and the frame rate to 24 fps, as shown at right.
-
Using the Text Tool (T), enter whatever text you'd like to feature in your 3D effect. Type the text at the final size that you want it to scale to (in other words, large rather than small), and position it as you want it to appear in the final frame of the animation. We used 96pt Arial, Bold.

-
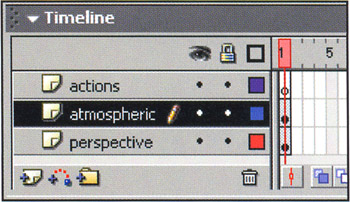
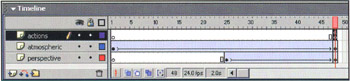
Make sure that you put each word, phrase, or sentence that you want to scale separately in its own layer. As you can see, for this example we're scaling two words ”Atmosph eric and Perspective ! ”so we've placed them in layers named likewise. Don't be afraid to be blatantly obvious when setting up your Flash movies-it's much better than being cryptic! We've also added an actions layer, since we'll need to stop() the animation once it reaches the end (we'll cover this shortly).
-
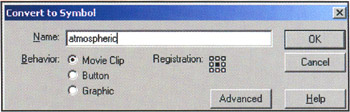
Before you start to animate the text, you need to change each word into a movie clip. In addition to being good practice, this will help when it comes time to scale the text since, in Flash, text is scaled from the lower-left corner and youwant your text to scale from the center out. Converting the text to movie clips will automatically allow us to do this since the registration point of movie clips is set to the center of the clip by default.
To convert the word Atmospheric to a movie clip, click on frame 1 of the atmospheric layer to select all objects on that frame ”in this case, the solitary word ”and press F8. Call the movie clip atmospheric , and repeat this for the Perspective ! text, calling the movie clip perspective .
-
Let's start animating now. Click on frame 48 of the atmospheric layer and insert a keyframe ( Insert > Keyframe or F6). Repeat this for the perspective layer. Since your frame rate is 24 fps, the animation will take 2 seconds:
-
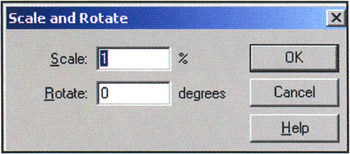
Now click back to frame 1 of the atmospheric layer to select the atmospheric movie clip. Initially, you want the text to start out tiny and zoom in, so resize the clip using Modify > Transform > Scale And Rotate (CTRL/CMD+ALT/OPT+S) and setting the Scale to 1%.
-
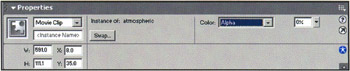
Click on the atmospheric movie clip in frame 1, and click on its instance in the canvas (now very small) to bring up its details in the Property Inspector. Choose Alpha in the Color drop-down menu and set it to 0%. This is going to create the atmospheric perspective effect by making the text appear to fade in as it gets closer.
-
To actually make the text scale up and fade in, make sure that one of the frames between 1 and 48 are selected in the timeline and use Insert > Create Motion Tween. (You can also create a motion tween from the Property Inspector by choosing Motion from the Tween drop-down.)
-
Repeat Steps 6 to 8 for the perspective layer. You can test the movie at this point to see the effect. The two words should scale up in a perfectly synchronized animation that loops .
-
To make the motion more interesting (and appear to arc slightly as the text scales ), select the atmospheric movie clip in frame 1 and move it down slightly. Do the opposite with the perspective movie clip (nudge it up) so that they start out from approximately the same place. For our purposes, this will be the horizon.
-
Let's also separate the two animations a little. Click on the keyframe on the perspective layer (frame 1) to select it. Click (again) and drag it to frame 25.
-
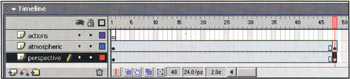
Finally, let's stop the animation after it has played through once by adding a stop action to frame 48 of the actions layer. Click on frame 48 of this layer and insert a blank keyframe (F7). Click on the newly created keyframe and type stop() ; in the Actions panel ( Window > Actions or F9 if it's not already open ). Once you're done, your timeline should resemble the one below:
Test the movie and you should see the text scale up and fade in from a single vanishing point:

There are times when making objects transparent will not work within the context of your movies. A variant on this effect would be to animate the color of the movie clip from a washed-out bluish-gray to its actual color as it gets closer to our view. Objects that are further away also have denser textures and appear out of focus. Re-creating these effects in Flash, however, usually requires the use of multiple prerendered bitmaps and can be both CPU- and bandwidth- intensive . Be sure to check out Chapter 7 for some more neat tricks along the lines of manipulating text in pseudo-3D space.