Working Through an Extension Development Example
| < Day Day Up > |
| With the introduction of Firefox version 1.5, extension development has been made a bit easier. The contents.rdf files are gone, replaced by an easier-to-understand chrome.manifest file. In the following paragraphs, you will build a simple extension that works with most versions of Firefox below version 1.5 and a second extension for Firefox version 1.5 and later. The basic functions of these two extensions are identical: You add a menu item and a call to a relatively trivial JavaScript piece of code. These examples have been kept as simple as possible, with the intention that they be easy to learn and implement. After you gain more experience, you can either add to these examples or create your own from scratch. First, we will describe items that are common to all versions of Firefox. Following this, we will discuss the version-specific bits and pieces. You will need a few helper batch files. One batch file will package your extension, creating your JavaScript Archive (JAR) contents file and the extension's XPI installation file. This batch file will then call another batch file that will clear Firefox's profile, restoring it to a known starting point. For extensions, the best starting point is with no extensions or themes installed. Development Profile Save and RestoreFirst, start Firefox with the -profilemanager command-line option. This starts the Profile Manager. In the Profile Manager, create a new profile, naming it Testing Profile. Next, set your development preferences as described previously in the section "Preferences for Extension Developers." If you want to set a home page, do so now. After your preferences (and home page, if desired) are set, exit Firefox. Some developers might want to also load the Extension Developer extension; if you do, do this before exiting Firefox. Restart Firefox and ensure that your setup is what you want and that any necessary extensions are loaded (and functional). Then exit Firefox again. Now you will create a backup copy of your profile. The easiest way to back up your profile is to open a Windows Explorer window and navigate to Firefox's profiles folder (for example, in Windows XP, it's Documents and Settings\user-id\Application Data\Mozilla\Firefox\Profiles). Right-click the profile you created there should be only one profile at this point if you have started with a clean Firefox installation and deleted any preexisting profiles. Next, drop it in the same folder and select Copy Here from the pop-up context menu Windows Explorer displays. You will then have a second copy of the profile with an additional extension of .bak added to the profile's name. Make a note of this backup copy's name. Now repeat the copy again and save the third copy with the extension .backup. This third copy is your emergency recovery copy. Next, you need to configure a development folder. The Development FoldersYou must create a folder to hold your new extension. Although you probably will develop your extension by using an existing extension as a foundation to build upon, let's take a look at what the folder structure for this sample extension looks like. MyExtension's Root FolderYour new extension needs a name. I've picked the name MyExtension as the name for the extension. After you have a name for the extension picked out, the extension will need a home. The name for this top-level folder is not critical. Other subfolder names will be significant, but the topmost level folder can have any convenient name, usually the same name as your extension. Note There is nothing to say that your extension can not have more folders than those described here. However, most extensions have these two subfolders as a minimum. As well, none of the folder names are absolute you can use other names if you want. The names given here are simply those used by many developers of Firefox extensions. In My Documents, I created my MyExtension folder. In this folder we need two subfolders. The first is named content, and the second is called chrome. We now have these folders:
Contained in the root folder will be two or three project files: the install.rdf file, the extension's .xpi file, and (for Firefox 1.5 and later) the chrome.manifest file. Caution Windows programmers are used to having filenames and folder names that are not case specific. So, for a Windows programmer, MyExtension is the same as myExtension and myextension. However, Firefox might not always be so forgiving. A good rule of thumb is to be case conscious when working with Firefox extensions. contentThe content folder is where you will put your working copies of the extension's files. In MyExtension the three files in the contents folder are
More complex extensions will have more files in the contents folder. chromeThe chrome folder will hold the extension's JAR file. Most extension developers use the chrome folder only to hold the JAR file, and nothing else. However, this name is significant to Firefox, so you should not put your JAR file anywhere else. Extension FilesWith the folders created, next you need a few files. Your extension is rather simple, so you only have a few files that must be created for it. extension.XPI, the Extension Distribution FileAll extensions are distributed using XPI files. The definition of an XPI file is that it is a Mozilla extension distribution file, although that tells little of what it really is. XPI files are, for all intents and purposes, simply renamed Zip files. You can create them in several ways. My method uses the WinZip command-line interface driven by a batch file. (I will go more into depth regarding this batch file later in this chapter.) Contained in the XPI file will be a minimum of two files:
More complex extensions might have other files that are used as part of the installation process. An example is the Google Bar extension that also has install.js and googlebar.js. All the root files in the XPI file are used for the extension's installation. The extension's actual functionality is always contained within the JAR file. The following paragraphs cover the contents of the XPI file for this chapter's extension project (see Figure 16.12). Figure 16.12. This extension has only install.rdf and the extension's JAR file for contents.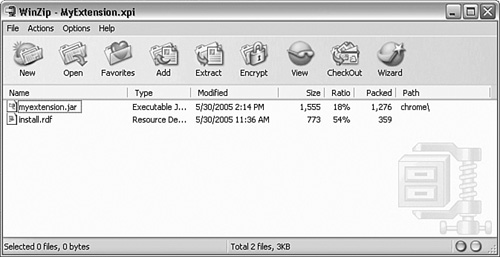 extension.jar, the Extension's JAR FileContained within the extension's JAR file are all the files that make up the extension. Some of the files often found in a JAR file include XUL, RDF, JavaScript, and various image files. The files contained in this extension's JAR file are shown in Figure 16.13. Figure 16.13. The JAR file contains the actual extension's working code.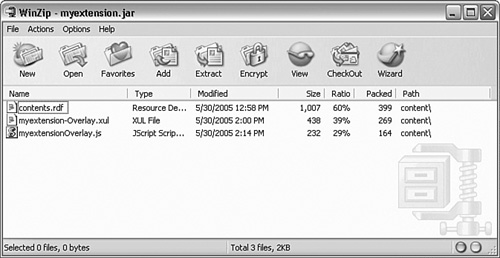 There will be two or three files in the JAR:
Other Files for Extension DevelopersA few other files can be used to streamline the extension packaging process. If you want to use it, the Extension Developer extension also provides this functionality. The first supporting file is named makexpi.bat (see Listing 16.2). This is a command batch file that calls the command-line version of WinZip to create both the JAR file and the XPI file. Optionally, this batch file can do other cleanup tasks as well. Comments have been added to this file to make its function clearer. Note The makexpi.bat file depends on WinZip and the command-line interface. Both are available at the WinZip website (http://www.winzip.com). By default, WinZip and the command-line interface, wzzip.exe, are installed in C:\program files\winzip. If you want to use another Zip-type program, such as TUGZip, makexpi.bat must be modified accordingly. Listing 16.2. The makexpi.bat File@echo off If X%1 == Xhelp ( Echo makexpi [firefox] Echo where specifying firefox builds for Firefox 1.1.x and later. Echo if no parameter is specified this will build Echo a Firefox version 1.0.x and earlier Echo extension. goto end ) REM the debug.txt file holds the output from all the commands. REM This keeps execution cleaner. time /T >debug.txt REM - Create the JAR file first. WinZip will add or create as necessary. echo Refreshing the JAR file! >>debug.txt REM This line is for versions of Firefox 1.0.x and earlier. If X%1 == Xfirefox ( "%programfiles%\WinZip\wzzip" -a -r -P chrome\myextension.jar content In Listing 16.3, you must change the parts in bold to whatever filenames you want for your extension. Listing 16.3. The clearprofile.bat File@echo off Rem you *must* fix the profile name below (in bold) to match your profile name! RD /s /q "%appdata%\Mozilla\Firefox\Profiles\jvaofcos.Testing Profile" MD ""%appdata%\Mozilla\Firefox\Profiles\jvaofcos.Testing Profile" xcopy /s /y ""%appdata%\Mozilla\Firefox\Profiles\jvaofcos.Testing Profile.bak" "%appdata% In Listing 16.3, you must change jvaofcos.Testing Profile to reflect the name of the Firefox profile you created for testing and debugging purposes. An Extension for Firefox 1.0.xFirefox 1.0.x represents versions of Firefox before 1.5. Some users have not switched to Firefox 1.5 due to concerns that their favorite extensions and themes will not be compatible with the newer version. Firefox 1.0.x does not support the chrome.manifest format (we'll talk about chrome.manifest later). Thus, any extension for these platforms require the more complex contents.rdf file. This makes these extensions slightly more complex. First, for your extension, you will create some folders. The first folder will be the extension's root folder. In the extension root folder, you will create two additional folders, chrome and content. In this example, you have to create or modify four files: install.rdf, contents.rdf, myextension-Overlay.xul, and myextensionOverlay.js. I've listed each of these files in the following sections, showing the parts that are relatively generic and those areas that you'd rewrite or enhance for your extension. install.rdfThe install.rdf file is the file Firefox uses to install the extension (see Listing 16.4). This file describes the extension and provides Firefox with the name and location for the extension's JAR file. Listing 16.4. install.rdf <?xml version="1.0"?> <RDF xmlns="http://www.w3.org/1999/02/22-rdf-syntax-ns#" xmlns:em="http://www.mozilla.org/2004/em-rdf#"> <Description about="urn:mozilla:install-manifest"> <em:id>{71536D06-A8BD-411a-BC0C-15C1FDB7DF2A}</em:id> <em:version>0.1.05</em:version> <em:targetApplication> <Description> <em:id>{ec8030f7-c20a-464f-9b0e-13a3a9e97384}</em:id> <em:minVersion>0.9</em:minVersion> <em:maxVersion>1.0</em:maxVersion> </Description> </em:targetApplication> <em:name>My Extension</em:name> <em:file> <Description about="urn:mozilla:extension:file:myextension.jar"> <em:package>content/</em:package> </Description> </em:file> </Description> </RDF> In the install.rdf file, you must provide a new GUID for your extension. My GUID was 71536D06-A8BD-411a-BC0C-15C1FDB7DF2A, and it is in bold in the listing. Please don't just change a few numbers trying to make your own GUID; use a generator as described previously to make a new GUID. The minVersion and maxVersion need to be changed to reflect for which versions of Firefox your extension is designed. The defaults in Listing 16.4 are what you should use for versions of Firefox before 1.5.
The name My Extension should be changed to the name of your extension. Spaces are acceptable, and no quotation marks are needed. The JAR filename, myextension, must be the same as the JAR file created by makexpi.bat. Everything else in install.rdf should remain the same. contents.rdfThe contents.rdf file needs some modifications, as shown in Listing 16.5. Listing 16.5. contents.rdf<?xml version="1.0"?> <RDF:RDF xmlns:RDF="http://www.w3.org/1999/02/22-rdf-syntax-ns#" xmlns:chrome="http://www.mozilla.org/rdf/chrome#"> <RDF:Seq about="urn:mozilla:package:root"> <RDF:li resource="urn:mozilla:package:myextension"/> </RDF:Seq> <RDF:Description about="urn:mozilla:package:myextension" chrome:displayName="My Extension" chrome:author="Peter D. Hipson" chrome:authorURL="http://www.hipson.net" chrome:name="myextension" chrome:extension="true" chrome:settingsURL="chrome://myextension/content/settings/settings.xul" chrome:description="Add a menu item to Files in Firefox."> </RDF:Description> <RDF:Seq about="urn:mozilla:overlays"> <RDF:li resource="chrome://browser/content/browser.xul"/> </RDF:Seq> <!-- overlay information for Mozilla Firebird--> <RDF:Seq about="chrome://browser/content/browser.xul"> <RDF:li>chrome://myextension/content/myextension-Overlay.xul</RDF:li> </RDF:Seq> </RDF:RDF> In Listing 16.5, the lines starting with chrome: should be changed as appropriate. The chrome:name value should match the name in chrome:settingsURL and in the chrome://myextension line. The myextension-Overlay name should match the name of your extension's XUL file. Mozilla conventions say that overlay should be part of the name. myextension-Overlay.xulYou need to modify the myextension-Overlay.xul file as shown in Listing 16.6. This filename needs to match the name in the contents.rdf file (refer to Listing 16.5). This file is identical for all versions of Firefox. Listing 16.6. myextension-Overlay.xul<?xml version="1.0"?> <overlay docEmphStrong">MyExtensionOverlay" xmlns="http://www.mozilla.org/keymaster/gatekeeper/there.is.only.xul"> // Include the Javascript <script type="application/x-javascript" src="/books/1/225/1/html/2/chrome://myextension/content/myextensionOverlay.js"> </script> <menupopup > <menuitem label="My Extension" position="1" oncommand= "myextensionmessage();" /> </menupopup> </overlay> In the myextension-Overlay.xul file, you must give the overlay a name. Change MyExtensionOverlay to a name that suits your extension's name. In the chrome: line, the myextension should be changed to match the chrome:name in the contents.rdf file. The menuitem line needs to reflect whatever chrome changes your extension is doing. I'm adding a menu item, but you might be doing something different. The myextensionmessage() call to JavaScript must match your JavaScript functions, if you use JavaScript, or whatever way you choose to add functionality to the menu item. myextensionOverlay.jsThe myextension.js file contains the JavaScript code to give my extension its functionality (see Listing 16.7). In the listing, you would rename it to match the name in the myextension.xul file. This extension is trivial it just displays a message box using the JavaScript alert() function call. This file is the same for all versions of myextension. Listing 16.7. myextension.js // An example of some JavaScript functionality. // You could code virtually any functionalty that // JavaScript supports here: function myextensionmessage() { alert(" ...and, it worked! "); } If you decide to use JavaScript in your extension, you could use this file to hold your JavaScript functionality. As extensions grow more complex, additional JavaScript source files might need to be added. An Extension for Firefox 1.5Firefox 1.5 and later versions are compatible with extensions written for earlier versions of Firefox. However, it is best to adhere to the new extension conventions as described here. In this sample extension, both myextension.js and myextension-Overlay.xul won't change based on versions of Firefox. For the contents of these two files, refer to the previous section. In addition to these two files, two other files exist in the Firefox 1.5 version of this sample extension. One file (install.rdf) will be modified, whereas the other (chrome.manifest) will be added to your extension. The file contents.rdf is no longer used. If Firefox finds a contents.rdf file and does not find chrome.manifest (for example, an old extension written for earlier versions of Firefox), a chrome.manifest file is created from the contents.rdf file. install.rdfBecause some of the changes to install.rdf will be new even to experienced extension writers, let's cover them in detail. First, Listing 16.8 shows the new install.rdf file. Most of the changes in install.rdf involve the addition of lines and some minor rearranging of content. Listing 16.8. install.rdf <?xml version="1.0"?> <RDF xmlns="http://www.w3.org/1999/02/22-rdf-syntax-ns#" xmlns:em="http://www.mozilla.org/2004/em-rdf#"> <Description about="urn:mozilla:install-manifest"> <em:id>{71536D06-A8BD-411a-BC0C-15C1FDB7DF2A}</em:id> <em:version>0.1.05</em:version> <em:targetApplication> <Description> <em:id>{ec8030f7-c20a-464f-9b0e-13a3a9e97384}</em:id> <em:minVersion>1.0</em:minVersion> <em:maxVersion>1.5+</em:maxVersion> </Description> </em:targetApplication> <!-- Front End MetaData --> <em:name>My Extension</em:name> <em:creator>Peter D. Hipson</em:creator> <em:description>Add a menu item to Files in Firefox. </em:description> <em:homepageURL>http://www.hipson.net</em:homepageURL> <em:updateURL>http://www.hipson.net</em:updateURL> <em:file> <Description about="urn:mozilla:extension:file:myextension.jar"> <em:package>content/</em:package> </Description> </em:file> </Description> </RDF> In addition to the name and GUID changes outlined in Listing 16.8, in versions of Firefox earlier than 1.5, you need to make the following changes to your install.rdf file. You should create a new section, preceded by the following comment line: <!-- Front End MetaData --> This comment indicates that data for your extension follows. Next, add four lines that take data that was in your contents.rdf file and place them in install.rdf. The format of the lines will change we are only interested in the extension-specific data that has been highlighted in the listing. The <em:name>My Extension</em:name> remains the same as the previous example: <em:creator>Peter D. Hipson</em:creator> The em:creator line takes the data that was in the contents.rdf file's chrome:author line. No quotes are needed for this field: <em:description>Add a menu item to Files in Firefox. </em:description> The em:description line takes the description that was in the chrome:description line in the contents.rdf file: <em:homepageURL> http://www.hipson.net</em:homepageURL> The data in em:homepageURL is the chrome:authorURL data from contents.rdf: <em:updateURL>http://www.hipson.net</em:updateURL> The em:updateURL data was not present in the sample contents.rdf file and simply specifies where to look for updates to this extension. chrome.manifestThe chrome.manifest file is new to Firefox 1.5 (see Listing 16.9). It is intended to replace the complex and often problematic contents.rdf file with something that's easier to work with. This file, in this example, has just two lines, making it considerably shorter than contents.rdf. The file is a simple text format, created with Notepad or your favorite text editor. Listing 16.9. chrome.manifestoverlay chrome://browser/content/browser.xul chrome://myextension/content A chrome.manifest file has, at a minimum, the lines shown in Listing 16.9. Some additional lines might be present in a more complex extension's chrome.manifest file. These potential lines are listed in the following, along with a description. Compare these specification lines with the lines in Listing 16.9 to see how the parameters would change. Items in bold would change to match your extension. The content package line describes the extension (packagename) and the location of the extension's JAR (or other content) file: content packagename path/to/files In the chrome.manifest file, the path/to/files was jar:chrome/myextension.jar!/content/. The exclamation point after the JAR file's extension is required, so don't forget it. The locale package line specifies the locale name and the path to that locale's files. This line is required in chrome.manifest: locale packagename localename path/to/files An example of this line is locale myextension en-US jar:en-US.jar!/locale/en-US/myextension. In this example, en-US is the locale identifier for English in the United States. The en-US.jar file is the JAR file containing elements specific to the locale and the location in that JAR file of the necessary content. This file is optional in chrome.manifest. The skin package line specifies the extension's skin (think theme) location. Again, it includes the package name and a path to files that would be similar to that in the previous examples: skin packagename skinname path/to/files The XUL overlay package line specifies the extension's XUL overlay's location. There is a path to the chrome for this extension: overlay chrome://file-to-overlay chrome://overlay-file An example of this line from chrome.manifest is overlay chrome://browser/content/browser.xul chrome://myextension/content This code gives the information provided in the contents.rdf file's overlay section. Many extensions modify the Cascading Style Sheets (CSS) used by Firefox. The style overlay line provides this information in a format similar to the previous overlay line: style chrome://file-to-style chrome://stylesheet-file Firefox is a multiplatform product, meaning it will run on Windows, Linux, and Mac OS/X. If your extension is specific to one of these platforms, add the keyword platform at the end of the content lines. More complex extensions have multiple occurrences of these lines in chrome.manifest. If you want to learn more about chrome.manifest, go to http://www.mozilla.org/xpfe/ConfigChromeSpec.html. |
| < Day Day Up > |
EAN: 2147483647
Pages: 245
- MPLS Control and Data Plane Components
- L2TPv3 Overview
- Introduction to Layer 2 VPNs
- Case Study 2: Implementing Multi-VRF CE, VRF Selection Using Source IP Address, VRF Selection Using Policy-Based Routing, NAT and HSRP Support in MPLS VPN, and Multicast VPN Support over Multi-VRF CE
- Case Study 8: Implementing Hub and Spoke Topologies with EIGRP