Internet Information Server
Microsoft Internet Information Server, or IIS, is the primary Web server for sites constructed on Microsoft Windows NT technology, and it represents a vast improvement over servers that simply use CGI to create content. IIS supports a new set of applications that use the Internet Server Application Programming Interface, or ISAPI. ISAPI applications can be executed by IIS in a fashion similar to CGI, but they run in the same memory space as the Web server. In fact, ISAPI applications are constructed as dynamic-link libraries that can run as much as twenty times faster than equivalent CGI applications. Microsoft Active Server Pages, or ASP, is an example of an ISAPI application. In order to understand how ASP creates dynamic content, you must first understand how IIS works with Windows NT to create a Web site. The following pages cover the fundamentals of installing and administering IIS and setting up the system to publish dynamic content.
Installing IIS
Internet Information Server is available for both the Server and Workstation versions of Windows NT. Although IIS is nearly identical under these two platforms, its installation process differs. However, neither setup is particularly difficult or time consuming.
Under Windows NT Server, IIS is used as a primary publishing mechanism. The complete version of IIS ships with Windows NT Server version 4.0 and can easily be installed during the Windows NT setup process. If you want your Windows NT Server to act as a Web server, all you have to do is install the IIS administrator when you set up the server. Figure 2-1 shows the setup dialog box for IIS.
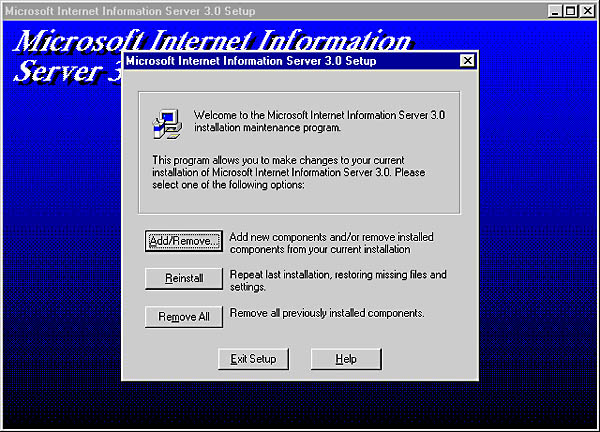
Figure 2-1. IIS installation dialog box under Windows NT Server 4.0.
IIS running under Windows NT Server is officially regarded as version 2.0 because it does not ship with the Active Server Pages technology. ASP must be installed separately after IIS is installed. When ASP features are added to IIS, the version of IIS is automatically upgraded to version 3.0. Upgrading to 3.0 does not fundamentally change the Web server; it simply adds the ability to run Active Server Pages. You can find the ASP core on the same CD-ROM as Microsoft Visual InterDev.
At this writing, IIS version 4.0 is available in a Beta release. Under the Beta implementation, setup is straightforward and works well with all the technologies discussed in this book. The sample code provided on the CD-ROM has been fully tested with IIS 4.0 Beta.
IIS is also available for Windows NT Workstation version 4.0. When run under NT Workstation, IIS is known as Microsoft Peer Web Services. Peer Web Services is exactly the same Web server as IIS except that Peer Web Services has a 10-user connection limit. In order to install the Web server on NT Workstation, you must use the Network applet in the Control Panel. On the Services tab of the Network applet, you can install Peer Web Services as a new service, as shown in Figure 2-2.
Figure 2-2. Adding Peer Web Services.
A typical setup scenario for IIS is to create a Web site under Windows NT Server for use on an intranet while installing Peer Web Services on Windows NT Workstation for development. Visual InterDev provides the necessary tools for developing sites locally and then deploying the completed and debugged versions to IIS on a server. This setup prevents moving untested pages into production.
During the installation process, you will be prompted to provide a directory for your Web pages. Typically, this directory is named \WWWROOT. All references to your site begin with this directory name. The root directory maps directly to the name of your site. The site name is determined by the name of the host computer, which can be found by using the Network applet in the Control Panel, as shown in Figure 2-3.

Figure 2-3. The host computer name.
To understand how IIS uses the name of the host computer, suppose you have a Windows NT Server called NT_SERVER. This name becomes the name of the site and can be accessed by Microsoft Internet Explorer from any machine on the network. When the user explores the Uniform Resource Locator (URL) http://NT_SERVER, IIS is invoked and directs the browser to a special Web page located in \WWWROOT. Typically, this is a page named DEFAULT.HTM, but it can be any page you want.
Administering the WWW Service
When installed, IIS provides three primary services: File Transfer Protocol (FTP) and Gopher, which are file transfer services; and World Wide Web (WWW), which delivers Web pages to browsers and allows access to the functionality of Active Server Pages. For the purposes of Web development, WWW is the most important of the three services.
Administering IIS in general and the WWW service in particular is critical for the success of your site. In order to administer the WWW service, select Programs/Microsoft Internet Server/Internet Service Manager from the Start menu. Internet Service Manager lists available services, as shown in Figure 2-4.
Figure 2-4. Internet Service Manager.
When you select a service in the list and click the Properties button, a tabbed dialog box appears that presents all the features of the service. The tabs allow you to handle security features, directory locations, and logging activity. Each of these areas contains information that helps you maintain a strong site.
Under IIS 4.0 Beta, the interface for managing IIS has changed radically. Gone is the familiar Internet Service Manager, which has been replaced by Microsoft Management Console, or MMC. MMC provides an Explorer-style view of Internet services and is intended to be a centralized management system for enterprise services on Windows NT. It supports the addition of snap-ins that allow products such as Microsoft Transaction Server to use the MMC interface. Figure 2-5 shows the MMC interface.
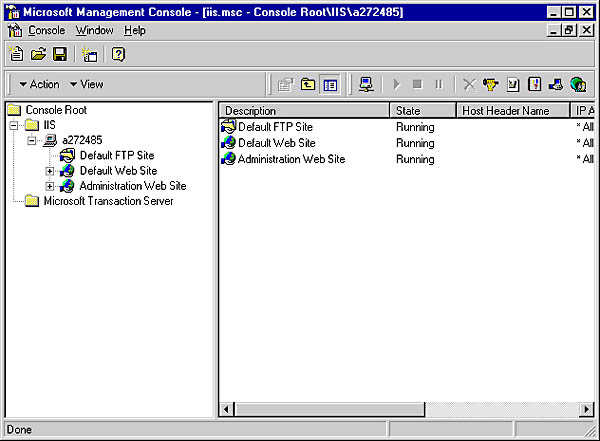
Figure 2-5. Microsoft Management Console.
Security Issues
Security is certainly a major concern on any Web site. Many well-publicized security breaches have contributed to a general feeling of vulnerability regarding Internet systems. Fortunately, IIS is a secure server. Its security system is closely linked to Windows NT security, and together IIS and Windows NT provide a number of security layers through which a user must pass before gaining access to your site.
The first matter to consider in site security is accounts. IIS uses the same user accounts that Windows NT uses to allow access. In fact, logging on to IIS isn't much different from logging on to Windows NT. A user attempting to connect to your Web site must have a valid user ID and password for the domain.
Because Windows NT requires that all users have a user ID and a password, no one can gain access to IIS without an account. But how do you assign an account to the millions of people who might want to visit your site? The answer is to provide an anonymous logon account. An anonymous account can handle any user who does not have a real user ID and password for the Windows NT domain that is hosting your IIS server.
When IIS is installed, it automatically establishes an account for anonymous logons. This account is given a special user ID that is derived from the name of the machine. Specifically, IIS creates an anonymous account called IUSR_MachineName, where MachineName is the name of the Windows NT server. So, for example, if your server is named MyServer, your anonymous logon account is IUSR_MyServer.
Anonymous logons are allowed when you check the Allow Anonymous option found on the Service tab in the Service Properties dialog box. (See Figure 2-6.) Normally, anonymous logons are treated as domain guests, so it is vital that you check the permissions assigned to guests on your network to verify that anonymous logons are not given inappropriate authority. Any permissions assigned to guests are assigned to anonymous logons. So if you make all guests administrators on the system, anyone who browses your site will also be an administrator!
Figure 2-6. The Service tab.
IIS also allows you to specify that users who have actual accounts on the network should be logged on under those accounts. This is done by checking the Basic (Clear Text) or the Windows NT Challenge/Response option on the Service tab. The difference between the two options has to do with the way the password is transmitted. Under Basic (Clear Text) authentication, the password can be sent over the Internet in clear (unencrypted) text. Sending a clear text password over the Internet is a potential security problem because clear text might be intercepted during the transfer, compromising the account. Most browsers, however, support the Basic (Clear Text) authentication scheme.
Windows NT Challenge/Response provides a more secure logon by encrypting the password before sending it to the server. This functionality is supported by Internet Explorer version 2.0 and later. At first, you might think that Windows NT Challenge/Response represents the most secure setup you can have, but that is not necessarily true. If your server is an Internet server, the most secure setup is to select only the Allow Anonymous option. This is true because if you allow only anonymous logons, you can easily control the permissions of every user through the anonymous account established by IIS. You can never guarantee that a user account hasn't been compromised, so anonymous logons might actually be more secure.
Under IIS 4.0, you have the same security options that you have under IIS 3.0, but you are able to set security properties for each subdirectory on the site. Select the site subdirectory through MMC, and select Properties to display the Properties dialog box. In the Properties dialog box, click the Directory Security tab and click the Edit button for the password authentication method. The resulting dialog box, shown in Figure 2-7, gives you the familiar Allow Anonymous, Basic Authentication, and Windows NT Challenge/Response options.
Figure 2-7. Setting security for IIS 4.0.
Virtual Directories
IIS supports virtual directories, aliases for hard-coded paths on the server. Virtual directories are administered through the Directories tab in the Service Properties dialog box. (See Figure 2-8.) On the Directories tab, you can view the one-to-one relationship between hard-coded paths and virtual directories.

Figure 2-8. The Directories tab.
Virtual directories offer several advantages in site development. The first is that virtual directories hide important information about the directory structures of your site. In a Web browser, the user can always view the source for any Web page by selecting Source from the View menu. If you use hard-coded paths in your Web page, you are exposing important information regarding your site's directory structure. This might aid someone in attacking your system.
The second advantage of virtual directories is more important for developers. Virtual directories allow Web pages to be moved from one machine to another without changing any code in the pages. Both machines must have the same virtual directories, although each machine would have different hard-coded paths for those directories.
Adding, deleting, and editing virtual directories is also done through the Directories tab. To add a virtual directory, click the Add button and enter the appropriate information (such as the hard-coded path and the designated alias) in the Directory Properties dialog box. (See Figure 2-9.) To delete a virtual directory, select the directory and click the Remove button. To edit an existing virtual directory, select it and click the Edit Properties button to display the Directory Properties dialog box.
Figure 2-9. The Directory Properties dialog box.
In the Directory Properties dialog box, you must also specify the access method for the virtual directory: Read, Execute, or both. Read access means that content in the directory can be passed from IIS to the browser. Execute access means that executable content can be run from within the directory. In practical terms, regular HTML pages require Read access while ASP pages need Execute access. In general, you should segregate Read and Execute content. This is usually done by establishing separate subdirectories on your site for HTML pages and ASP pages. The HTML subdirectory should be designated as Read but not Execute. The ASP subdirectory should be Execute but not Read.
Under IIS 4.0, you can create a new virtual directory inside MMC by right-clicking one of the Web Site icons. When the pop-up menu appears, simply choose Create New/Virtual Directory. Then use the New Virtual Directory wizard, shown in Figure 2-10. A series of dialog boxes maps the alias to the selected directory path.
Figure 2-10. The New Virtual Directory wizard.
Logging Activity
IIS has the capability to log user activity on the site. This is an important feature that you should utilize regularly. Logging user activity can help you identify potential security threats from outside users. On the Logging tab in the Service Properties dialog box, shown in Figure 2-11, you can choose to log to a text file or to a SQL Server database.
Figure 2-11. The Logging tab.
Advanced IIS Features
On the Advanced tab in the Service Properties dialog box, shown in Figure 2-12, you can specify access to your server by Internet Protocol (IP) address; you can specify a pool of addresses for access or a pool to be denied access; and you can specify individual addresses for access. This is extremely useful for intranet systems, where you might want to restrict access by department. For example, you could limit the Accounts Receivable intranet to members of the department whose IP addresses are in the range 100.100.100.50 through 100.100.100.70. You can also manage access by IP address under IIS 4.0, but you control it by virtual directory. This allows you to establish security differently for different directories.
Figure 2-12. The Advanced tab.
EAN: 2147483647
Pages: 84