Exercise 7-3: Custom Tool Parts
Exercise 7-3: Custom Tool Parts
Custom tool parts allow you to create specialized user interfaces within the property pane. These tool parts lend support to properties that go beyond the fundamental data types. In this exercise, you will create a web part with a text property designed to only accept a properly formatted phone number as a value.
Building the Basic Web Part
Start this project by creating a new web part library in Visual Studio using VB.NET. As always, clean up the template code and modify the web part description file. Name the project SPSMaskTool and name the class Part . Additionally, define a text property for the web part and render that text as HTML. Listing 7-23 shows what the web part should look like to get started.
| |
Imports System Imports System.ComponentModel Imports System.Web.UI Imports System.Web.UI.WebControls Imports System.Xml.Serialization Imports Microsoft.SharePoint Imports Microsoft.SharePoint.Utilities Imports Microsoft.SharePoint.WebPartPages <DefaultProperty("Text"), ToolboxData("<{0}:Part runat=server></{0}:Part>"), XmlRoot(Namespace:="SPSMaskTool")> _ Public Class Part Inherits Microsoft.SharePoint.WebPartPages.WebPart Dim m_text As String = "" 'Browsable must be False to hide the normal custom property tool part <Browsable(False), Category("Miscellaneous"), DefaultValue(""), WebPartStorage(Storage.Personal), FriendlyName("Text"), Description("Text Property")> _ Property [Text]() As String Get Return m_text End Get Set(ByVal Value As String) m_text = Value End Set End Property Protected Overrides Sub RenderWebPart(ByVal output As _ System.Web.UI.HtmlTextWriter) output.Write(SPEncode.HtmlEncode([Text])) End Sub End Class | |
The Custom Tool Part
Your custom tool part will be built as a separate class that inherits from the ToolPart class. In this class, you will code the methods to handle events from the Apply, OK, and Cancel buttons . When the tool part is complete, you will add it to the property pane.
Creating the New Class
Because your custom tool part is defined in a new class, you must add a class to the project. Fortunately, the web part templates provide a template for the custom tool part as well. You can add this template to your project directly from the menu.
Here is what you need to do to add the new tool part:
-
From the Visual Studio menu, select Project Add New Item.
-
In the Add New Item dialog, click the Tool Part template.
-
Change the name of the new file to Tool.vb .
-
Click Open .
-
From the Solution Explorer, open Tool.vb .
-
Modify the code in Tool.vb to appear as follows :
Imports System.Web.UI Imports System.Web.UI.WebControls Imports Microsoft.SharePoint.Utilities Imports Microsoft.SharePoint.WebPartPages Imports System.Text.RegularExpressions Public Class Tool Inherits ToolPart End Class
Creating the Child Controls
Just like a web part, a tool part must create child controls to render in the user interface. In fact, the code is identical to the code you have created several times in past exercises. In the custom tool part, you will use a TextBox to accept the user input and a Label to present error messages if the input is not a valid phone number. Add the code from Listing 7-24 to the tool part to create these controls.
| |
'Controls to appear in the tool part Protected WithEvents txtProperty As TextBox Protected WithEvents lblMessage As Label Protected Overrides Sub CreateChildControls() 'Purpose: Add the child controls to the web part 'Label for the errors lblMessage = New Label With lblMessage .Width = Unit.Percentage(100) End With Controls.Add(lblMessage) 'Text Box for input txtProperty = New TextBox With txtProperty .Width = Unit.Percentage(100) End With Controls.Add(txtProperty) End Sub
| |
Coding the Property Pane Events
When the user clicks any of the buttons in the property pane, events are fired in your tool part. This allows you to use a regular expression to validate the input and modify the web part based on the results. Add the code from Listing 7-25 to implement the event handling for the buttons.
| |
Public Overrides Sub ApplyChanges () 'User pushes "OK" or "Apply" Try 'Test the input value against the regular expression Dim objRegEx As New Regex("\b\d{3}-\d{3}-\d{4}\b ") Dim objMatch As Match = objRegEx.Match(txtProperty.Text) If objMatch.Success Then 'Move value from tool pane to web part Dim objWebPart As Part = _ DirectCast(Me.ParentToolPane.SelectedWebPart, Part) objWebPart.Text = txtProperty.Text lblMessage.Text = "" Else lblMessage.Text = "Invalid phone number." txtProperty.Text = "###-###-####" End If Catch x As ArgumentException End Try End Sub Public Overrides Sub SyncChanges () 'This is called after ApplyChanges to sync tool pane with web part Try 'Test the input value against the regular expression Dim objRegEx As New Regex("\b\d{3}-\d{3}-\d{4}\b") Dim objMatch As Match = objRegEx.Match(txtProperty.Text) If objMatch.Success Then 'Move value from web part to tool pane Dim objWebPart As Part = _ DirectCast(Me.ParentToolPane.SelectedWebPart, Part) txtProperty.Text = objWebPart.Text lblMessage.Text = "" Else lblMessage.Text = "Invalid phone number." txtProperty.Text = "###-###-####" End If Catch x As ArgumentException End Try End Sub Public Overrides Sub CancelChanges() 'User pushes "Cancel" Dim objWebPart As Part = DirectCast(Me.ParentToolPane.SelectedWebPart, Part) objWebPart.Text = "" txtProperty.Text = "###-###-####" lblMessage.Text = "" End Sub | |
Rendering the Tool Part
Just like a web part, a tool part must be rendered. In this case, the tool part overrides the RenderToolPart method. Other than the name change, the code is identical. Add the following code to the tool part to render the user interface in the property pane.
Protected Overrides Sub RenderToolPart(ByVal output As HtmlTextWriter) 'Display the existing property Dim objWebPart As Part = DirectCast(Me.ParentToolPane.SelectedWebPart, Part) txtProperty.Text = objWebPart.Text 'Draw the tool part lblMessage.RenderControl(output) output.Write("<br>") txtProperty.RenderControl(output) End Sub Adding the Custom Tool Part
Once the tool part is coded, you can add it to the tool pane. The custom tool part is added by overriding the GetToolParts method. This method is part of the web part class, so you will have to open SPSMaskTool.Part for editing. Once you have this open, add the code from Listing 7-26 to override the method.
| |
Public Overrides Function GetToolParts() As ToolPart() 'This code is required because it was contained in the 'method we are overriding. We cannot simply call the base class 'because we can only return a single array, so we have to rebuild it. Dim toolParts(3) As ToolPart Dim objWebToolPart As WebPartToolPart = New WebPartToolPart Dim objCustomProperty As CustomPropertyToolPart = New CustomPropertyToolPart toolParts(0) = objWebToolPart toolParts(1) = objCustomProperty 'This is where we add our tool part toolParts(2) = New Tool Return toolParts End Function
| |
Using the Tool Part
Once the web part and tool part are coded, you may compile and use them. Be sure to give the web part a strong name, modify the web part description file, and mark the web part as safe in the web.config file. After you have properly deployed the web part to the \inetpub\ wwwroot \bin directory, import it into a web site and try the functionality. Figure 7-5 shows the tool part after an incorrectly formatted property was entered.
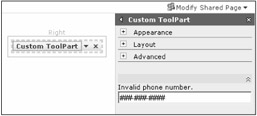
Figure 7-5: The custom tool part
EAN: N/A
Pages: 92