Deploying Web Parts
Deploying Web Parts
After you have finished coding the web part, you are ready to begin the process of deploying it for use in SharePoint Services. Unfortunately, deploying web parts is not a simple matter. You must complete several detailed steps in order to successfully use a web part in a new page.
Understanding Strong Names
Because SPS is a web-based application with potential ties to sensitive organizational information, web part security is a significant concern. These security concerns encompass not only access to information, but also potential malicious behavior by web parts. In order to ensure that no unsafe web parts are allowed to run in SPS, you must digitally sign all web parts with a strong name .
You can create a strong name by combining the text name of the web part, its version number, culture information, digital signature, and a public key. When you create a strong name for your web part, you guarantee that its name is globally unique. This ensures that your web part is not confused with any other web part that might happen to have the same text name.
Along with uniqueness, a strong name also guarantees the version lineage of the web part. This means that no one can create a new version of the web part without access to the private key that created the initial strong name. This is important, because it ensures that every subsequent version of the web part came from the same developer ”or independent software vendor (ISV) ”who created the initial version. This protection establishes trust with SPS and the end users.
Additionally, strong names also ensure that the web part has not been modified since it was originally compiled. The .NET Framework applies several security checks to web parts that have strong names. It is this series of tests that ensure that the web part has not changed. Once again, this creates trust within the SPS deployment, which helps an organization feel confident deploying and using web parts for even sensitive business needs.
One thing to keep in mind about strongly named web parts is that they are only allowed to reference other strongly named assemblies. This is because security is only assured when the entire chain of calls is protected by strong naming. Most of the time this will not be an issue, but occasionally you might run into a third-party component that you want to use in a web part that is not strongly named. In this case, Visual Studio will notify you during the build process.
Before you can give your web part a strong name, you must generate a public/private key pair to use when signing the web part. You create a key pair using the Strong Name tool ( sn.exe ). In order to use the Strong Name tool, you must open the command-line interfaces and navigate to the directory where the tool is located. From that location, you must run the Strong Name tool with the syntax sn.exe “ k [file name] .
To create a key pair file, follow these steps:
-
Open a command window by selecting Start All Programs Accessories Command Prompt.
-
In the command window, navigate to \Program Files\Microsoft Visual Studio .NET 2003\SDK\v1.1\Bin .
-
In the command-line window, create a key file by executing the following line:
sn.exe -k c:\keypair.snk
Once the key pair is created, you can use it to sign the web part by referencing it in the AssemblyInfo file. Within this file, three attributes determine how the web part is signed: AssemblyKeyFile , AssemblyKeyName , and AssemblyDelaySign .
Using the AssemblyKeyFile attribute, you may reference the key pair directly by an absolute path or a path relative to your project directory. This is the most likely mechanism you will use to sign your web parts. The following code shows an example of how to reference the key file.
' VB.NET Syntax <Assembly: AssemblyKeyFile("C:\keypair.snk")> //C# Syntax [assembly: AssemblyKeyFile("C:\keypair.snk")] Using the AssemblyKeyName attribute, you can reference an existing key that has been installed on your machine. Organizations might choose to do this if they have a digital certificate from a provider such as VeriSign that they already use to sign code. In this case, you would provide the name of the key to use.
If an organization already has a digital certificate, then it may not be made generally available to developers who need to sign code. In this case, the developer may choose to delay signing the web part. When you delay signing, the web part space is reserved for the final signature, but you can still use the web part during development.
In order to delay signing the web part, you must set the AssemblyDelaySign attribute to True . You must then get the public key portion of the certificate and reference it using the AssemblyKeyFile attribute. Finally, you must instruct the .NET Framework to skip the strong-name verification test for the web part by using the Strong Name tool with the following syntax:
sn Vr [assembly.dll]
| Caution | Skipping the strong-name verification opens a security hole in SPS. Any web part that uses the same assembly name can spoof the genuine web part. Reserve this technique solely for development in organizations where the digital certificate is not provided to developers. Otherwise, always reference a valid key pair. |
Regardless of how you choose to sign the web part, you should make sure that the version number specified in the AssemblyInfo file is absolute. Visual Studio .NET has the ability to auto-increment your project version using wild cards; however, this is not supported by strong naming. Therefore, you must specify an exact version for the web part. The following code fragment shows an example.
//C# Syntax [assembly: AssemblyVersion("1.0.0.0")] 'VB.NET Syntax <Assembly: AssemblyVersion("1.0.0.0")> Building the Web Part
After the assembly file is edited, you have just a couple of steps left before you can build the web part. The first of these steps is to modify the web part description file ”with the .dwp extension ”in order to update it with the assembly information. SPS uses the web part description file to upload the web part into one of its galleries. The last step is to designate the proper build directory for the final assembly.
The web part description file is an XML file that contains the title, description, assembly name, and type name for the web part. If you use the web part template to start a project, then you are provided with a mock web part description file. To successfully upload the web part, you must modify the entries to reflect the information related to your web part. Although the <Title> and <Description> elements are self-explanatory, the rest of the file requires some explanation.
The <Assembly> element consists of the assembly name without the .dll extension followed by the Version , Culture , and PublicKeyToken . The assembly name is generally the same as the web part project name, and the Version is found in the AssemblyInfo file. The Culture is also found in the AssemblyInfo file in the AssemblyCulture attribute. However, this attribute is often left empty. In this case, use the value Neutral to indicate that no culture information is supplied. The PublicKeyToken is a truncated version of the public key, which is obtained by using the Strong Name tool.
Once you have generated a key file using the Strong Name tool, you can extract the PublicKeyToken from the file. The PublicKeyToken is important in not only the web description file, but also later in SPS as you will see. To extract the PublicKeyToken , run the Strong Name tool using the following syntax:
sn.exe -T assembly.dll
The <TypeName> element consists of a fully qualified name for the web part. The fully qualified name is the namespace followed by the class name.
Along with the required elements of the web part description file, you may also set properties of the web part using the description file. To set a property, simply add an element that has the same name as the property you wish to set. When the web part is uploaded, the property values are set by the SPS web part infrastructure. The following code shows a complete web part description file.
<?xml version="1.0" encoding="utf-8"?> <WebPart xmlns="http://schemas.microsoft.com/WebPart/v2" > <Title>Page View</Title> <Description>A web part to embed pages in the portal</Description> <Assembly>SPSPageView, Version=1.0.0.0, Culture=Neutral, PublicKeyToken=5959aab8a976a104</Assembly> <TypeName>SPSPageView.Container</TypeName> <Width>100</Width> </WebPart>
Once the web part description file is properly modified, you must set the build directory for the project. All web parts must be installed in the \inetpub\ wwwroot \bin directory. Although you can certainly copy your assembly to this directory after it is built, you may find it easier to simply set the build directory so that the assembly is automatically compiled to the correct spot.
| Note | The \bin directory is not created by default; you must create it manually. |
You can set the build directory for your project by right-clicking the project in Visual Studio and selecting Properties from the pop-up menu. This will open the Property Pages dialog. In this dialog, select Configuration Properties Build. Locate the Output Path option and set it to point to \inetpub\wwwroot\bin . Now you can build the web part successfully. Figure 5-3 shows the output path in the Property Pages dialog for a C# project.
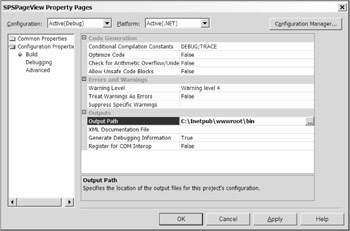
Figure 5-3: Setting the output path in C#
Code Access Security
SPS is based on ASP.NET technology. As such, it is bound by the same security limitations that apply to any ASP.NET application. Practically speaking, this means that web parts are often restricted from accessing enterprise resources such as databases and web services unless you specifically configure SharePoint Services to allow such access. Managing how code can access enterprise resources is known as code access security.
Understanding Configuration Files
Code access security is implemented by a series of configuration files. The first configuration file of concern is machine.config located in C:\Windows\Microsoft.NET\Framework\v1.14322\CONFIG . This file specifies master settings that will be inherited by all SharePoint Services sites that run on the server. This particular file is densely packed with information, and a complete discussion of the contents is beyond the scope of this book. However, one section ” <securityPolicy> ”is of immediate importance.
The <securityPolicy> section defines five levels of trust for ASP.NET applications: Full, High, Medium, Low, and Minimal. The trust level definitions allow you to assign partial permissions to an ASP.NET application that determine what resources the application can access. For example, applications with High levels of trust can read and write to files within their directory structure whereas an application with a Low trust level can only read files. The permissions allotted by each level of trust are defined within a separate policy file designated by the <trustLevel> element. The following code shows the <securityPolicy> section for the machine.config file associated with an installation of SPS.
<securityPolicy> <trustLevel name="Full" policyFile="internal"/> <trustLevel name="High" policyFile="web_hightrust.config"/> <trustLevel name="Medium" policyFile="web_mediumtrust.config"/> <trustLevel name="Low" policyFile="web_lowtrust.config"/> <trustLevel name="Minimal" policyFile="web_minimaltrust.config"/> </securityPolicy>
The security policy files referenced by the <trustLevel> element are also XML files. These files contain a separate section for each policy that the file defines. Examining each of the files referenced in the machine.config file results in the complete picture of the trust levels and permission shown in Table 5-1.
| PERMISSION | FULL | HIGH | MEDIUM | LOW | MINIMAL |
|---|---|---|---|---|---|
| AspNetHosting-Permission | Full | High | Medium | Low | Minimal |
| Environment | Unlimited | Unlimited | Read TEMP, TMP, OS, USERNAME, COMPUTER-NAME | None | None |
| FileIO | Unlimited | Unlimited | Read, Write, Append, PathDiscovery: Application Directory | Read, PathDiscovery: Application Directory | None |
| IsolatedStorage | Unlimited | Unlimited | Assembly-Isolation-ByUser, Unrestricted | 1MB quota Assembly-Isolation-ByUser | None |
| Reflection | Unlimited | ReflectionEmit | None | None | None |
| Registry | Unlimited | Unlimited | None | None | None |
| Security | Unlimited | Execution, Assertion, Control-Principal, ControlThread, Remoting-Configuration | Execution, Assertion, Control-Principal, ControlThread, Remoting-Configuration | Execution | Execution |
| Socket | Unlimited | Unlimited | None | None | None |
| WebPermission | Unlimited | Unlimited | Connect to Origin Host | None | None |
| DNS | Unlimited | Unlimited | Unlimited | None | None |
| Printing | Unlimited | Default | Default | None | None |
| OleDBPermission | Unlimited | None | None | None | None |
| SqlClient-Permission | Unlimited | Unlimited | Unlimited | None | None |
| EventLog | Unlimited | None | None | None | None |
| Message Queue | Unlimited | None | None | None | None |
| Service Controller | Unlimited | None | None | None | None |
| Performance Counters | Unlimited | None | None | None | None |
| Directory Service | Unlimited | None | None | None | None |
The machine.config file represents the highest level of configuration for ASP.NET applications; however, each application may have a supplemental configuration file named web.config . This file is typically found in the root directory of an application, and for SPS it is located in \inetpub\wwwroot . Opening this file will reveal that it also has a <securityPolicy> section that defines two additional levels of trust known as WSS_Medium and WSS_Minimal. The following code shows the <securityPolicy> section from the file.
<securityPolicy> <trustLevel name="WSS_Medium" policyFile="C:\Program Files\Common Files\Microsoft Shared\ Web Server Extensions\config\wss_mediumtrust.config" /> <trustLevel name="WSS_Minimal" policyFile="C:\Program Files\Common Files\Microsoft Shared\ Web Server Extensions\config\wss_minimaltrust.config" /> </securityPolicy>
The security policy files defined by SPS are based on the files defined by ASP.NET. As a result, they define permissions for the same functions plus two additional functions. Table 5-2 shows the trust levels and permissions added by SPS.
| PERMISSION | WSS_MEDIUM | WSS_MINIMAL |
|---|---|---|
| AspNetHostingPermission | Medium | Minimal |
| Environment | Read TEMP, TMP, OS, USERNAME, COMPUTERNAME | None |
| FileIO | Read, Write, Append, PathDiscovery: Application Directory | None |
| IsolatedStorage | AssemblyIsolationByUser, Unrestricted | None |
| Reflection | None | None |
| Registry | None | None |
| Security | Execution, Assertion, ControlPrincipal, ControlThread, RemotingConfiguration | Execution |
| Socket | None | None |
| WebPermission | Connect to Origin Host | None |
| DNS | Unlimited | None |
| Printing | Default | None |
| OleDBPermission | None | None |
| SqlClientPermission | Unlimited | None |
| EventLog | None | None |
| Message Queue | None | None |
| Service Controller | None | None |
| Performance Counters | None | None |
| Directory Service | None | None |
| SharePointPermission | ObjectModel=true | None |
| WebPartPermission | Connections=true | Connections=true |
The default installation of SharePoint Services defines a trust level of WSS_Minimal for all sites. Because web parts are deployed to the \inetpub\ wwwroot\bin directory, they are affected by the trust level set in the web.config file. This means that web parts associated with a SharePoint Services site have significant limitations. Most importantly, web parts running under WSS_Minimal cannot access any databases nor can they access the objects contained in the SharePoint object model.
The Common Language Runtime (CLR) will throw an error if a web part attempts to access an unauthorized resource. Therefore, you must always implement appropriate error handling in a web part during attempts to access resources. Exception classes for these errors can be found in the Microsoft.SharePoint.Security namespace.
Customizing Policy Files
Because one of the major reasons to write a web part is to integrate line-of-business systems with the portal, you will undoubtedly want to raise the trust level under which certain web parts will run. You have three options for raising the trust level for assemblies in the \inetpub\wwwroot\bin directory. All three have strengths and weaknesses you need to consider depending upon whether you are in a development, testing, or production environment.
The first option is simply to raise the trust level for all SharePoint Services sites by modifying the web.config file directly in a text editor. The trust level for SharePoint Services is set in the <system.web> section of the web.config file. To raise the level of trust, modify the <trust> tag to use any one of the seven defined levels. The following code shows an example with the trust level set to WSS_Medium.
<trust level="WSS_Medium" originUrl=""/>
Although making a global change to the trust level is simple, it should only be done in development environments. Generally, you should strive to limit access to resources to only essential web parts in a production environment. The default WSS_Minimal level is recommended for production.
The second option is to deploy all of your web parts into the Global Assembly Cache (GAC). The GAC grants the Full level of trust to web parts installed there without requiring a change to the web.config file. Once again, this is a fairly simple way to solve the problem, but it does make the web part available to all applications and servers. This is a potential problem because a highly trusted component is now more widely accessible. As a side note, you will also have to restart Internet Information Server (IIS) each time you recompile a web part into the GAC.
Web parts can be added to the GAC in several ways. First, you can use the command-line tool gacutil.exe with the following syntax:
gacutil i [assembly.dll]
You can also simply navigate to the directory \Windows\assembly to view and modify the contents of the GAC. Finally, you can use the Microsoft Windows Installer to install the web part to the GAC during distribution. The latter method is the recommended best practice for production environments, whereas the first two are generally acceptable for development and testing environments.
The final option for raising the trust level associated with a web part is to create your own custom policy file. Although this approach requires the most effort, it is easily the most secure. This approach should be considered the recommended best practice for production environments.
To create a custom policy file, follow these steps:
| Note | If you are strictly following this text, you may not have developed your first web part yet. If this is the case, complete this series of steps after you finish the exercise at the end of the chapter. |
-
Open the Windows File Explorer and navigate to \ProgramFiles\CommonFiles\Microsoft Shared\Web Server Extensions\60\config .
-
Copy wss_minimaltrust.config and paste it back to create a copy of the file.
-
Rename the copied file wss_sqltrust.config .
-
Open wss_sqltrust.config in Visual Studio for editing.
-
In the <SecurityClasses> section, add a reference to the SqlClientPermission class so web parts can access SQL databases.
<SecurityClass Name="SqlClientPermission" Description="System.Data.SqlClient.SqlClientPermission, System.Data, Version=1.0.53383.0, Culture=neutral, PublicKeyToken=b77a5c561934e089"/>
-
In the <NamedPermissionSets> section, add a new permission set that grants all of the rights you want to define for your new policy, including access to SQL databases.
-
Extract the public key for the assembly from a web part you have developed by using the Security Utility tool with the following syntax:
secutil.exe -hex -s [assembly.dll]
-
Create a new <CodeGroup> section to apply the policy to the web part. This <CodeGroup> must precede the existing <CodeGroup> section defined for ASP.NET because once a policy is assigned, processing stops. The following code shows an example:
<CodeGroup class="UnionCodeGroup" version="1" PermissionSetName="wss_sqltrust"> <IMembershipCondition class="StrongNameMembershipCondition" version="1" PublicKeyBlob="0x002433830048338300943383338 3060233833383243383052534131338343383001338310 0936E3CD84B98E97825E63A7DBD7C15C10893315D16B5D9 8E7B7F38814BF0861D0BB5279A710EFFA CA29A01BB745136FA2DDCAF8F5105C5F429DFF904A0B94 F0A4A8D27D3F8329CA4E7B44962D8764B8 D8A38D9F16859A035C23AC69D39D2969D03680C791C4D7 5B38BBE4D12C30467B6FE8F41131FC859E D3B9B6F0D432478DC" Name="SPSPivotalContacts" />
-
Save and close the file.
-
Open the web.config file in Visual Studio.
-
Edit the <securityPolicy> section to add a reference to the new policy as shown here:
<securityPolicy> <trustLevel name="WSS_Medium" policyFile="C:\Program Files\ Common Files\Microsoft Shared\Web Server Extensions\config\wss_mediumtrust.config" /> <trustLevel name="WSS_Minimal" policyFile="C:\Program Files\ Common Files\Microsoft Shared\Web Server Extensions\config\wss_minimaltrust.config" /> <trustLevel name="WSS_SQL" policyFile="C:\Program Files\ Common Files\Microsoft Shared\Web Server Extensions\config\wss_sqltrust.config" /> </securityPolicy>
-
In the <system.web> section, modify the <trust> element to use the new policy as shown here:
<trust level="WSS_SQL" originUrl="" />
-
Save and close the file.
-
Restart IIS and the new policy will be in effect.
Listing 5-6 shows the final XML.
| |
<PermissionSet class="NamedPermissionSet" version="1" Name="wss_sqltrust"> <IPermission class="AspNetHostingPermission" version="1" Level="Minimal" /> <IPermission class="SecurityPermission" version="1" Flags="Execution" /> <IPermission class="WebPartPermission" version="1" Connections="True" /> <IPermission class="SqlClientPermission" version="1" Unrestricted="true" /> </PermissionSet>
| |
The predefined security policies available to SharePoint Services lack templates for defining access to several key resources. These resources include the SharePoint object model and web services. Therefore, I will review the necessary modifications you must make to policy files in order to access these resources.
If you want your web part to be able to access the classes in the SharePoint namespace, you must define a new <IPermission> element in the policy file similar to what was done above for SQL access. The following code shows how to define the element.
<IPermission class="SharePointPermission" version="1" ObjectModel="true" />
Similarly, if you want your web part to be able to call a web service, you must also define a new <IPermission> element. In this element, you specify the Uniform Resource Identifier (URI) of the web service to access. This URI may be in the form of a regular expression, which means you can set it up to match more than one available web service. The following code shows how to define the element.
<IPermission class="WebPermission" version="1" <ConnectAccess> <URI uri="http://localhost/services/callreport.asmx?WSDL"/> </ConnectAccess> />
Remember that in any case where a strongly named web part is in use, all of the other components must also be strongly named. This can cause problems when you are accessing web services or other libraries. In these cases, you must either install your web part to the GAC or implement a custom security policy.
Marking Web Parts As Safe
Adding a new web part to the inetpub\wwwroot\bin directory or the GAC handles the code access security issues for the part, but it is not sufficient to allow the part to be imported into SPS. In addition to permission to access resources, web parts also need permission to be imported into SPS. This permission is granted by marking the web part as "Safe" in the web.config file.
The web.config file contains not only the code access security policy, but also the list of all assemblies allowed to run in a web part page. This information is kept in the <SafeControls> section of the file. Before a web part can be imported into SPS, it must be listed in the section. Listing 5-7 shows a truncated example of a <SafeControls> section.
| |
<SafeControls> <SafeControl Assembly="SPSMaskTool, Version=1.0.0.0, Culture=neutral, PublicKeyToken=eb3e58846fb2ac2b" Namespace="SPSMaskTool" TypeName="*" /> <SafeControl Assembly="SPSPageView, Version=1.0.0.0, Culture=neutral, PublicKeyToken=eb3e58846fb2ac2b" Namespace="SPSPageView" TypeName="*" /> <SafeControl Assembly="SPSDataList, Version=1.0.0.0, Culture=neutral, PublicKeyToken=eb3e58846fb2ac2b" Namespace="SPSDataList" TypeName="*" /> <SafeControl Assembly="SPSDataSet, Version=1.0.0.0, Culture=neutral, PublicKeyToken=eb3e58846fb2ac2b" Namespace="SPSDataSet" TypeName="*" /> <SafeControl Assembly="SPSPivotalContacts, Version=1.0.0.0, Culture=neutral, PublicKeyToken=eb3e58846fb2ac2b" Namespace="SPSPivotalContacts" TypeName="*" /> <SafeControl Assembly="Citrix, Version=1.0.0.0, Culture=neutral, PublicKeyToken=eb3e58846fb2ac2b" Namespace="Citrix" TypeName="*" /> </SafeControls>
| |
In the <SafeControls> section, you must add a <SafeControl> element for each web part that you want to use in SPS. In the <SafeControl> element, you must specify several attributes. These attributes are similar to those attributes that you specified in the web part description file.
-
The Assembly attribute contains the fully qualified assembly name along with the Version , Culture , and PublicKeyToken attributes.
-
The Version attribute contains the assembly version as it appears in the manifest file.
-
The Culture attribute contains the culture designation or "neutral" if none is provided.
-
The PublicKeyToken attribute contains the token generated from the Strong Name tool.
-
The Namespace attribute contains the namespace as defined in the web part project.
-
The TypeName attribute contains the fully qualified name of the type or an asterisk to denote every web part in the assembly.
-
Safe is an optional attribute that is normally set to True , but can be set to False to deny permission to a specific web part.
SharePoint Services reads the <SafeControls> section at runtime to load web parts dynamically into the appropriate web page. Essentially, SharePoint Services uses late binding to load the control, and the <SafeControls> section contains the information necessary to load the web part and test it for security. If a web part is not listed in the <SafeControls> section, SharePoint Services throws an exception notifying you that the control is not safe. Figure 5-4 shows a typical error message for an unsafe web part.
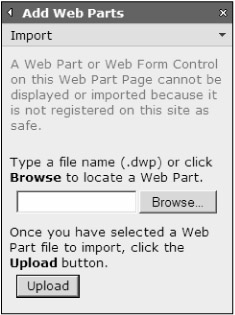
Figure 5-4: Identifying unsafe web parts
Deployment Packages
Setting the output path for the web part project to inetpub\wwwroot\bin is a simple way to ensure that the final web part assembly is deployed to the right location; however, this technique is only useful in a development environment. For production environments, you will want to build a distribution package that can be deployed independent of Visual Studio.
Creating a deployment package is done inside Visual Studio .NET as a new cabinet project in the same solution where the web part project is located. When you create the cabinet, you need to include the manifest file and the web part description file. Along with the assembly, these files are required to successfully deploy the web part.
Here are the steps to follow to create a deployment package:
| Note | If you are strictly following this text, you may not have developed your first web part yet. If so, complete this series of steps after you finish the exercise at the end of the chapter. |
-
Start Visual Studio .NET.
-
Open a solution containing a web part project.
-
From the Visual Studio main menu, select File Add Project New Project to open the Add New Project dialog.
-
Click the Setup and Deployment Projects folder.
-
Select to create a new Cabinet Project.
-
Name the project and click OK.
-
In the Solution Explorer, right-click the Cabinet project and select Add Project Output from the pop-up menu.
-
In the Add Project Output Group dialog box, select the web part project you want to deploy.
-
In the configuration drop-down list, select Release .NET.
-
In the project list box, select Primary Output.
-
Click OK.
-
In the Solution Explorer, right-click the Cabinet project again and select Add Project Output from the pop-up menu.
-
In the Add Project Output Group dialog box, select the web part project you want to deploy.
-
In the configuration drop-down list, select Release .NET.
-
In the project list box, select Content Files.
-
Click OK.
-
Build the Cabinet project.
Once the cabinet file is created, you may deploy it onto any server running SharePoint Services by using the administration tool StsAdm.exe . The tool is located in the directory \Program Files\Common Files\Microsoft Shared\web server extensions\60\bin . Using this tool, you can add a web part to SharePoint Services, delete one, or see a list of all the web parts that are available. Table 5-3 lists the available command-line switches for the tool and the following examples show you how to use it.
| SWITCH | USAGE |
|---|---|
| o | addwppack, deletewppack, enumwppacks |
| filename | The name of the Cabinet file |
| name | The name of the package |
| url | The URL of the virtual server; if not specified, applies to all virtual servers on the machine |
| globalinstall | Installs the package to the GAC |
| force | Forces an overwrite of an existing package |
To add a web part package:
Stsadm.exe -o addwppack -filename c:\mypart.cab
To delete a web part package:
Stsadm.exe -o deletewppack -name mypart.cab
EAN: N/A
Pages: 92