Installing from the Desktop CD
| So let's assume you are playing with Ubuntu running from the desktop CD, and you decide you like it. You decide you like it so much, in fact, that you want to install it on your computer. Does this mean you need to get a separate CD and install it? Heck, no. The new and improved Ubuntu lets you install to the hard disk by simply clicking a single icon and following the instructionsone disk to run them all. If you don't already have the desktop CD running, pop it into your DVD/CD drive, and reboot your computer. If your computer does not boot from the CD, you should enter your computer's BIOS and change the boot order to ensure that your CD-ROM drive is tried first and the hard disk is tried next. Save your BIOS changes, and then restart again. The disk should boot now. Tip: BIOS Problems If you have problems configuring your BIOS to boot from the CD, you should consult the manual. If you don't have the manual, visit the manufacturer's Web site, and see if you can download the manual. After a few seconds the Ubuntu logo appears and the top option is Start Ubuntu. Click Enter to select this option, and Ubuntu will begin to boot. After a minute or so the Ubuntu desktop will appear, and you can use the system right away. Under this scenario, the system is running from the CD and will not touch your hard disk. Do bear in mind, however, that because Ubuntu is running from the CD, it will run slower than if it were installed to your hard disk. If you decide you want to install the system permanently on your computer's hard disk, double-click the Install System Permanently icon located in the top left corner of the screen. An installer application appears that walks you through the different steps to permanently install your Ubuntu system. We will run through each of these pages in turn now. Tip: Time to Back It Up! Clicking the Install System Permanently icon will install Ubuntu on your hard disk. It is recommended that you back up any important files before you perform the installation. LanguageIn the screen shown in Figure 2-1 you select the language for your Ubuntu system. Figure 2-1. Pick your language. Ubuntu supports a huge range of different languages. Select your language from the list on the left, and then click Forward to continue. Configure Your KeyboardThe next screen (shown in Figure 2-2) configures your keyboard. Figure 2-2. Select the correct keyboard to ensure the symbols on the keys work correctly.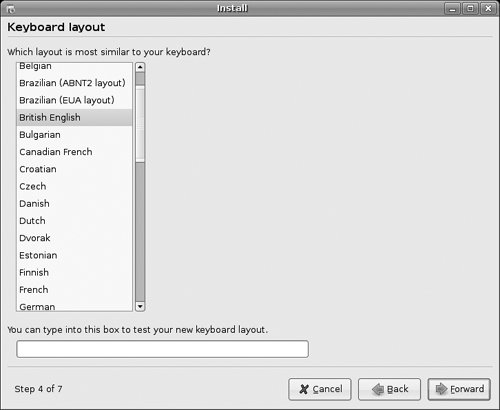 Choose your country from the list to select your keyboard layout. You can also use the box at the bottom of the window to test whether your keyboard layout works. Try typing some of the symbols on your keyboard (such as ", /, |) to make sure they work. If you press a symbol and a different one appears, you have selected the wrong keyboard layout. LocationNow you can tell the installer where in the world you live (see Figure 2-3). Figure 2-3. Clicking the map zooms in, allowing you to select a location more easily.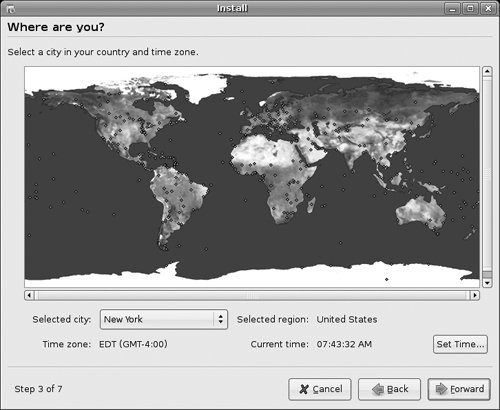 You can select your location in one of several ways. First, you can hover your mouse over the red dots in your part of the world to select the nearest location. When you are happy with the location, click it, and the map zooms in. You can then select the city nearest to you. Alternatively, use the Nearest City combo box to find the city nearest to you. When you are done, click Next to continue. IdentificationThe next step is to add some details about you that can be used to create a user account on the computer (see Figure 2-4). Figure 2-4. This user account is also used as the main system administrator.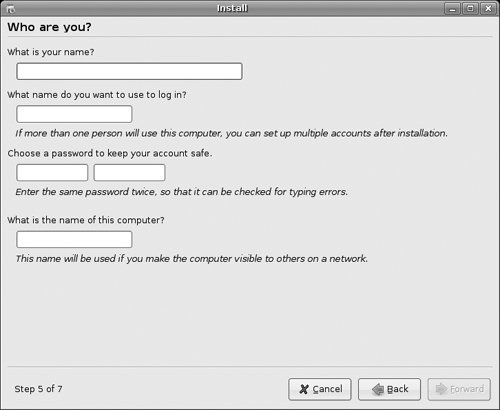 First fill in the Real Name box. The information from this box is used in different parts of the system to indicate who the user is behind the account. Next add a username in the Username box. Your username should be something easy to remember. Many people use either their first name or add an initial (such as jbacon or jonob). Each username on your computer must be uniqueyou cannot have two accounts with the same username. Next add a password in the Password box, and then enter it again in the Verify Password box. This password is used when logging in to your computer with the username that you just created. When choosing a password, follow these simple guidelines:
Finally, add a hostname in the Hostname box. The hostname is a single word that identifies your current machine. This is used on a local network so that you can identify which machine is which. Believe it or not, hostnames can be great fun. Many people pick themes for their hostnames, such as superheroes, and name each computer on their network after a superhero (Superman, Batman, Spiderman, etc.). Think of a fun hostname theme you can use. When you have added all the information, click Next to continue. Disk SpaceThe next part of the installation process prepares your hard disk for the software. This involves creating a number of partitions that store the Ubuntu system and your files. Hard disks are divided into partitions. Each partition reserves a specific portion of the hard disk for use by a particular OS. As an example, you may use the entire hard disk for your new Ubuntu system, or you may share the disk so that both Windows and Ubuntu are installed. This shared scenario is known as dual-booting. In a dual-booting situation, your hard disk typically has Windows partitions as well as Linux partitions, and when it boots it gives you a little menu so you can select whether to boot Windows or Linux. In this part of the installer you create the partitions for your new system. This is the trickiest part of the installation, and also the most dangerous. If you have existing partitions (such as a Windows installation) on the disk, it is highly recommended that you back up your important files. Tip: Seriously, We Mean It Really, really, really do back up any important files. If you make a mistake in this part of the installation, you could lose your files and stop your system from booting. Deciding on Your PartitionsBefore you create your partitions, you should get an idea of what you want to do. If you have a clear idea of how your hard disk should be partitioned, it is easier to get everything working and up and running quickly. These are the common methods of partitioning:
Irrespective of whether you only install Ubuntu or dual-boot, you will need to decide how Ubuntu is partitioned. Ubuntu requires at least two partitions (one for the system and one for virtual memory swap space), but you can use additional partitions if you want to. Using the Entire DiskIf you are happy to erase your entire hard disk, just select the Erase Entire Disk option, and click Forward. You are then asked to confirm the actions. Click Yes to continue. That's it! Manually PartitioningClick the Manually Edit Partition Table option, and click Forward to continue. You will see the screen shown in Figure 2-5. Figure 2-5. Main partitioning view.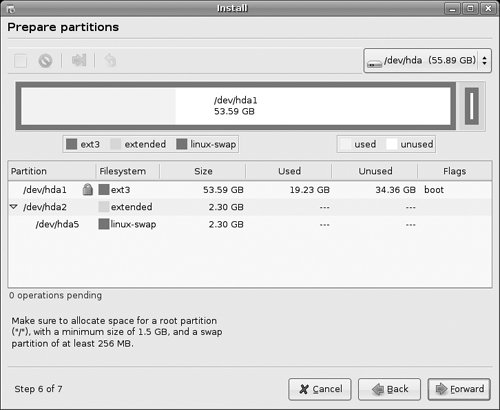 This screen has a number of controls that are used to create your partitions. First, the combo box in the top right of the screen allows you to select which hard disk to partition. Select the relevant disk to add partitions to. The disks are listed by device name in alphabetical order. As such, disk A (such as /dev/hda) is the first disk in the system. If you only have one hard disk in your computer, the disk is already selected for you. The large rectangle in the middle of the screen shows the current partition setup on the disk. If you are installing on a blank disk you will not see anything, as no partitions have been added. Click this rectangle, and you are ready to go. Before you begin, you should prepare the disk for your partitions. Click New, and a box appears asking if you want to create an MS-DOS disk label. Click Create to continue. You are then asked if it is fine to destroy the data on the diskclick OK to continue. The disk is now filled with unallocated data. Now you can add your Ubuntu partitions. To add a partition, click the unallocated space in the large rectangle, and then click New. A new window appears like that shown in Figure 2-6. Figure 2-6. Configuring a partition.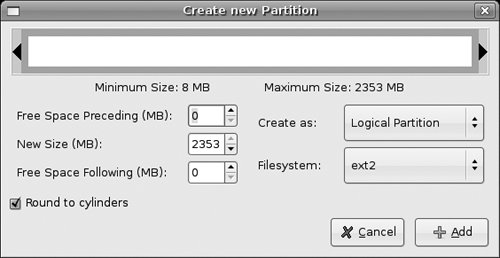 This window lets you configure a partition. The easiest way to do this is to use your mouse to move it around visually, and use the arrows on either side of the partition to stretch it to the correct size. If you would prefer to enter specific values, you can use the controls on the left side of the dialog box. The Filesystem combo box is used to select which one of the many filesystem types you want the partition to use. The default filesystem included with Ubuntu is ext3, and it is recommended that you use ext3 for any Ubuntu partitions. Although ext3 is a good choice for Ubuntu, you cannot read an ext3 partition in Windows. If you need to create a partition that is shared between Windows and Ubuntu, you should use the FAT32 filesystem. Add each of your partitions, and then click Forward. With the partitions added, you now need to specify what each one is used for. You will see the screen shown in Figure 2-7 next. Figure 2-7. Mount points.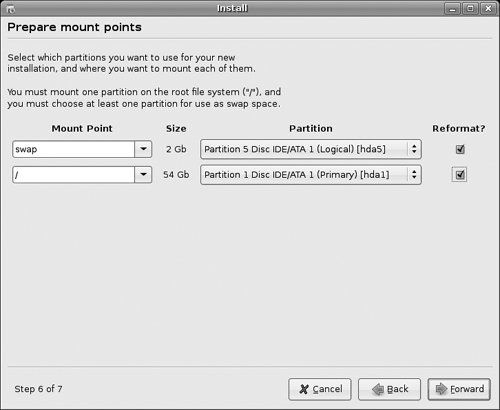 Use the Mount Point combo box to select one of the different mount points, and then use the Partition combo box to select the partition to which it applies. Finishing UpWith the partitions complete, the installation is virtually done. You are given a summary of the choices that you made. When you accept these choices, the Ubuntu software is installed on your computer. At the end of this process, you are asked to reboot your computer. You are now finished! Tip: Better Use of Your Valuable, Valuable Time One of the great benefits of the desktop CD installer is that while the files are being copied from the disk, you can still use the system. Instead of sitting at your computer staring at the progress bar, you can play a few games to while away the time. |
EAN: 2147483647
Pages: 133