Installing Using the Alternate Install CD
| Although the desktop CD is ideal for installing Ubuntu, you may want to use the traditional installer method to install the system. This method involves booting the alternate install CD, running through the installer, and then starting the system. This kind of installer is ideal for server installation or installation on older hardware. To get started, put the CD in the drive, and restart your computer. When the CD boots you will see the menu shown in Figure 2-8. Figure 2-8. Alternate install CD menu.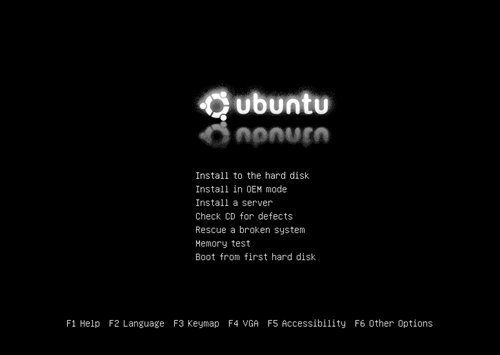 Select the Install to the Hard Disk option with the arrow keys, and click Enter. After a few minutes, the installation process begins by asking you to choose a language. Select from the different languages by using the up and down arrow keys, and then use the Tab key to jump to red buttons to continue through the setup. Tip: Installing a Server If you choose to use the Install a Server Option, Ubuntu will install the software tools required for a typical server. This will not include any of the graphical applications or interface that come with the typical desktop installation. This makes Ubuntu ideal for running headless servers. See Chapter 5 for more details about running Ubuntu as a server. Choosing Your Spot in the WorldNext you are asked to choose your location (see Figure 2-9). Figure 2-9. Select your keyboard layout.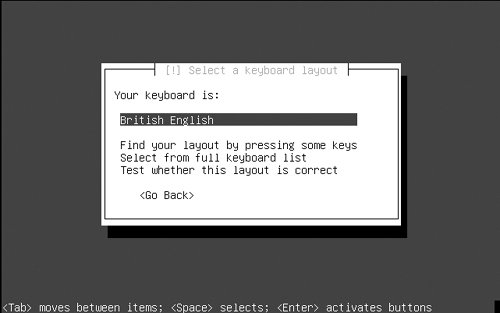 Pick which country you are in, and click Enter. This information is used to configure your time zone. The next screen configures the layout of your keyboard. Keyboard layouts vary across the world to take into account the many and varied symbols and letters used in different countries. Even if you are using the typical Latin character set (as used in most European countries, America, Africa, and Australia), there are variations and additions (e.g., German umlauts). A keyboard layout is selected for you (e.g., British English if your location was set to United Kingdom), but the dialog box includes some additional options.
With the language selected, your CD-ROM drive is then detected and scanned, and additional components are loaded. NetworkingNext an attempt is made to detect any network hardware and configure your network access. If you are connected to a wireless or wired network and are automatically assigned an IP address with DHCP, your network settings are automatically configured. If you are connecting wirelessly and need to enter a password for the WEP key, you are asked for one. Tip: WEP Passwords If you are entering an ASCII WEP password, prefix it with s: (e.g., s:theboinggreed). In some cases there is a problem, and your network hardware or network settings cannot be automatically configured. This can be either because your network card is not supported by Ubuntu or because Ubuntu could not connect to a network. Don't worry too much about this at the moment as you can configure the network later when you boot your computer. See Chapter 6 for details about solving networking problems. Qucik Tip The wpa, atheros (madwifi), ndiswrapper, and bcm43xx modules are not supported during the installation but do work afterward. You are next asked for a hostname for the computer (see Figure 2-10). Figure 2-10. The hostname is used to identify you on your local area network.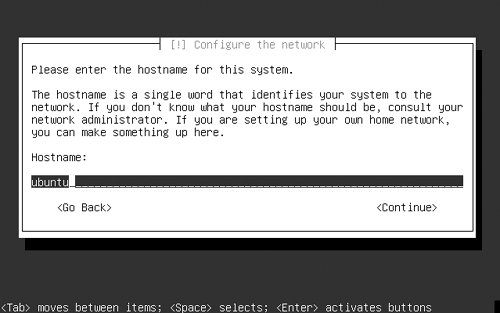 Use the text box to add your own hostname, or use the default Ubuntu hostname if required. Feel free to let your imagination go wild, and create a theme for your hostnames (such as superheroes). Each host on your network can be related to that theme (e.g., Superman, Batman, Spiderman). Creating PartitionsCreating partitions is the most challenging part of the installation routine. Before you partition your disk, think about how your partitions should be organized. You will see the screen in Figure 2-11. Figure 2-11. Partitioning disks.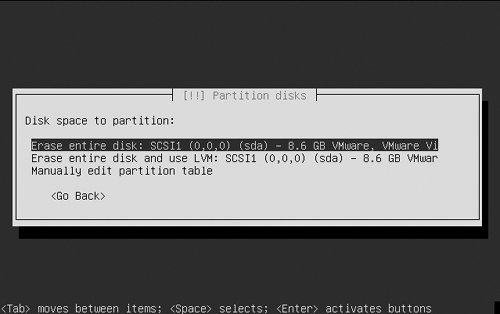 You are given a number of partition options:
In the majority of cases, you probably want to use the Erase Entire Disk option. This will erase everything on the hard drive in your computer and set everything up for you. The second option, Erase entire disk, and use LVM, allows you to use Logical Volume Management (LVM). Finally, if you want to set up specific partitions, use the Manually Edit Partition Table option. Let's look at each of these options in turn and how they are used. Erase Entire DiskWhen you select this option, your entire disk is partitioned automatically. The installer will tell you that a primary and logical partition will be created, and then it asks if you want to go ahead and create the partitions. Click Yes, and you are done. Erase Entire Disk and Use LVMConfiguring LVM is covered in Chapter 5. Manually Edit Partition TableSelect this option if you want to create your own partitions manually. Here you can create a number of different types of partitions, set their size, and configure their properties. Creating these partitions is not done in the same graphical way as the live CD installer, and so it is a little more complex. However, doing so is still largely a process of selecting something and clicking Enter. You are given a number of options with which to kick off:
Quick Tip Discussion of software RAID and Logical Volume Manager is covered in Chapter 5. Your disk is listed below these options, and it may display a few existing partitions. If you want to delete the existing partitions, select each one, click Enter, and select Delete the Partition. When you have deleted some partitions, you should see a FREE SPACE line. The FREE SPACE line is used to create new partitions. If the disk was empty already and you don't see a FREE SPACE line, select the hard disk, and click Enter. When it asks if you want to create an empty partition table, click Yes. You should now see the FREE SPACE line. To create a new partition, select the FREE SPACE line, and click Enter. In the next screen, click Create a New Partition, and click Enter. Now enter the size the partition should be. You can use gigabytes (GB) and megabytes (M) to indicate size. For example, 4.2GB is 4.2 gigabytes, and 100M is 100 megabytes. You can also use a percentage or just add max to use the entire disk. Add the size, and then press the Tab key to select Continue. Click Enter. You are next asked whether the partition should be primary or logical. It is likely that you will want a primary partition. Make your choice, and continue. If this is the first partition, you are asked if the partition should be at the beginning or end of the disk. It is recommended that when creating the root partition (known as /) on older computers, it should be placed at the beginning of the disk. This gets around some potential BIOS problems on older hardware. On newer computers, this is no longer a problem, and you can put the partition where you like on the disk. On the next screen to display (see Figure 2-12) you can configure some settings for the partition. Figure 2-12. Setting partition options.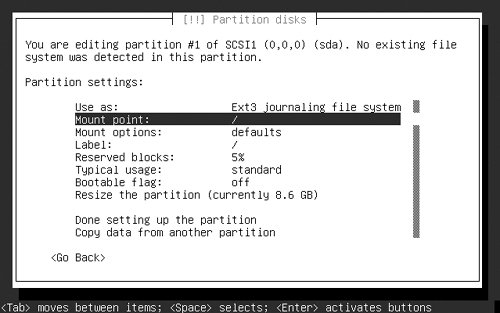 The settings are run down for you in Table 2-1.
With the partition configured, click the Done Setting Up the Partition option. You can now select FREE SPACE again (if there is free space left, of course) to create another partition. When you have finished partitioning, click Finish Partitioning and Write Changes to Disk option. Configuring a UserThe next part of the installation routine configures a user for the computer. This user role is important as it cannot only be used as a normal user but also has the ability to use sudo to perform system administrator tasks. You are first asked to enter a full name for the user (such as Alan Clement). Next you are asked for a username, and one will be picked for you from your full name (such as alanc). If you want another username, enter it there. Finally, you are asked to enter a password for the user and asked to repeat the password for verification. Finishing UpAt this point, the installation routine can now go away and install the system for you. After this the computer will reboot, and the installation is complete. |
EAN: 2147483647
Pages: 133