Setting Things Up
|
| < Day Day Up > |
|
To get started, you will have to turn your computer off, connect your printer to the computer, turn on the printer, and then restart your computer. Of course, if your printer was connected and on during installation, you can skip this step. Either way, if your printer is supported, the system will find it and automatically configure it.
Sometimes, things can be a tad less automatic: When your system starts up, it will, upon finding your printer, shoot up a blue and red Kudzu (hardwareprobing utility) screen, which will tell you that it has found some new hardware. On that screen, you then press any key to proceed, and on the following screen you tell it to configure your printer by hitting ENTER.
That’s it, as far as printer hardware goes. After that, you still might have to set it up so that the operating system knows how to communicate with that particular printer.
To see whether or not you will have to do this, go to the GNOME Panel and click the GNOME Print Manager icon (the one that looks like a printer). If a printer icon appears in the window that pops up, you are all set.
If not, follow these steps:
-
In the GNOME Main menu, select System Settings > Printing. You will be prompted for your root password, so type it in and then click OK. After doing this, the Printer Configuration window (shown in Figure 6-1) will appear, and it will be as empty as my head in the early morning.
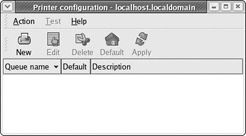
Figure 6-1: The empty Printer Configuration window -
To remedy this emptiness, you will need to create a new print queue — a print queue is more than just where your documents line up for the next crack at the printer — it is a virtual printer, but you will learn more about that further on in the chapter. For now, just click on the New button to get started. This will start up the Print Queue wizard (see Figure 6-2).
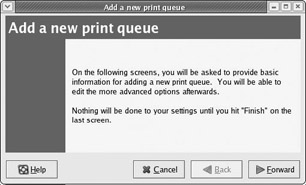
Figure 6-2: Starting up the Print Queue wizard -
Click the Forward button to get to the next page of the wizard. In this page, you will give your printer a name and, if you like, write a comment about it. Because my printer is a Hewlett-Packard, I’ll call it “Hewie,” but you are free to name yours whatever you like. You needn’t worry too much at this point; you can always change the name later. You can also leave the comment section empty for now — you can fill it in later when you find out how to use it best for your purposes. Once you are done bestowing a name upon your printer, click the Forward button.
-
The next wizard page is quite important, as it will show you whether or not your printer was configured properly (see Figure 6-3 on the next page). If it was, the name of the printer should appear here as /dev/lp0 yourprintername or /dev/usb/lp0 yourprintername, depending on whether your printer is connected to a parallel/printer port or a USB port. (The yourprintername part will be the name you gave your printer in the previous step, of course.) If your printer appears here, then you can proceed by clicking Forward.
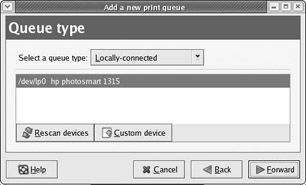
Figure 6-3: Checking the queue type for your new printer queue -
In the next page of the wizard, it is likely that your printer will already be selected. If it is, then just go on to the next step. If it is not, and the drop- down menu says Generic, click the menu and scroll down to find and select your printer’s manufacturer. Once you do that, a list of all the supported models for that manufacturer will appear in the bottom portion of the wizard page. Scroll through that list to find and select your model. When you are all done, the wizard page should look something like that in Figure 6-4 on the next page, although yours will differ depending on the printer you have.
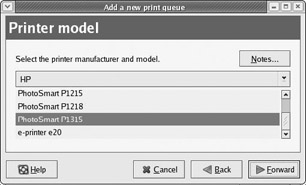
Figure 6-4: Selecting the printer model for your new printer queue -
Once all is as it should be, click the Forward button, which will take you to the last page of the wizard.
-
This last page is merely an announcement that the wizard is about to create a new queue. Click Apply, and a small window will open asking if you want to print out a test page. Doing so isn’t a bad idea, so click Yes and you will soon find out if all is working as it should. If your test page looks okay, you’ve done well, and you now have yourself a print queue. You can start committing your words to paper.
Note If your test page didn’t come out the way it should, or if your printer wasn’t configured automatically or correctly by the system, check out www.linuxprinting.org and see if there are any special requirements or caveats for your model.
|
| < Day Day Up > |
|
EAN: 2147483647
Pages: 188