Using Eclipse for Time Expression
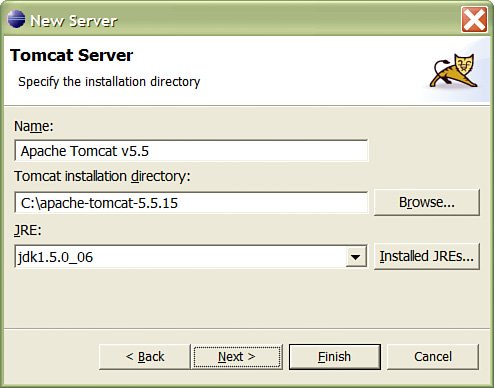
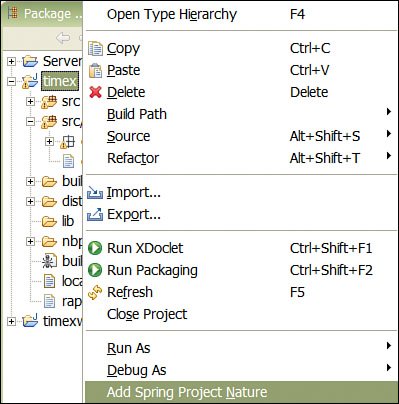
| Until now, we have used a variety of tools and technologies from the command line, so it would be nice to get the same or better functionality, given the toolbox paradigm I used to describe Eclipse earlier in this chapter. You'll be glad to know that plug-ins are available for each of these technologies. The JDT already tightly integrates views for Ant and JUnit, so we just need to get the plug-ins for the other technologies. This is relatively simple using the Eclipse software update feature or by downloading the plug-in as an archive file (.zip and .tar.gz, for example) and installing. Let's review the various plug-ins applicable to Time Expression. Prebundled JDT Plug-insAs I mentioned earlier, the JDT provides several plug-ins, such as a JSP editor, Ant view, and JUnit plug-ins. Also, we looked at a couple of Ant and JUnit plug-in related screen-shots in Figures 8.26 and 8.27. Figure 8.32 shows our view file for our Enter Hours screen, enterhours.jsp, being edited. Notice the context help (invoked using Ctrl+spacebar) for the spring:bind tag library and the integration with the Outline view (to display the JSP elements and attributes). Figure 8.32. JSP Editor.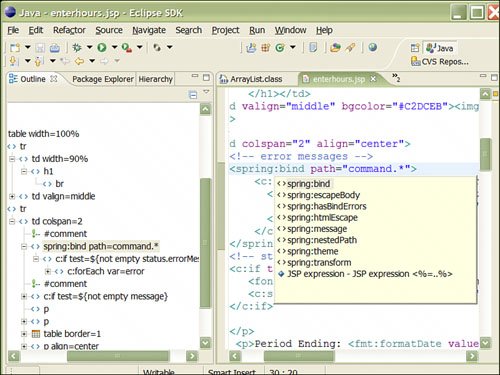 I use Ant within Eclipse only when I want to copy configuration files, build/deploy a distribution, or perform other special tasks I have defined in our build.xml file. However, for compilation of individual .class files, I rely on JDT's builder because it is so fast and transparent (that is, it compiles automatically every time I save my .java files). To begin using our build.xml file within Eclipse, we need to add it from the Ant view. Select Window, Show View, Ant to add the Ant view. From the Ant view, select the Add Buildfiles option and select the Time Expression build.xml file as shown in Figure 8.33. Figure 8.33. Adding the Time Expression build.xml.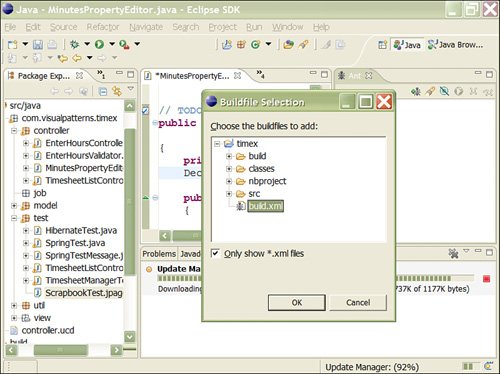 When it comes to JUnit, I use the JDT integrated support for JUnit extensively. Let's start out by adding the JUnit view using the Window, Show View, Other menu item (look for Java, JUnit in the list of views). Figure 8.34 shows how we can run the TimesheetManagerTest class by selecting the Run, Run As, JUnit Test option (available on the Eclipse menu, source code context menu, or Package Explorer). The results of the test case run are shown in the JUnit view and the command output in the Console view. Figure 8.34. Sample JUnit test case run. Although I have discussed a single JUnit test class here, real-world projects typically contain lots of such JUnit test classes (potentially, in the tens to hundreds). Data Plug-in (for HSQLDB)Next we will set up the capability to work with HSQLDB within the Eclipse workbench. Ensure that the HSQLDB server is running as specified in Chapter 5, "Using Hibernate for Persistent Objects." Next, we will add the Data, Database Explorer view. From the Database Explorer view, either right-click the Connections icon or the corresponding button on the view's toolbar. Figure 8.35 shows my connection parameters. I couldn't find a database manager for HSQLDB, but I was able to fake it by using DB2 UDB V8.1, and everything seemed to work. There is probably at least one or more plug-ins out there for HSQLDB, but I wanted to use the standard plug-ins provided with the WTP. Figure 8.35. HSQLDB setup for Database Explorer. Figure 8.36 shows a variety of things we can do with the Data related plug-ins. For example, as I'm browsing the database objects, I ran a query against the Employee table and can even generate a DDL script! Figure 8.36. A variety of features provided by the Data plug-ins.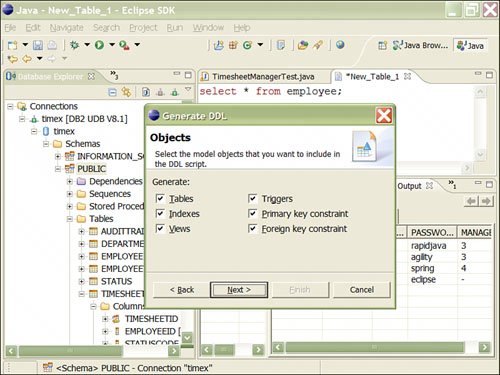 Servers Plug-in (for Tomcat)Next, we will set up the capability to work with Tomcat from the Eclipse workbench. Let's begin by adding the Servers view. We can right-click in the Servers view (or open Server from the File, New, Other list of wizards). On the next screen, we will select Tomcat v5.5 for your setup; if you are using another server, you can choose it here as well (BEA, IBM, or JBoss, for example). On the screen shown in Figure 8.37 (part of the New Server Wizard), I noticed a little warning message indicating that Tomcat requires a JDK (versus a JRE), so I added a new JDK via the Installed JREs button, and after returning to the wizard screen, I selected it from the JRE drop-down list (yes, the JRE and JDK cross-referencing can get confusing). Figure 8.37. Add New Server Wizard screen (for adding Tomcat Server). After our Tomcat Server is added, we need to tweak an entry. (It sounds easy now, but it took me a while to figure this out.) Figure 8.38 shows the Server Overview configuration editor (yup, an editor; Eclipse can have any number of content editors and not just for text, but also for images and other types of content). Next, we will uncheck the Run Modules Directly Checkbox from Workspace option because we want to use the existing configuration so that our Ant can continue to function. Also, notice the Modules tab toward the bottom-left part of Figure 8.38; this can be used to configure external modules, both web archives (.war files) and exploded web application directories (for example, our build/timex directory). Figure 8.38. Tomcat Server configuration.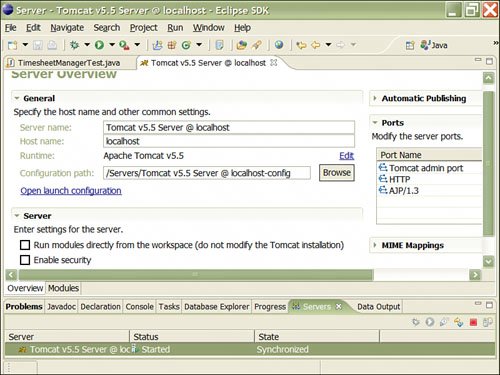 Note Deploying an exploded directory versus a .war file is a better idea during development (versus UAT, for example) because you can quickly test changes to files such as JSP, HTML, and images without the need to redeploy the entire application (.war file). Now we are ready to run Tomcat. Notice the Servers view crammed at the bottom of Figure 8.38. This is where we can stop and start Tomcat; the status shows as Started and the changes we made to the configuration are Synchronized. We can start, stop, and monitor Tomcat from this view. We can also start Tomcat in Debug mode, which enables debugging of server-side applications (for example, using breakpoints, inspecting variables, and so on; debugging is covered in detail in Chapter 9, "Logging, Debugging, Monitoring, and Profiling"). Hibernate Plug-inNow that we have the plug-ins from eclipse.org installed and set up, we need to go out and get some third-party plug-ins. These can be installed in the same manner as the WTP plug-inthat is, from the Help, Software Updates, Find and Install menu item or by simply unpacking an archive into the /eclipse or /eclipse/plugins/ subdirectory (in case you are behind a firewall, for example), depending on how the archive is packaged by the vendor. Hibernate provides a plug-in that eases the generation of the hibernate XML configuration and mapping filesa nice feature considering mapping is one of the tedious jobs of working with ORM technologies. Hibernate plug-ins can be obtained as a direct archive download or via the Eclipse software update feature, which is my general preference. Follow the instructions on the Hibernate site (http://hibernate.org/) to obtain this plug-in. At the time of this writing, I was able to connect to http://download.jboss.org/jbosside/updates/development/ and download the latest plug-ins. After the installation, I had to restart Eclipse. Figure 8.39 shows some of the Hibernate views (organized inside a perspective named Hibernate Console). These views enable us to create a hibernate.cfg.xml file, mapping files, test run HQL scripts, and more. Figure 8.39. Hibernate plug-in views.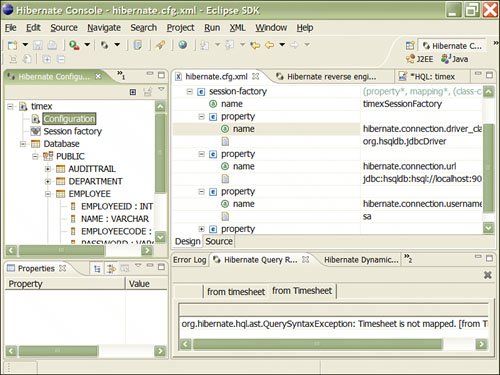 The Spring IDE Plug-inLast, but not least, we will get a Spring plug-in known as the Spring IDE, a subproject of the Spring Framework. One of the fundamental problems of working with Spring is the heavy use of XML files for configuration. Before you know it, the XML grows and can become a cumbersome task to edit and maintain, even when you have it split into multiple application context XML files (as recommended by Spring). According to the http://springide.org website, this plug-in should be downloaded using only the Eclipse software update feature. Sometime back, I personally tried this as a direct install (unzip of an archive file) and it corrupted my install, so beware! Follow the up-to-date instructions on the Spring IDE website to obtain this plug-in. At the time of this writing, I was able to download and install the plug-in from http://springide.org/updatesite/ within minutes. As expected, I had to restart Eclipse for this new plug-in to take effect. Note The Web Standard Tools (WST) project is required by the Spring IDE; luckily, we already installed it. After this plug-in is successfully created, we need to right-click the timex project from the Package Explorer view and select the Add Spring Project Nature option (as shown in Figure 8.40). According to the following excerpt taken directly from the Eclipse help documentation: Figure 8.40. Add Spring Project Nature. "Project natures allow a plug-in to tag a project as a specific kind of project. For example, the Java development tools (JDT) uses a 'Java nature' to add Java-specific behavior to projects. Project natures are defined by plug-ins, and are typically added or removed per-project when the user performs some action defined by the plug-in." After we have tagged the timex project as a Spring nature, we need to do the following:
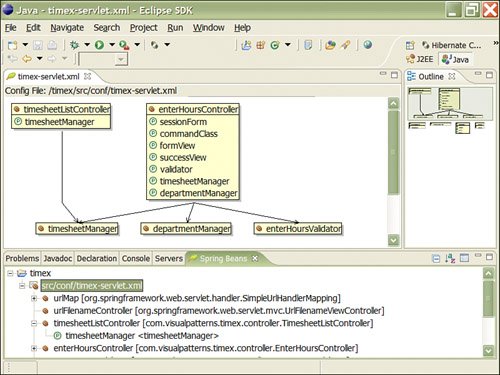
We can now navigate using the graph or tree views to navigate our XML file! Beats using just a text-based editor. In addition, the Spring IDE integrates tightly with other Eclipse views, such as the Problems view, to display validation errors for the Spring application context files associated with Spring IDE. Also, notice the Outline view in Figure 8.41; it shows a scaled-down version of the diagram for easier navigation in case your diagrams become large and complex. The Spring IDE plug-in is bundled with online help, which can be accessed from Eclipse's Help, Help Contents menu. Other Notable WTP Plug-insWe looked at a few plug-ins in this section that apply to Time Expression. However, the WTP project provides plug-ins, editors, views, and wizards for other aspects of JEE application development, such as support for EJB projects, application client projects, web services, connectors, and much more. These can all be conveniently accessed using the JEE perspective or related views. |
EAN: 2147483647
Pages: 219