6.1 Organizing a document using styles
Organizing a document using styles
Both outlines and tables of contents are based on styles. In each case, you associate a style with each heading level, and Word does the rest. (In fact, Word can use this approach for multi-level lists, as well. See "Organizing text with lists" in Chapter 4.) The first step in creating either an outline or a table of contents is to use styles for each heading level in your document. You can use the built-in styles or create your own set of styles. As an extra benefit, this makes it easy to ensure that headings at the same level look the same throughout.
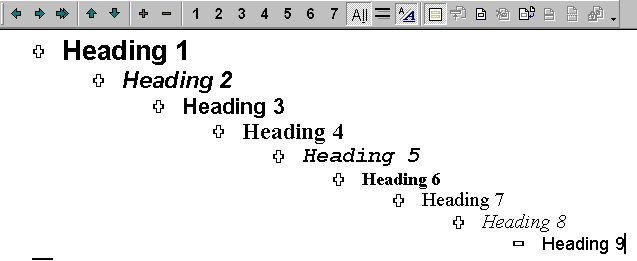
Word recognizes nine heading levels. Not coincidentally, the Normal template includes nine styles, named "Heading 1" through "Heading 9," that are linked to those nine heading levels. The easiest way to prepare for outlines and tables of contents is to use those built-in heading styles in your own documents. Figure 1 shows them in outline view.

Figure 1
. Built-in heading styles. You can use these styles for your headings to simplify creation of outlines and tables of contents, or you can set up your own.You can use other styles, if you prefer. Set the heading level for a style through the OutlineLevel property of the Style object s ParagraphFormat object. The OutlineLevel property uses a set of constants with names like wdOutlineLevel1 the value of each is its outline level.
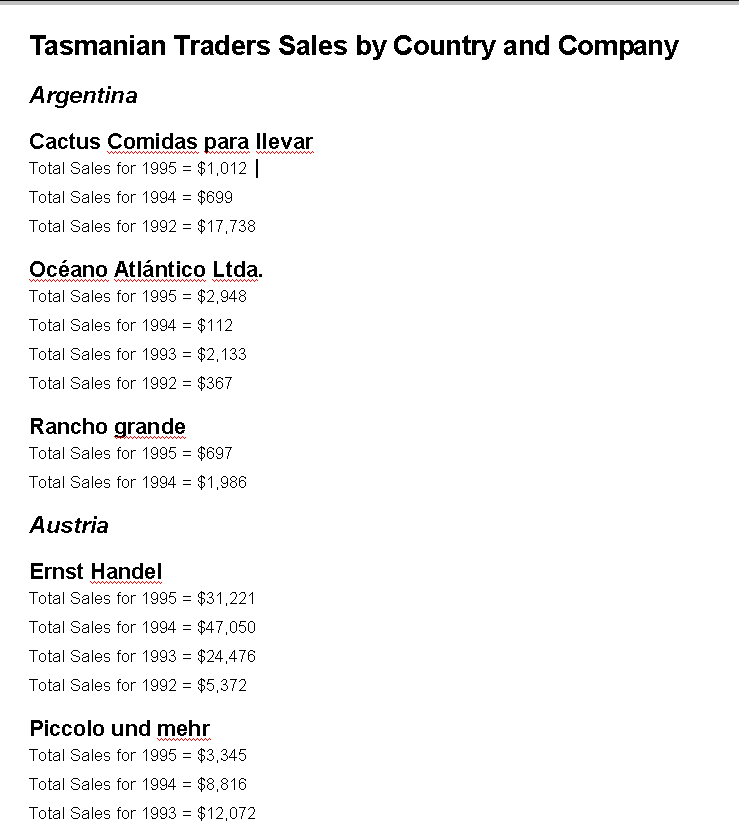
To demonstrate this use of styles, Listing 1 is a program that creates a report of TasTrade sales organized by country. Within each country, customers are listed alphabetically. The report s title uses the Heading 1 style. Country names use Heading 2, and company names use Heading 3. The sales by year for each company (rounded to the nearest dollar) make up the body of the report and use the Body Text style. This program is included as MultiLevel.PRG in the Developer Download files available at
www.hentzenwerke.com.Listing 1
. Using heading styles. This program creates a document that makes both outlining and table of contents creation simple.* Create a multi-level document using built-in
* heading styles.
#DEFINE wdCollapseEnd 0
#DEFINE CR CHR(13)
LOCAL oDocument, oRange
LOCAL cCountry, cCompany, nYear
* Create an instance of Word.
* Make it public for demonstration purposes and so
* that you can use oWord in the following examples.
RELEASE ALL LIKE o*
PUBLIC oWord
oWord = CreateObject("Word.Application")
* Make Word visible.
oWord.Visible = .T.
oDocument = oWord.Documents.Add()
OPEN DATA _SAMPLES + "TasTrade\Data\TasTrade"
* Collect customer/order information. Result contains one record per
* company per year, order by country, then company,
* then year in descending order
SELECT Company_Name, Country, YEAR(Order_Date) AS Order_Year, ;
ROUND(SUM(Order_Line_Items.Unit_Price*Order_Line_Items.Quantity - ;
(0.01 * Orders.Discount * Order_Line_Items.Unit_Price * ;
Order_Line_Items.Quantity)) + Orders.Freight, 0) AS OrderTotal ; FROM Customer ;
JOIN Orders ;
ON Customer.Customer_Id = Orders.Customer_Id ;
JOIN Order_Line_Items ;
ON Orders.Order_Id = Order_Line_Items.Order_Id ;
GROUP BY 3, 2, 1 ;
ORDER BY 2, 1, 3 DESC ;
INTO CURSOR CompanyInfo
* Send data to document, as follows:
* Country is Heading 2
* Company is Heading 3
* Total with some text is Body Text
oRange = oDocument.Range()
WITH oRange
.Style = oDocument.Styles[ "Heading 1" ]
.InsertAfter("Tasmanian Traders Sales by Country and Company" + CR)
.Collapse( wdCollapseEnd )
ENDWITH
cCountry = ""
cCompany = ""
nYear = 0
SCAN
WITH oRange
.Collapse( wdCollapseEnd )
IF NOT (Country == cCountry)
.Style = oDocument.Styles[ "Heading 2" ]
.InsertAfter( Country + CR )
.Collapse( wdCollapseEnd )
cCountry = Country
cCompany = ""
nYear = 0
ENDIF
IF NOT (Company_Name == cCompany)
.Style = oDocument.Styles[ "Heading 3" ]
.InsertAfter( Company_Name + CR )
.Collapse( wdCollapseEnd )
cCompany = Company_Name
nYear = 0
ENDIF
.Style = oDocument.Styles[ "Body Text" ]
.InsertAfter( "Total Sales for " + TRANSFORM(Order_Year,"9999") + ;
" = " + TRANSFORM(OrderTotal,"@B, $$ 99,999,999") + CR)
.Collapse( wdCollapseEnd )
ENDWITH
ENDSCAN
Figure 2
shows a portion of the resulting document.Working with outlines
Outlines in Word are more a state of mind than a separate entity. They allow you to hide the details of a document while still showing its structure. Because different portions of an outline can be expanded different amounts, Word s outlines also provide you with the effect of a drill-down report.
Once you use appropriate styles to create the headings in a document, you ve outlined the document. To see the outline, all you have to do is switch to Outline View by choosing View|Outline from the menu. As Figure 1 shows, Outline View includes a special toolbar for working with outlines. It allows interactive users to expand and collapse the outline, to determine which heading levels are visible, to decide whether to show all body text or just the first line, and to manipulate items in the outline, changing their level. When a document is displayed in Outline View, printing it prints the displayed outline, not the entire document. We suppose this is what you should get from a WYSIWYG word processor, but it s something of a surprise, since other views don t affect printing.

Figure 2
. Multi-level document. The headings in this document, created by the program in Listing 1, use the built-in heading styles.As Views are a visual issue and Automation is usually performed behind the scenes, what does all this mean for Automation? You probably won t need to display an outline in an Automation setting, but you may need to print it, requiring a switch to Outline View. Fortunately, this switch to Outline View and subsequent outline manipulation can be done even when Word is hidden.
The key object for working with outlines is the View object, accessible through the View property of the Window object. The Window object is accessed using the ActiveWindow property of Document. So, to set the ActiveDocument to OutlineView, use code like:
#DEFINE wdOutlineView 2
oWord.ActiveDocument.ActiveWindow.View.Type = wdOutlineView
Figure 3
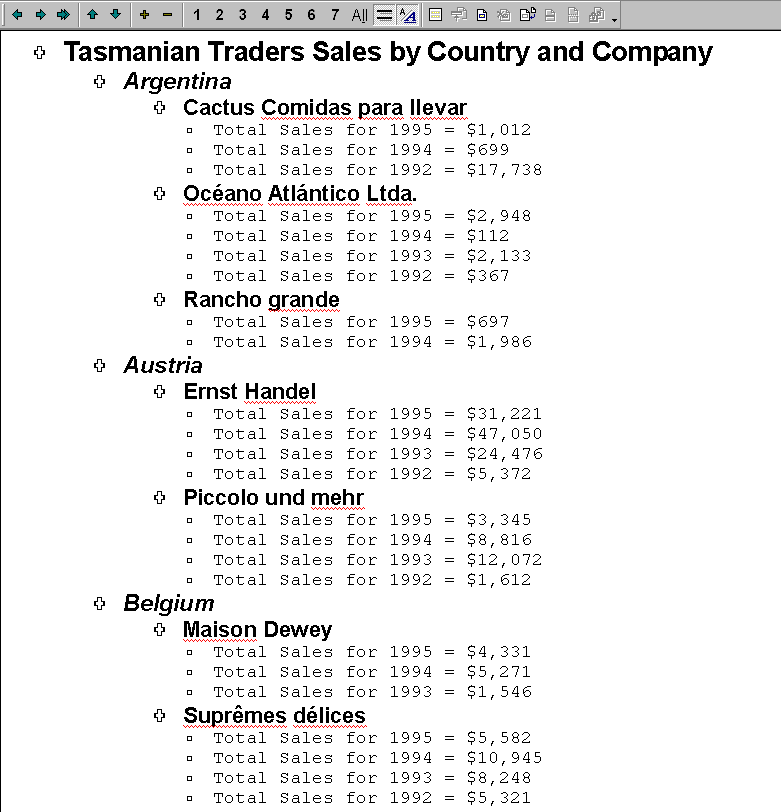
shows the results of issuing this code against the multi-level document from Figure 2. Other values for View s Type property include wdNormalView (1) and wdPrintPreview (4).
Figure 3
. Document outline. If a document s headings use the right styles, creating an outline is as easy as switching to Outline View.Once you re in Outline View, you can expand and collapse the outline, either as a whole or parts of it, using View s ExpandOutline and CollapseOutline methods. Each accepts a single, optional, parameter the range to be expanded or collapsed. If the parameter is omitted, the current selection/insertion point determines what is expanded or collapsed. For example, to collapse the detail for the vendor "Cactus Comidas para llevar" in Figure 3, issue this code:
oRange = oWord.ActiveDocument.Paragraphs[3].Range()
oWord.ActiveDocument.ActiveWindow.View.CollapseOutline( oRange )
 ExpandOutline has a bug (acknowledged by Microsoft). When you pass it a range consisting of a heading paragraph that has body text both above and below it, it expands that paragraph, showing the body text below it, but it also shows the body text above it. This expansion error causes problems when you attempt to collapse this part of the outline. In order to do so, you have to collapse a much larger portion of the outline than you should.
The ShowHeading method lets you determine how many levels of headings are displayed overall. You pass it a number all headings up to and including the specified level are displayed, while all headings below that level, plus body text, are hidden. For example, to display headings up to level 3, use this code:
oWord.ActiveDocument.ActiveWindow.View.ShowHeading( 3 )
If you want to display all headings, call the ShowAllHeadings method:
oWord.ActiveDocument.ActiveWindow.View.ShowAllHeadings()
To show only the first line of body text, set the ShowFirstLineOnly property to .T.; this is a good way to get a summary of the document without showing just the headings. (In the example shown in Figure 3, changing this property doesn t make a difference because each paragraph has only a single line.) If you re showing all levels, it gives you the first line of each paragraph. Unfortunately, this property works only on screen; it doesn t affect printed output.
Notwithstanding the inability to use ShowFirstLineOnly, once you ve arranged the outline the way you want it, call Document s PrintOut method (described in the "Printing" section in Chapter 4) to print your outline.
Creating a table of contents
When you have a document with headings that use heading level styles, creating a table of contents is a piece of cake. One call to the Add method of the document s TablesOfContents collection and you re done. All you need to know is where to put the table of contents (a range) and which heading levels you want to include. This code adds a table of contents right at the beginning of the document. It includes headings through level 3.
#DEFINE wdNormalView 1
oWord.ActiveDocument.ActiveWindow.View.Type = wdNormalView
oRange = oWord.ActiveDocument.Range(0,0)
oWord.ActiveDocument.TablesOfContents.Add( oRange, .T., 1, 3 )
Figure 4
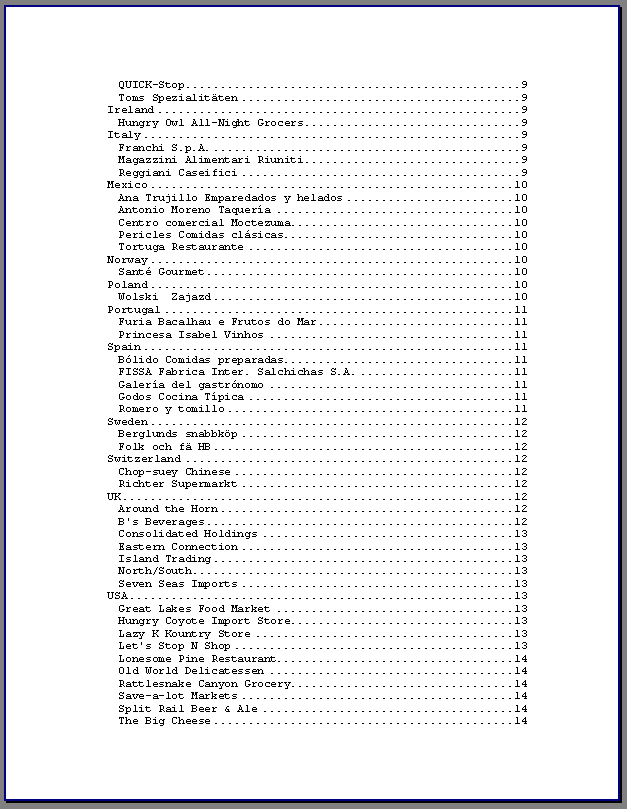
shows one page of the results for the document in Figure 2.TablesOfContents is a collection of TableOfContents objects. (Note the plural "Tables" in the collection name.) Each TableOfContents object represents one table of contents in the document. Why would you have more than one? Because you might have a separate table of contents for each chapter or each major section in a document.

Figure 4
. Table of contents. Using built-in heading styles makes it a breeze to create a table of contents.The Add method takes quite a few parameters. Here s the syntax, listing the ones you re most likely to use:
oDocument.TablesOfContents.Add( oRange, lUseHeadingStyles, nFirstHeadingLevel,
nLastHeadingLevel, lUseFields, ,
lRightAlignPageNums, lIncludePageNums,
cAddedStyles )
| oRange | Object | Range where the table of contents should be placed. |
| lUseHeadingStyles | Logical | Indicates whether the table of contents should be created based on built-in heading styles. Defaults to .T. |
| nFirstHeadingLevel | Numeric | The lowest numbered heading style to be included in the table of contents. Defaults to 1. |
| nLastHeadingLevel | Numeric | The highest numbered heading style to be included in the table of contents. Defaults to 9. |
| lUseFields | Logical | Indicates whether items marked as table of contents fields are included in the table of contents. See Help for more information. Defaults to .F. |
| lRightAlignPageNums | Logical | Indicates whether page numbers are right-aligned on the page. Defaults to .T. |
| lIncludePageNums | Logical | Indicates whether page numbers are included in the table of contents. Defaults to .T. |
| cAddedStyles | Character | A comma-separated list of styles other than the built-in heading styles that should also be used in creating the table of contents. |
Once you create the table of contents, you can set the character that fills the space between the entries and the page numbers on each line by using the TabLeader property of the TableOfContents object (not the collection). Table 1 shows constant values for TabLeader.
Table 1
. Filling the space. The TabLeader property determines how the space between the headings and the page numbers in a table of contents is filled.| Constant | Value | Constant | Value |
| wdTabLeaderSpaces | 0 | wdTabLeaderLines | 3 |
| wdTabLeaderDots | 1 | wdTabLeaderHeavy | 4 |
| wdTabLeaderDashes | 2 | wdTabLeaderMiddleDot | 5 |
Several other properties of TableOfContents let you change parameters set by Add, such as IncludePageNumbers, RightAlignPageNumbers, LowerHeadingLevel (corresponds to nFirstHeadingLevel) and UpperHeadingLevel (corresponds to nLastHeadingLevel).
As you may have guessed from our comments on the lUseFields parameter, there is another approach to creating a table of contents. It involves marking each item you want listed with a code. For details, see the topic "Use field codes for indexes, tables of contents, or other tables" in the regular Word Help.
Copyright 2000 by Tamar E. Granor and Della Martin All Rights Reserved
EAN: 2147483647
Pages: 128
- Chapter I e-Search: A Conceptual Framework of Online Consumer Behavior
- Chapter II Information Search on the Internet: A Causal Model
- Chapter V Consumer Complaint Behavior in the Online Environment
- Chapter X Converting Browsers to Buyers: Key Considerations in Designing Business-to-Consumer Web Sites
- Chapter XIV Product Catalog and Shopping Cart Effective Design