Creating Time-lapse Movies and Animation
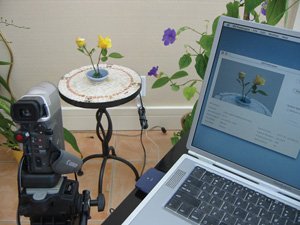
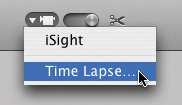
| Our minds are mesmerized by animation, whether it's a time-lapse movie of a brewing storm, some claymation that brings Play-Doh to life, or the hand-drawn artistry of a classic cartoon. With some inexpensive software and a video camera, you can put your world into motion. The process is simple, if time consuming. For animation, shoot one frame of video at a time, moving objects or changing a drawing between each frame. Time-lapse movies are easier: point your camera at an interesting scene, then go to the mall while your software snaps a frame at whatever interval you like. When you play your final movie, clouds will billow, and flowers will bloomyou get the idea. A time-lapse or animation project can be a fun school or family endeavor. Here's a look at the tools you'll need, along with some tips and project ideas. The Tools To put your world in motion, you need a camera, a tripod, and some software. To get the best video quality, connect a miniDV camcorder to your Mac's FireWire jack. If you don't have a camcorder, an inexpensive Web cam, such as Apple's iSight, will also work. iMovie HD 6 can create time-lapse movies, as can several other programs. Boinx Software's iStopMotion was designed specifically for the task. It works with DV cameras as well as Web cams. You can also use Web-cam software, such as Evological's EvoCam or Econ Technologies' ImageCaster. For links to these and other animation tools, see www.macilife.com/imovie. The Techniques Prepare your gear. Mount your camera on a tripod and plug the camera's power adapter into a wall outletbatteries won't last long enough. Many DV camcorders shut themselves off after a few minutes when you aren't recording to tape. You can usually bypass this auto-shutoff by taking the tape out of the camera. If your camera still insists on slumbering, try leaving its tape door open. Connect the camcorder to your Mac, launch your software, and you're ready to go. Here are some possible destinations. Toys in motion. For an easy stop-motion project, put some toys in motion: the Matchbox Car 500. For your animation stage, choose an area where the lighting is going to be fairly consistent over several hours. If you're relying on light from windows, try to shoot on a cloudy day. Dramatic variations in lighting from one frame to the next will ruin the illusion of motion. For animators, patience isn't a virtueit's a must. Move objects slowly and graduallyjust a fraction of an inch between frames. And whatever you do, don't bump your tripod between frames. To save time, try shooting two frames, instead of just one, between each move. Animators call this animating on twos, and it takes half the time but usually delivers fine results. Kids in motion. For a variation on the previous theme, animate some kids: point the camera at the backyard, and have the kids take a small step between each frame. In the final movie, they'll appear to move without walking. Time for time-lapse. Making time-lapse movies is much easier, since your subject does the moving on its own. All you have to do is set up your scene and start capturing. In iMovie HD, choose Time Lapse from the camera icon's popup menu, choose an interval, and click OK. Then click Import to start recording (see page 226). What to shoot? A snowstorm, a rose, the clouds, a burning candle, a glass filled with ice, the shadows cast by a fence or set of window blinds. Anything that moves or changes shape slowly in the real world is a great candidate for time-lapse photography. Sunsets and sunrises make spectacular time-lapse movies. To avoid damaging your camera, don't zoom in on the sun or point the camera directly at a midday sun. How frequently should you capture a frame? That depends on how quickly your subject is changing and on how long you want your final clip to be. For a time-lapse of a rose blooming, I used a one-minute interval, which turned an hour of real time into one second of video. For some cloud scenes, I used a 15-second interval. To calculate the ideal frame interval, begin by determining the duration of the real event, the desired duration of your final clip, and the number of frames per second you want the final clip to have (20 frames per second is a good starting point). Say a rose bud takes four hours to blossom, and you want the time-lapse clip to play for nine seconds. Multiplying nine seconds by 20 frames per second yields 180 frames. Finally, divide the duration of the real event by the number of frames you need. In this example, 240 minutes divided by 180 frames equals about 1.3 minutesor about 80 seconds between frames. Post-Production After creating an animation, enhance it. Make a montage. When researching animation and time-lapse techniques, I shot a variety of time-lapse scenes, then edited them into a montage. After shooting the clips and importing them into iMovie HD, I added a music track. I've always loved Koyaanisqatsi, a film comprised largely of beautiful time-lapse photography; its Philip Glass music score is a perfect complement to time-lapse scenes. A quick search of the iTunes Music Store led to the soundtrack album, and 99 cents later, I had my soundtrack. (Remember, you can't use copyrighted work in commercial projects.) Next, I imported my time-lapse movies into iMovie HD and added them to the timeline, cropping each clip so that the scenes would change roughly in tempo with the music. Then I added a cross-dissolve transition between the scenes. Run it backwards. To put a different spin on a time-lapse clip, reverse it: see a rose close itself or a glass of water turn into a glass of ice. After adding the clip to iMovie HD's timeline, select it and use the Fast/Slow/Reverse effect.
|