Controlling a Picture s Position on the Page
Controlling a Picture's Position on the Page
After you insert a picture into your page, you can change how the picture is displayed on the page. For example, you can control how it aligns with surrounding text, how much space surrounds the picture, and whether it has a border. Because Expression Web uses CSS styles to control all these characteristics, you get to be precise and nitpicky about how your pictures look. In this section, we introduce you to a few positioning options as they relate specifically to pictures. Check out Chapter 8 for more information about using CSS styles to position pictures and other elements on your Web pages.
Aligning a picture with surrounding text
Generally, aligning pictures with text is best accomplished after you get into the finer points of laying out your pages, either with CSS positioning or in table layouts. (We cover positioning with CSS in Chapter 8 and table layouts in Chapter 10.)
However, when you insert a picture at the start of a paragraph of text and you simply want to control how the text flows around it, these steps do the trick:
-
In the page, double-click the picture.
The Picture Properties dialog box appears with the General tab visible.
-
Click the Appearance tab.
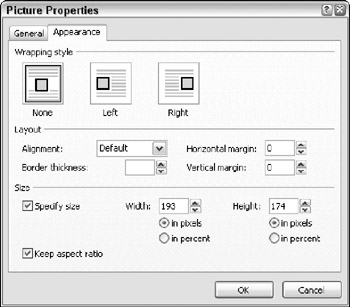
Figure 5-7 shows the contents of the Appearance tab.

Figure 5-7: The Appearance tab in the Picture Properties dialog box. -
To align the picture against the left or right margin and have the text wrap around it, select either Left or Right in the Wrapping Style area.
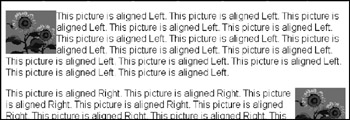
Figure 5-8 shows the results of the Left and Right wrapping style options.

Figure 5-8: The results of the Left and Right alignment options.GLANCE AT THE CODE You use the options in the Alignment drop-down list box to fine-tune how the picture aligns vertically with the text by specifying which part of the text to use as a reference point. Play around with the choices and see whether you get the results you want. Here are your choices:
-
Baseline: Aligns the picture with the text baseline. The baseline is the invisible line that the page's text sits on, something like the lines on a piece of notebook paper.
-
Sub: Moves the picture slightly downward in relation to the text.
-
Super: Moves the picture slightly upward in relation to the text.
-
Top: Aligns the top of the picture with the text.
-
Text-top: Aligns the top of the picture with the top of the tallest text in the line.
-
Middle: Aligns the middle of the picture with the text.
-
Bottom: Aligns the bottom of the picture with the text.
-
Text-bottom: Aligns the picture with the bottom of the text in the line.
-
-
Click OK.
The dialog box closes, and the picture alignment changes accordingly.
| GLANCE AT THE CODE | Take a look at the code for the wrapping-style alignment we describe in Step 3 of the preceding instructions. In this example, we aligned a picture to the left of a block of text: <img alt="old barn" src="/books/1/178/1/html/2/images/barn.jpg" width="320" height="207" style="float: left" /> |
Notice the style information that Expression Web has inserted in the img tag: style=“float: left”. This is an inline style because it appears inside an HTML tag. We talk in Chapter 7 about the different places where Expression Web writes style information and why it matters. For now, we want you to notice the style information: “float: left”. This style declaration (as a style property and value pair are called in CSS) indicates that the picture should move on over to the left edge of the page and let other elements (in this case, a paragraph of text) flow around it. If we had clicked Right (on the Appearance tab, in the Wrapping Style area of the Picture Properties), the style would read style=“float: right”, and the picture would align on the right side of the page with the text wrapping around it on the left. Figure 5-8 shows the result of applying these two options.
When it comes to flowing text around a picture, float is your new best friend. You can use it for page elements other than pictures, too. You find out how in Chapter 8.
Controlling the amount of space surrounding a picture
When you insert a picture in a text block or among other elements on your page, it can get a bit crowded. To give your pictures some elbowroom, you can increase the margins around the left and right sides and the top and bottom of the picture. To adjust margins around a picture, follow these steps:
-
In the page, double-click the picture.
The Picture Properties dialog box appears.
-
Click the Appearance tab (refer to Figure 5-7).
-
In the Horizontal Margin text box, type the number of pixels of blank space that you want to insert to the left and right of the picture.
The specified margin width is inserted on both the left and right sides. For example, if you type 6 pixels, 6 pixels of blank space appear to the left and to the right of the picture.
-
In the Vertical Margin text box, type the number of pixels of blank space that you want to insert above and below the picture.
The specified margin width is inserted on both the top and the bottom. For example, if you type 6 pixels, 6 pixels of blank space appear above and below the picture.
-
Click OK to close the dialog box and adjust the spacing.
| Tip | When you adjust the margins around a picture by using the options on the Appearance tab, Expression Web writes a CSS style for the picture with the margin widths you enter. You can get much more precise margins by editing the style rule. You can even set different margin widths for the left, right, top, and bottom. We show you how to edit automatically generated style rules and describe your options in Chapter 7. |
Adding or removing a picture border
You can place borders around pictures in several ways. The method we describe here simply places a black box around the selected picture. But because the border is controlled by styles, you have many more options for line style, line width, and line color. You can even set different border types for each side individually. (We tell you how in Chapter 7.)
With all these choices, you can easily get carried away and apply borders with wild abandon. But keep basic design principles in mind and preview your pages often to make sure that borders don't unnecessarily create visual clutter on your pages. (We describe how to preview your Web pages in different browsers in Chapter 2.)
To give your picture a simple border, or to remove an existing border, follow these steps:
-
In the page, double-click the picture.
The Picture Properties dialog box appears.
-
Click the Appearance tab (refer to Figure 5-7).
-
In the dialog box's Border Thickness box, type the thickness, in pixels, of the picture border.
We recommend nothing thicker than 2 pixels. Anything much thicker tends to look gaudy, but experiment to see what you prefer.
To remove borders, specify a border thickness of 0 pixels.
-
Click OK to close the dialog box and apply the border setting.
| GLANCE AT THE CODE | Take a peek at the code for border styles. In this example, we specified a border thickness of 2 pixels on the Picture Properties Appearances tab. Here's the code for the picture that is the lucky recipient of the border (it also has the float: left style applied to it; we explain float earlier in this chapter): <img "sunflower" src="/books/1/178/1/html/2/images/sunflower.gif" width="100" height="100" style="float: left: |
Notice that, rather than add the style rule for the border in the img tag, Expression Web added class=“stylex” and wrote the style rule at the top of the page (your style rule may contain other or different style definitions, depending on what you've done to your picture):
.stylex { border-style: solid; border-width: 2px; } By default, Expression Web writes different types of style information either inline (inside the HTML tag) or at the top of the Web page (called internal or embedded style rules). We explain more in Chapter 7 about different types of styles and why it matters where they appear.
EAN: 2147483647
Pages: 142