Using Web Services
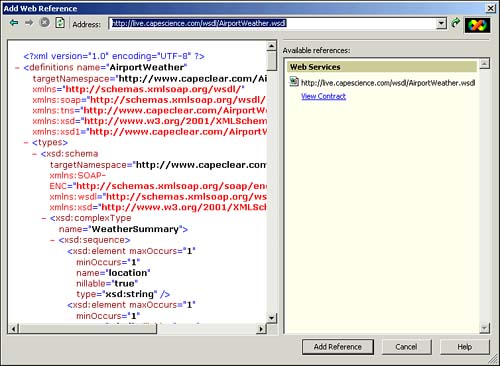
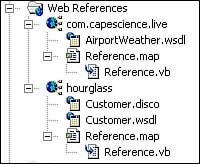
| Using a Web service is very similar to accessing any other type of object within the Visual Studio .NET interface. You must first set a reference to the Web service and then instantiate an object from that Web service. A special type of reference called a Web Reference is used with Web services. In this section, you'll learn how to set a Web Reference and how to work with the resulting Web service objects. Adding a Web ReferenceWithin a project, you can add a Web Reference and specify the proper URL for the Web service (see Figure 7.1). To do this, simply right-click the References folder within the Solution Explorer and select Add Web Reference from the options provided. This will open the Add Web Reference dialog box, as shown in Figure 7.1. Enter the address for a WSDL file and press Enter to retrieve the details of the Web service. In Figure 7.1, we've used the Add Web Reference dialog box to connect to the AirportWeather Web service, which can be used to retrieve details about the weather at airports worldwide. Figure 7.1. The Add Web Reference dialog box displaying information from the AirportWeather Web service. When you click Add Reference, Visual Studio .NET will discover the methods and properties of the Web service and allow these to be used within your application. It does so by creating proxy classes in your project, as shown in Figure 7.2. Figure 7.2. Files created by adding Web References to Web services on two different servers.
The Web Services Discovery Tool ( disco.exe )When you create a Web Reference, Visual Studio performs all of the steps necessary to discover and make available the target Web service. It is also possible to do this explicitly by using the command-line tool disco.exe . The disco.exe utility may be used within the Visual Studio .NET Command Prompt window, accessible through Start, Programs, Microsoft Visual Studio .NET, Visual Studio .NET Tools, Visual Studio .NET Command Prompt. In order to discover the methods and properties of the AirportWeather Web service using this utility, you may input the following: disco http://live.capescience.com/wsdl/AirportWeather.wsdl The tool will contact the Web service and (in this case) create two files on the local PC: AirportWeather.wsdl and results.discomap . The results.discomap file is a cross-reference between the local files and their original URLs. The AirportWeather.wsdl file is an XML file that contains information on the interface of the Web service. This includes details of the messages, parameters, and objects with which you can interact. This file gives Visual Studio .NET the details it needs to let you use a Web service from your code. Table 7.1 details some of the more common options used with the disco.exe utility. Table 7.1. Command-line Options for the disco.exe Utility
The Web Services Description Language Tool ( wsdl.exe )The .NET Framework Software Development Kit (SDK) includes a command-line utility named wsdl.exe that can use a WSDL file and create a proxy class that may be used to invoke the Web service. Using the Visual Studio .NET Command Prompt window, simply navigate to the folder containing the WSDL file and input the proper options: wsdl /language:VB /out:aw.vb AirportWeather.wsdl The resultant file, aw.vb , may then be added to your application project by selecting File, Add Existing Item and then navigating to the proper file. Table 7.2 details some of the more common options used with the wsdl.exe utility. Table 7.2. Command-line Options for the wsdl.exe Utility
|
EAN: N/A
Pages: 188