| Beyond practice sessions, Windows applications will generally consist of more than a single file. These may include application code files with .dll and .exe extensions, graphics files with extensions such as .gif or .bmp , and other data files used by the application storing utility information or strings for multilingual support. The .NET Framework groups all the files from an application into a single logical group called an assembly . The files are not physically altered to designate them as part of an assembly but are instead detailed within the assembly manifest , which includes the metadata for the assembly.  | Each assembly has a version number. All types and resources within an assembly share the same version number to make it possible for applications to refer to the correct version of files. |
When the Common Language Runtime prepares to load an assembly, it reads the manifest to get the following information: -
The name and version of the assembly. -
The files that make up the assembly, including their name and hash values. -
The compile-time dependency of this assembly on other assemblies. -
The culture or language that an assembly supports. An assembly can only support a single language, although you can use satellite assemblies to supply translations. -
The set of permissions required for the assembly to run properly. You can view an assembly's manifest using the Microsoft Intermediate Language (MSIL) Disassembler, which is a separate utility program that may be used from within the Visual Studio interface, via the following process: -
Within the Solution Explorer window of Visual Studio .NET, click the Show All Files button in its toolbar and then navigate to the folder holding your project's assembly. -
Right-click the DLL or EXE file generated by your project and select Open With from the options listed in order to access the Open With dialog box. -
Select ildasm.exe from the options in order to open the MSIL Disassembler, as shown in Figure 4.8, and expand the nodes to see the methods and constructors of the assembly. If you haven't used ildasm from this dialog box before, you'll need to browse your hard drive to find it. By default, it's installed in the bin folder of the .NET Framework SDK. Figure 4.8. The MSIL Disassembler displaying metadata from an assembly. 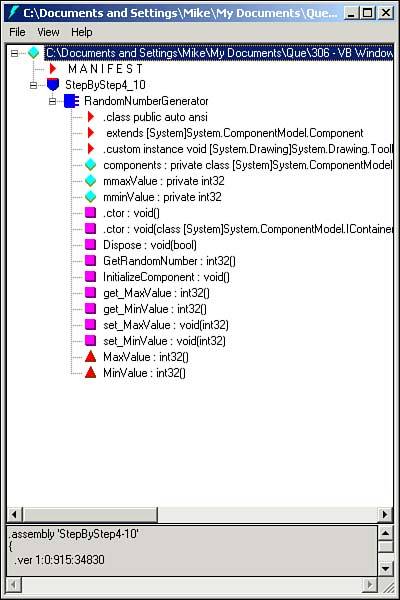 -
Double-clicking the MANIFEST node will display the metadata for the assembly, as shown in Figure 4.9. Figure 4.9. Metadata displayed from within the MANIFEST node. 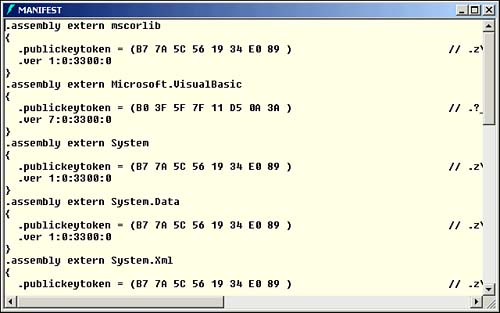 One method used to identify assemblies is based on the manner of their use. We examine the following categories based on this method of identification: -
Single-file and multifile assemblies -
Static and dynamic assemblies -
Private and shared assemblies -
Satellite and resource-only assemblies Single-file and Multifile Assemblies Most examples you have encountered will generate a single-file assembly, which is a single EXE or DLL file encapsulating all code, embedded resources, and the assembly manifest within the same file. Visual Studio .NET does not support the creation of multifile assemblies, but you may create them using the .NET Framework SDK's command-line tools. See the documentation for the al.exe tool for instructions. In a multifile assembly that includes several DLL and EXE files, the assembly manifest may be attached to any of them or contained within its own separate file. Although Visual Studio .NET does not allow the creation of multifile assemblies, it can make use of multifile assemblies in other projects. Static and Dynamic Assemblies Assemblies emitted by compiling your projects within Visual Studio .NET include files that are physically stored on a disk that can be moved or copied as needed; these assembles are referred to as static assemblies . Other options, such as the virtual assemblies created during the execution of an ASP.NET (ASPX) file, are dynamic assemblies , which are compiled at runtime. The classes involved in creating dynamic assemblies of this type are located within the System.Reflection.Emit namespace. Detailed familiarity with this namespace is not required for this exam's objectives. Private and Shared Assemblies Assemblies can be deployed using two different approaches: -
When an assembly is deployed for use within a single application, it is called a private assembly . Private assemblies are located within the same folder where the application is installed and do not require detailed name and versioning information. -
When an assembly is deployed for use by many applications, it is stored within the Global Assembly Cache and is called a shared assembly . Shared assemblies have several common characteristics, including the following: -
Assemblies stored in the GAC cannot be deployed simply by copying the appropriate files to the destination systemthey must instead be deployed to the GAC of the target system using an appropriate technology, such as Windows Installer 2.0. You'll learn about this in Chapter 13, "Deploying a Windows Application." -
An assembly installed within the GAC must have a strong name in order to ensure its identity. A strong name consists of an assembly's name, version number, culture, a public key and a digital signature. The CLR checks an assembly's identity before installing it to the GAC and then ensures that it has not been tampered with later by checking its strong name. -
Unlike a folder containing a private assembly, the GAC can contain multiple copies of an assembly with the same name but different versions. An application can determine which version of an assembly to load at runtime based on its configuration file. This is covered in greater detail in Chapter 15, "Configuring a Windows Application." You can view the contents of the GAC using the following process: -
Within the Windows Explorer, navigate to the system folder of your computer (such as C:\Windows or C:\WINNT ) and open the subfolder named Assembly , as shown in Figure 4.10. Figure 4.10. The Windows Explorer showing the contents of a system's GAC. 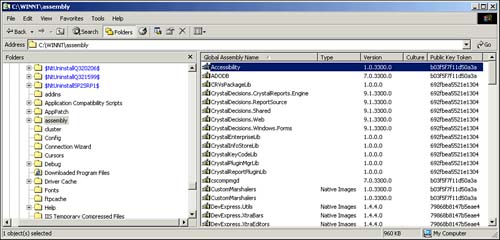  | Assemblies store code in the MSIL (Microsoft Intermediate Language) format. When a method is invoked for the first time, the CLR will Just-In-Time (JIT) compile that method into native machine code. The native code is stored in memory and is directly used for any subsequent calls to this method. In this mode, a method is slower when called for the first time because compilation is involved, but any subsequent calls to that method will run as fast as native code itself. When you view the GAC, you will note that some assemblies have their type marked as native image . These assemblies have been precompiled in native code before being installed in the GAC. The advantage of using a native image is that even the first call of a method will be as fast as its subsequent calls. You, too, can create a native image for your assembly by using the Native Image Generator Tool ( NGEN. EXE ) which is installed as part of .NET Framework SDK. |
-
Right-click an assembly and select Properties to display the assembly's information details, including its version (see Figure 4.11). Figure 4.11. Displayed properties of the System.Security assembly. 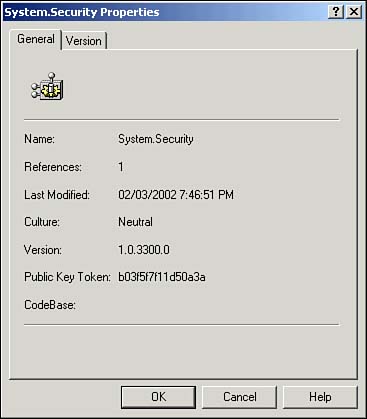 Satellite and Resource-Only Assemblies Many applications require additional resources beyond their code. In the RandomNumberGenerator.vb example shown earlier in this chapter, you included a bitmap (BMP) file with your assembly. There are two ways to include resource files in an assembly: -
Setting the Build Type of a project's Properties to Content will generate an assembly containing only code, metadata, and links to external resource files. The resources files must be distributed with the application in order to remain available at runtime. -
Setting the Build Type to Embedded Resources, as in the RandomNumberGenerator example, causes the compiler to include the resources embedded within the application's assembly itself. Visual Studio .NET performs this process in the following steps: -
An XML resource file is created with the extension . resx . This file stores the resources as key-value pairs (for example, the name of a resource file and its location). -
During compilation, all resources listed in the RESX file are embedded into a binary file with the extension .resources . -
The resultant binary resource file is embedded into the code assembly. Another option is to create an assembly containing only resources. Visual Studio .NET includes support for the creation of one type of resource-only assemblythe satellite assembly . A satellite assembly is used to store culture-specific information to support globalization (covered in greater detail in Chapter 8, "Globalization"). When a user downloads an application, it is unnecessary to download culture-specific information from other cultures, thus improving the speed of application download. If you set the Language property of a form to something other than the default selection, Visual Studio .NET will automatically create an RESX file for that culture's information (see Figure 4.12). Figure 4.12. Solution Explorer showing the RESX files for Hindi (hi) and Japanese (Ja) Language settings added to a project. 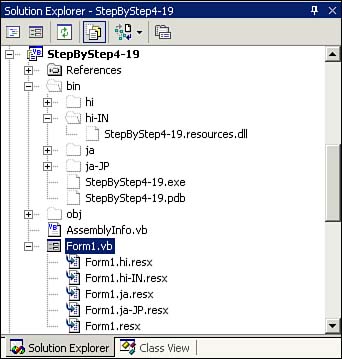 |