| As you type in OpenOffice.org, a lot of interestingand unexpectedthings can happen. For example, words are capitalized automatically, spelling is changed, words are completed, fractions are reformatted, and Internet URLs turn into hyperlinks . Any of these automatic changes can be helpful or annoying, depending on what you want to happen. The good thing is that you can control exactly how OpenOffice.org makes automatic changes. The place to control these changes is in the AutoCorrect window. With a document open, choose Tools > AutoCorrect. With a text or HTML document open , the menu option is called AutoCorrect/AutoFormat. Correcting and Formatting as You Type If you make consistent typos such as "teh" instead of "the," or if you want to create an automatic copyright symbol "" by typing "(C)", you can have OpenOffice.org apply those changes automatically as you type. -
With a document of some type open, choose Tools > AutoCorrect. (With a text or HTML document open, the menu item is AutoCorrect/AutoFormat.) -
In the AutoCorrect window, select the Replace tab, which displays the current text replacement settings, as shown in Figure 5-30. Figure 5-30. The AutoCorrect window 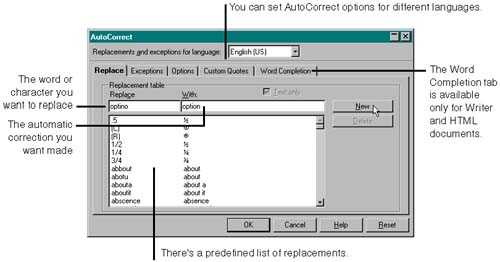 -
In the Replace field, type the typo or character you want to replace with something else. -
In the With field, type the replacement word or character. -
Click the New button. -
When you're finished creating replacements , click OK. To enter a special character, such as a symbol, close the AutoCorrect window, insert the special character in a document (Insert > Special Character), copy it, open the AutoCorrect window, and paste the character into the Replace or With fields. To delete a replacement, select it in the list and click the Delete button. If you use spreadsheets, you should delete the line that replaces .5 with 1/2. Controlling Capitalization By default, the program tries to capitalize the first letter after a period and a space. For example, if you use "attn." as shorthand for "attention," the program capitalizes the first letter of the next word in the sentence . The program also changes words that begin with two capital letters by changing the second capital to lowercase. This feature is designed for fast typists who sometimes don't let go of the Shift key quickly enough before typing the second letter of a word. But there may be certain words that you do want to begin with two capital letters. For example, if you type the name of a software company called "MSmonopoly," the program changes the second letter to lowercase to make "Msmonopoly." (Since this rule applies only to words that begin with two capitals, the program won't change words that begin with three or more capitals, such as "MSMonopoly," because it assumes since you haven't let go of the Shift key by the third letter, you intentionally want capital letters .) To stop this behavior altogether, see Activating and Deactivating Automatic Changes, next. However, if you want the program to make the changes automatically in some cases but not in others, use this procedure to add exceptions to those rules. The program comes with a default set of predefined exceptions to prevent automatic first-letter capitalizations. -
With a document of some type open, choose Tools > AutoCorrect. (With a text or HTML document open, the menu item is AutoCorrect/AutoFormat.) -
In the AutoCorrect window, select the Exceptions tab. -
Type an exception you want to add in either the Abbreviations or Words with TWo INitial CApitals fields, and click New to add it to the list, as shown in Figure 5-31. Figure 5-31. Controlling automatic capitalization by creating exceptions 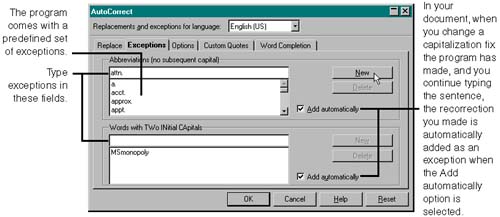 -
When you're finished, click OK. To delete an exception, select it in the list and click the Delete button. Activating and Deactivating Automatic Changes This procedure shows you how to activate and deactivate the specific types of automatic text changes the program makes. -
With a document of some type open, choose Tools > AutoCorrect. (With a text or HTML document open, the menu item is AutoCorrect/AutoFormat.) -
In the AutoCorrect window, select the Options tab. -
Select or deselect the types of automatic corrections you want the program to make. See Table 5-3 for descriptions of the options. -
When you're finished, click OK. The program gives you clues about the functionality of some options by the way it names them. For example, TWo INitial CApitals illustrates the types of words that feature will change automatically; and the Automatic *bold* and _underline_ option shows you the characters you need to type on the keyboard to automatically bold or underline words. An option is activated if there's an "x" in its check box. Table 5-3. Options for automatic text changes | Option | Description | | Use replacement table | Uses the replacements listed in the Replace tab of the AutoCorrect window. | | Correct TWo INitial CApitals | This is a great feature for fast typists. It automatically sets a second letter from capital to lowercase when you don't let go of the Shift key quickly enough after typing a first capital letter. You can set exceptions to this rule in the Exceptions tab of the AutoCorrect window. | | Capitalize first letter of every sentence | After you type a period and a space, this feature automatically changes the next letter to a capital if you type it lowercase. You can set exceptions to this rule in the Exceptions tab of the AutoCorrect window. | | Automatic *bold* and _underline_ | Automatically turns a word bold if you type an asterisk before and after the word, and underlines a word if you type an underscore character before and after the word. | | URL recognition | If you type a group of characters that the program thinks is a link to a Web site (a URL), such as http://www.sun.com, this feature automatically converts the group of characters into a hyperlink. Instead of turning this feature off, you can remove URL hyperlinking in your document on a case-by-case basis by pressing Ctrl+Z to undo the automatic hyperlink after it happens, or by dragging through the hyperlink to select it and choosing Format > Default. | | Replace 1st... with 1^st... | If you type 1st, 2nd, 3rd, 4th, etc., this option automatically makes the letters after the number superscript, such as 1 st , 2 nd , 3 rd , 4 th . | | Replace 1/2... with  ... ... | When you type a fraction (two numbers separated by a forward slash), this feature changes the fraction to a special character. Only fractions that have corresponding special characters for the current font are converted. Most standard fonts have only three special characters for the fractions 1/4, 1/2, and 3/4. | | Replace dashes | When you type a dash with a space on either side of it, this option converts the dash from a hyphen to a longer en dash. | | Ignore double spaces | This option lets you type only a single space between characters. | | Apply Numbering > Symbol: | This option works only when you use the "Standard," "Text body," or "Text body indent" paragraph styles. If you type a number followed by a period, a space (or tab), and some text, then press Enter, this option autonumbers the paragraph as if you clicked the numbering icon in the object bar. If you type a hyphen followed by a space (or tab) and some text, then press Enter, the hyphen is converted to a long dash bullet character. If you type a + or a * character followed by a space (or tab) and some text, the paragraph becomes bulleted as if you clicked the bullets icon in the object bar. You can change the bullet character used for the + or * symbol by selecting the name of this option in the AutoCorrect window and clicking the Edit button. | | Apply border | With this option, typing certain characters in succession and pressing Enter automatically creates a border line under the paragraph. The following character combinations illustrate the respective types of borders they create.  You can modify the border by clicking in the paragraph just above the line, choosing Format > Paragraph, and changing the setting on the Borders tab. To remove a border added with this option, click in the paragraph just above the line and choose Format > Default. | | Create table | With this option activated, you can create a table from the keyboard by typing a '+' to signify column borders, typing successive '-' characters to signify column widths, and pressing Enter at the end of the line. For example, typing +-----------------------+----------------------------+------------+ and pressing Enter creates a three-column table. | | Apply styles | This option is for applying heading formats automatically, and works only when you use the "Standard" paragraph style. When you begin a paragraph with a capital letter and don't end the sentence with a period, pressing Enter twice at the end of the line automatically changes the line to the Heading 1 paragraph style. The extra paragraph below the heading is removed. If you press the Tab key twice before typing the heading text, pressing the Enter key twice at the end of the line automatically changes the line to the Heading 2 paragraph style. Three tabs creates a Heading 3, and so on. | | Remove blank paragraphs | With this option activated, choose Format > AutoFormat > Apply (or Apply and Edit Changes) to remove all blank paragraphs from your document. If you're using the direct cursor, this option is indispensable . | | Replace custom styles | With this option activated, choose Format > AutoFormat > Apply (or Apply and Edit Changes) to convert any custom styles applied in your document to their equivalent default styles in the program. | | Replace bullets with: | This option works only on paragraphs using the "Standard" paragraph style. The paragraphs must begin with a '*', '+', or '-', be followed by a space (or tab) and some text. With this option activated, choose Format > AutoFormat > Apply (or Apply and Edit Changes) to convert these paragraphs into bulleted paragraphs with a bullet character of your choice. To change the bullet character used, select the name of this option in the AutoCorrect window and click the Edit button. | | Replace "standard" quotes with " custom" quotes | With this option activated, choose Format > AutoFormat > Apply (or Apply and Edit Changes) to convert single and double quote marks to the quote characters that are set in the Custom Quotes tab of the AutoCorrect window. | | Combine single line paragraphs if length greater than % | This option works only on paragraphs using the "Standard" paragraph style. With this option activated, choose Format > AutoFormat > Apply (or Apply and Edit Changes) to combine adjacent, single-line paragraphs into a single paragraph. The single-line paragraphs must be at least as wide (with relation to the total page width) as the percentage set for this option. To change the percentage on this option, select the option name in the AutoCorrect window and click the Edit button. If you activate this option while you have existing text in the document, none of the existing text is affected. Only the text you type after you activate the option is affected. | Managing AutoCompletion As you type in a text or HTML document, the program tries to guess what you're typing and inserts the rest of the words automatically. Sometimes it's what you wantsometimes it's bizarre and frightening. If you want to take the time to change the way the program completes words by default, you can actually make this feature productive for you by limiting the words you want the program to complete. For example, if in your business correspondence you use words that are tricky to spell or you're typing product names with trademark or copyright symbols over and over, you can limit Word Completion to those words. See Figure 5-32 for tips on making Word Completion an asset rather than an annoyance. Figure 5-32. Setting Word Completion to be useful instead of annoying 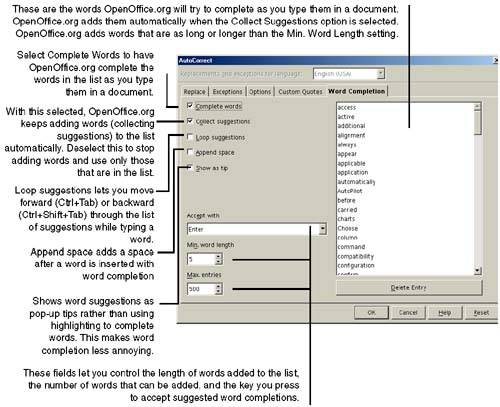 Word completion works only on single words. If you want to insert more than one word automatically into a document, see Creating and Inserting AutoText on page 180. Configuring What Key to Press to Accept AutoSuggestion If you set up the program to do word completion as in Figure 5-32, you might not have noticed you can specify what key to press when you're typing along and want to accept the word suggested. Figure 5-33. Selecting the key to press to accept the suggested word 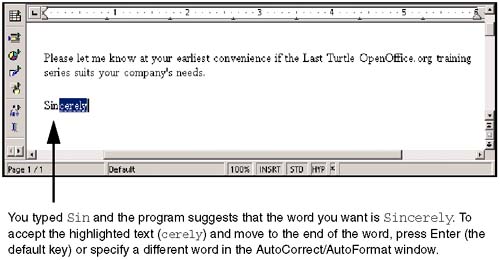 If you're happy with Enter as the key to press, you don't need to do anything. To change it, choose Tools > AutoCorrect/AutoFormat. You'll see the graphic at right. Accept with list in the window. Select the key you want to press to accept the suggested word. 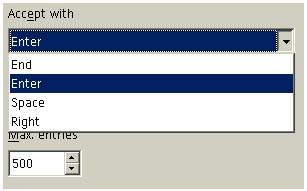 To turn this feature off: -
With a text or HTML document open, select Tools > AutoCorrect/AutoFormat. -
Select the Word Completion tab. -
Deselect the Complete Words option and click OK.  |