Setting Up and Managing the Menus and Interface
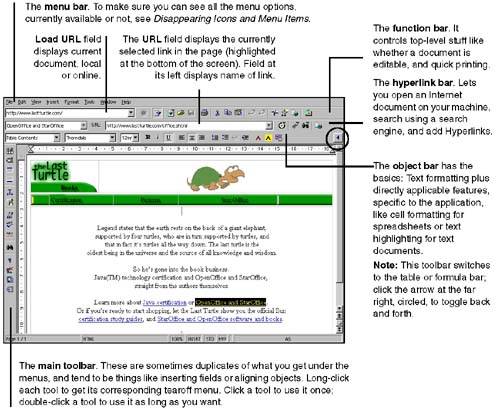
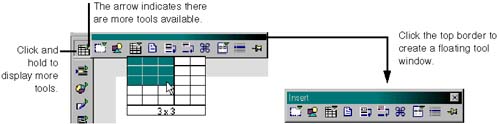
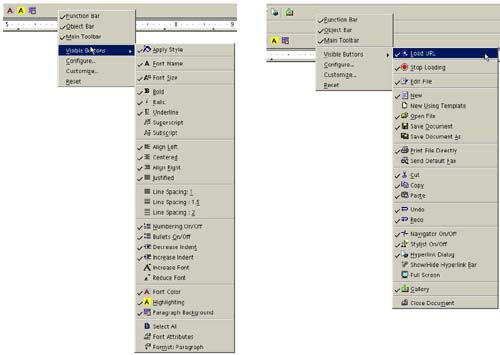
Setting Up and Managing the Menus and InterfaceKnowing where the controls are is the first step; setting up shortcuts is a big step toward ease and efficiency, as well. Finding and Using All the ToolbarsThe program does a good job of giving you a lot of icons, displayed all the time, so you can just click and get on with your work. Make sure they're all displayed; choose View > Toolbars > and be sure all are marked . They're shown in Figure 5-1. You also have the Stylist (press F12), which is a great quick way to format. Figure 5-1. The toolbars and menu bar (Writer shown) The formula bar , below, is available only in Calc. Use it to quickly insert cell contents and formulas. Seeing All the Things You Can Do With a Toolbar IconToolbar icons, shown in Figure 5-2, are more than they seem. If a toolbar icon has a green arrow, that means there are more options for you to select by clicking and holding the left mouse button down on the icon. Figure 5-2. The toolbar The toolbar icons with green arrows can display different icons on the main toolbar. For example, the Insert button on the toolbar displays the Insert Table icon if a table was the last thing you inserted. Note When you use the drawing tools, you can double-click the icons to repeat drawings without clicking the icon multiple times. For example, if you want to draw more than one rectangle, double-click the rectangle icon and draw one rectangle after another. To stop drawing rectangles, click in an open area of the workspace. You can also add and remove toolbar icons by right-clicking the toolbar, choosing Visible Buttons, and selecting or deselecting tools. Disappearing Icons and Menu ItemsIf you're looking for a menu item or icon that was there a second ago, and now it's nowhere to be found, it's probably just in hiding. If you can't find it using any of these procedures, then:
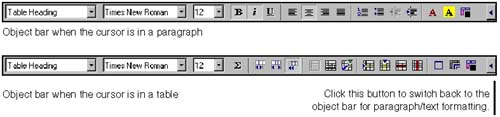
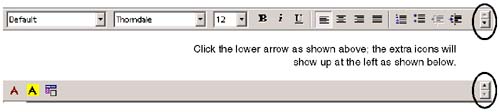
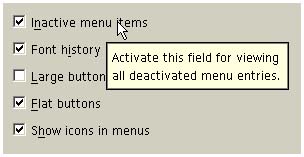
Making the Right Set of Formatting Icons Appear on the Object BarThe object bar is context sensitive, which means it shows the tools you can use depending on the task you're trying to perform. For example, as Figure 5-3 illustrates, if the cursor is in a paragraph, the object bar displays tools for basic text and paragraph formatting. If your cursor is in a table, it shows tools for working with tables. Figure 5-3. The context-sensitive object bar However, when you're in a table and want to format text, you can replace the table object bar with the text formatting object bar by clicking the arrow at the far right of the object bar, as shown in Figure 5-3. Finding Hidden Icons on the Right End of the ToolbarIf your monitor is small, if you've resized the program, or if the display settings in your operating system make it so you can't see all available icons in the function bar, option bar, or toolbar, a small set of arrows is displayed to let you view these icons (Figure 5-4). Figure 5-4. Viewing hidden icons Showing Inactive Menu ItemsA certain software design tendency has been in vogue recently that has caused confusion and frustration among many users (which isn't good, because frustration leads to anger, anger leads to hate, and hate leads to endless episodes ). We're speaking of the practice of hiding inactive menu items. The way it works is that when you're not allowed to perform a certain action at a given point, the menu item you would use to perform the action is hidden rather than turned gray. This practice causes confusion, because if you expect to be able to do something but don't see the menu item for it, you may assume that the software is broken or was installed incorrectly. On the other hand, if you see the menu item grayed out, you'll probably assume, correctly, that you must not be able to use that feature for some reason. Fortunately, the program resolves this dilemma nicely and lets you change inactive menu items from hidden (the default) to gray, saving you from a lot of frustration.
Viewing inactive menu items is also useful for seeing features that are available in the program. If the menu items are hidden, you may never know that certain features exist. Showing All the Icons on the ToolbarsIf you like to format using the toolbars, use this procedure to make sure all icons are showing on all the toolbars. By default, the program only shows the icons it thinks you need the most.
Customizing MenusThe program lets you manipulate its menu bar by creating, changing, and reorganizing menu items. You won't necessarily be considered a nerd for using this functionality, but it is getting into advanced user territory. Most users aren't likely to use or need this functionality, so we won't go into detailed procedures for customizing your menus. Instead, the information presented here is meant merely to help guide you if you are feeling adventuresome and want to change a menu or two. Each application has its own set of menus. If you want to modify menus for a specific application, make sure the application is active when you begin.
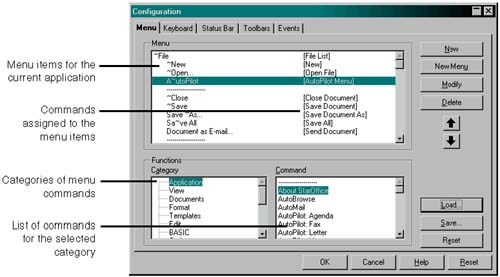
Menus are stored in configuration ( .cfg ) files. By default they're in the office\user\config folder. When you create, modify, and save menus, you're making changes to a .cfg file. Table 5-1 describes elements of this window. It's provided to help guide you through making menu changes. Table 5-1. Elements of the Menu Configuration window
Assigning Shortcut Keys to Menu ItemsThe program lets you assign actions to keyboard keys, or combinations of keys. A number of these shortcut keys are set up by default, such as the F9 key to recalculate Calc spreadsheets or the F11 key to launch the Stylist. Each application has its own set of shortcut keys. For example, in Writer, the F12 key turns numbering on and off; in Calc, the F12 key lets you define a cell group . You can also assign shortcut keys to run any macros you create. For example, if you create a macro that inserts the text "Java" (or any other product name with a trademark or registration mark), you can assign that macro to a shortcut key that automatically inserts that text when you press the key. If you want to modify shortcut keys for a specific application, make sure the application is active when you begin. This procedure is the same for assigning a new shortcut as it is for replacing an existing shortcut.
For more guidance on this window, see Table 5-2. Note Even if you don't want to assign or modify shortcut keys, the Keyboard tab is a great reference for viewing the shortcuts you can use. Keyboard shortcuts are stored in configuration ( .cfg ) files. By default they're in the office\user\config folder. When you assign, modify, and save shortcut key settings, you're making changes to a .cfg file. Table 5-2 describes elements of the Keyboard Configuration window. It's provided to help guide you through making shortcut key changes. Table 5-2. Elements of the Keyboard Configuration window
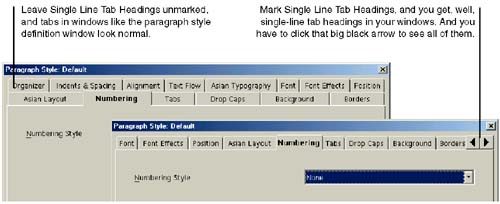
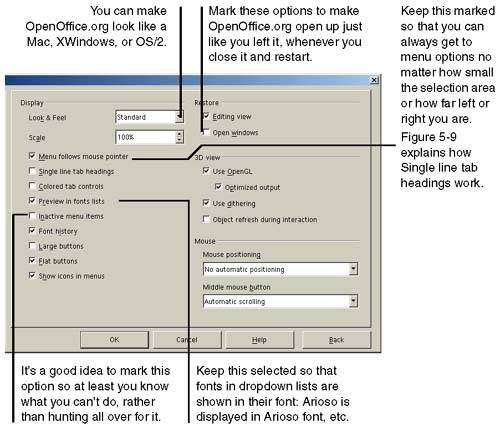
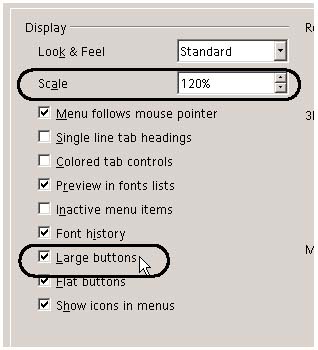
Specifying Button Size and GUI StyleThis is where you get to set various noncrucial display options, like where the mouse shows up and whether your system looks like a Mac. Choose Tools > Options > OpenOffice.org > View and make the appropriate entries. Note The option on the right in Figure 5-9 could useful for those of you who are doing visual scripting and need to pick the top tab, or the third tab. Or maybe it's just something some loud guy in a focus group reallllly wanted. Figure 5-9. Specifying how tabs look in windows with multiple tabs, effect of Single Line Tab Headings option Figure 5-8. Setting general display options Making Everything Onscreen BiggerIt's great to be able to fit lots of stuff onscreen but useless if you can't see it well. For instance, on Windows 2000 the icons for using layers and backgrounds in Impress might as well be teeny tiny Rorschach tests. To make everything bigger and readable, choose Tools > Options > OpenOffice.org > View. In the Scale field, select something like 120% and see how that works for you. Also select the Large Buttons option if you want. Right-Clicking: Just Do ItGet right-click happy. Some of the best shortcuts and most efficient ways of doing things happen through right-click menus. You can click the right mouse button just about anywhere in the program to bring up a context-sensitive menu. When in doubt, always right click. LeftiesIf you've configured your left mouse button to act as the right mouse button, left-click to bring up context menus. Note If you use the online help, the term "context menu" means the right-click menu. |

EAN: 2147483647
Pages: 407