Running Macros

"-->

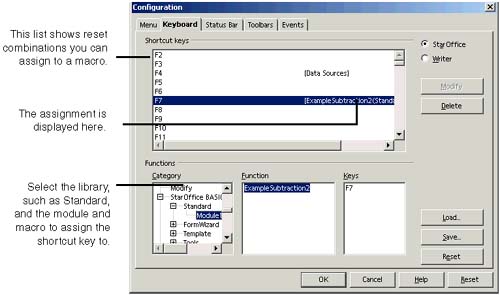
Running the macro, of course, is where you see whether the recording process translates into something useful.

Note

Don't be surprised if it doesn't run correctly the first time. If there are errors, see Opening and Editing Macros on page 974. You can also insert breakpoints during macros, which stop the process at certain points. These are useful because you can examine the results of a particular step, then continue playing the macro, or play it one step at a time. See Using Breakpoints to Stop Macros at a Specified Point on page 974.


Use any of the following procedures to run the macro.

Assigning a Shortcut Key to a Macro

If you'll be running the macro several times and it's not connected to a button or other element yet, it's a good idea to set up a shortcut to it, using the Configuration window. (For more information about setting up shortcut keys, see Assigning Shortcut Keys to Menu Items on page 104.)

  1. Switch to the application you want to run the macro in.

  2. Choose Tools > Configuration.

  3. The Keyboard tab should be in front; if not, click it.

  4. Select the OpenOffice.org option (see Figure A-10) unless you need the key only in Writer.

    Figure A-10. Setting up a shortcut key to run a macro

    graphics/afig10.jpg

  5. In the lower left corner in the Category list, scroll down until you see BASIC Macros a little over halfway down. (The earlier list item, BASIC, lets you assign shortcut keys to functions like Add Breakpoint.)

  6. Select BASIC and, if it's not expanded to show libraries and modules, click the + icon next to it to expand it.

  7. Expand the macro library, such as Standard, and select a module and macro.

  8. The Keyboard lists all the preset combinations that you can use to start the macro, as shown in Figure 36-54. Select the one you want for the selected macro.

  9. Select Modify to associate the shortcut key with the macro.

  10. Click OK.

Running a Macro From Start to Finish

You can run a macro in the IDE or in the application where the macro will run, if the necessary conditions to start the macro are available. For instance, if the first step to run the macro is making a selection from the File menu, you can run the macro from anywhere . If the first step is in a Writer document, it must be open and be the active document.

You can quickly run a macro using any of the following methods .

Running the First Macro in a Module

This works only if a macro is open in the IDE window (the icon will be dimmed if no macros are open). It will run only the first macro in the current module; only one module and library can be open at a time.

  1. Open a macro in the IDE window.

  2. Click the Run icon in the macro toolbar.

Running a Selected Macro
  1. Click the Macros icon on the macro toolbar.

  2. In the Macro window, select the library, module, and macro to run, and click Run.

Running a Macro One Step at a Time

Unfortunately, there is no debugging program for macros. However, you can run the script one step at a time to see what happens at each step.

  1. Be sure the macro is the first one in the module, if there is more than one.

    Cut and paste it to move it to the top, or create a new module (right-click the current module tab and choose Insert > BASIC Module) and paste the macro into the new module.

  2. In the IDE or in the application where the macro will run, click the Single Step icon on the macro toolbar.

    graphics/singlestep.jpg

  3. The macro will run one step at a time; click the icon again to go to each new line. Click the Step Back icon to repeat the previous step.

    If an error occurs, the IDE will be displayed with an error message and an arrow pointing to the line.

  4. Click the Stop icon to stop before the macro has run completely.

    graphics/stop.jpg

Using Breakpoints to Stop Macros at a Specified Point

You can add a breakpoint that stops the macro on the line you select. You can then run the macro manually step by step using the Single Step icons (see Running a Macro One Step at a Time).

Note

When you insert the breakpoint, the program checks the entire macro for errors; you can't insert one if there are any problems anywhere in the code. You might need to comment out problem lines before you can add the breakpoint.


  1. Open the macro in the IDE.

  2. Position the cursor on the line where you want to switch from automatic to manual.

  3. Click the Breakpoint icon in the macro toolbar.

    graphics/breakpoint.jpg

  4. A red circle will appear to the left of the line.

    graphics/ainf04.jpg

    To remove the breakpoint, just click the Breakpoint icon again.


OpenOffice. org 1.0 Resource Kit
OpenOffice.Org 1.0 Resource Kit
ISBN: 0131407457
EAN: 2147483647
Year: 2005
Pages: 407

flylib.com © 2008-2017.
If you may any questions please contact us: flylib@qtcs.net