Organizing Your Macros If you just want to leap in and record a few macros, go ahead and just store them in the default location ( Standard ); you won't need this information. However, if you'll be using more than a few, it's a good idea to read this section and organize your macros according to their function. How Macros Are Organized The interface isn't set up very well for quick, easy macro recording. Macros are categorized in a pathname-like structure: one or more macros are stored in a module, within a library, within a file. If you've used other macro programs, it might seem odd and unnecessarily complicated that you need to store macros in a library/module/macro tree structure, instead of just recording the macro file and storing it anywhere . You can store your recorded macros in modules in the Standard library, or you can create your own new libraries. You can't add your macros to any of the other libraries listed, such as CreateReport (though you can add any macros in any libraries to your documents). Figure A-7 shows the Macros window (choose Tools > Macro). This shows how macros that you just store within the Standard library are organized. Figure A-7. How macros are organized in the Macros window 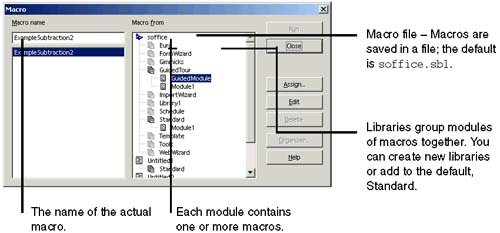 Organization Recommendations Take note of the following limitations. More than one macro in a module When you use the Step and Run icons in the macro toolbar to run the macro one step at a time, only the first macro in the module is run, which may not be the one you want. Size limit There is a limit of 64k on the amount of code allowed in one module. Getting at a macro to add it to a document Most of the macro-insertion features let you insert a macro from the Standard and other libraries, and from the document you're currently in, but not any other documents you've created. Keep this in mind when you're deciding where to put macros. Based on this, you can make your life as simple as possible by following these tips: -
If you're creating macros that a lot of people will want to use, or that you plan to run from a different document, create one or more libraries for your macros (Creating a New Library on page 968). Don't just assign them to one of your own documents. -
Create a new module for each macro you write (Creating a New Module on page 969). Creating a New Library -
Click the Modules icon on the macro toolbar.  -
In the Macro Organizer window, click the Libraries tab. -
Click the New button to display the Macro Organizer window (Figure A-8). Figure A-8. Creating a new library in the macro organizer 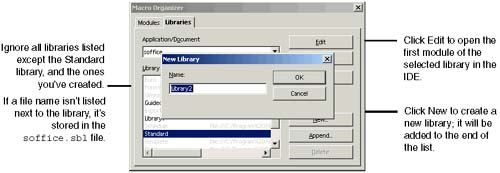 -
Enter the name in the New Library dialog. You can select the Attach file option to create the new library as a separate file in office/basic . If you don't do so, it will be stored in the soffice.sbl file. In addition, macros stored as a separate file will not be loaded automatically after starting the program, but instead must be activated manually (in the Macros window by clicking Run) or by another macro. This isn't your only chance to save the library as a separate file; you can edit the macro, then click the Save Source As icon on the macro object bar.  -
Click OK. -
A default module named Module1 was created and listed below the new library at the bottom of the Module/Dialog list. Click the Modules tab and select the new library. Highlight the name and rename it, based on the task that the macro you'll store in it will perform. Note The other libraries contain macros you can associate with events in hyperlinks and documents. See Adding Applets and Plugins on page 485.
Creating a New Module You can do so through the Organizer, or by opening a current library in the IDE. Using the Organizer -
Click the Modules icon on the macro toolbar. -
In the Macro Organizer window (Figure A-9), click the Modules tab. Figure A-9. Creating new modules using the Organizer 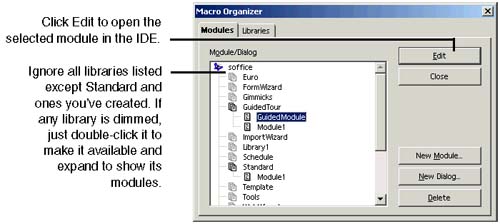 -
Select the library to add it to. You can add only to Standard and to libraries you've created. If the library name is dimmed, double-click it. -
Click the New Module button. -
Enter the name, be sure BASIC is selected, and click OK. Using the IDE -
Click the Macros icon on the macro toolbar.  -
Select a module within the library you want to add to and click Edit. -
Right-click on a tab of an existing module and choose Insert > BASIC Module. Managing Macros, Modules, and Libraries Use this information to move modules or macros around, rename, delete, and perform other similar tasks . Moving a Module to a Different Library Using the Organizer You can drag a module from one library to another in the organizer. -
Click the Modules icon on the macro toolbar. -
In the Organizer window, click the Modules tab. -
Select the module you want to move. Drag it to the new library; a line indicates where the module will be moved to when you release the mouse button. -
Select the module and click Edit, then choose File > Save. Moving Macros and Modules Using the IDE You also can simply cut and paste macros from one module to another, in the same library or a different library. -
Click the Macros icon on the macro toolbar. -
Select a module and click Edit. -
Select the macro or macros to move, then cut and paste them to a new module or library. -
To select a module in the same library, click the right tab below the work area. -
To select a new library, select it from the list in the work area upper right corner. -
Choose File > Save to save the changes. Renaming a Module -
Click the Macros icon on the macro toolbar. -
Select the module and click Edit. -
Right-click on a tab of an existing module and choose Rename. Type the new name on the tab. Hiding a Module You can temporarily remove the module without deleting it. -
Click the Macros icon on the macro toolbar. -
Select the module and click Edit. -
Right-click on a tab of an existing module and choose Hide. Deleting Macros To delete one or two macros, it's quickest to use the Macros window. -
Click the Macros icon on the macro toolbar, then select the module and click Edit. -
Select the correct category, library, and module, then select the macro and click Delete. If you want to delete a lot of macros from a module, it's quickest to go to the IDE and delete the text of the macros, or delete the entire module. -
Click the Macros icon on the macro toolbar, then select the module and click Edit. -
In the IDE text window, delete the text of each macro. Remember that the beginning and ending of each macro is selected by the following: Sub macroname End Sub Deleting Modules Either of the following methods is quick; they just provide alternate navigation. Use this method if you're sure you want to delete it. -
Click the Modules icon on the macro toolbar. -
Click the Modules tab if it's not active. -
Select a module and click Delete. Use this method if you want to look at the module before you delete it. -
Click the Macros icon on the macro toolbar, then select the module and click Edit. -
Right-click the tab of the module and choose Delete.  |