| If you completed the tutorial, or if you were already all over the database thing and skipped to this procedure, here's where you start creating the data sources. Note For extra tips, see http://dba.openoffice.org/FAQ.
UNIX Database Access With ODBC and MySQL Are you on UNIX but you haven't decided for sure what to do? Consider unixODBC and MySQL. An excellent document from containing instructions for doing so is at http://openoffice.homelinux.org/index.php?s=38 Database information for ODBC and UNIX can be found at http://unixodbc.org . See http://www.unixodbc.org/doc/OOoMySQL.pdf in particular. Creating a Data Source Based on Text Files Follow this procedure to define the data source for a plain text file or files. -
Create one directory containing only the text file or files that you want in the data source. You will be able to specify only the directory, not the full path to the file. Each text file will be a table in the data source. -
Choose Tools > Data Sources. The Data Source window will appear. -
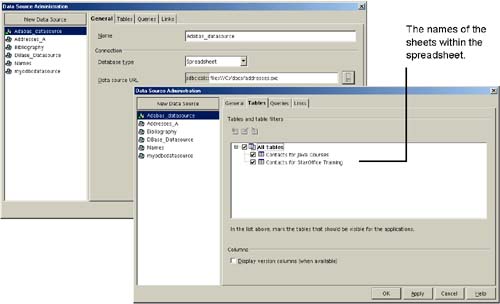
Click New Data Source. Enter new information as shown in Figure 35-9. Figure 35-9. Entering the name and connection type  -
Click Text. Enter new information as shown in Figure 35-10. Figure 35-10. Selecting the tables to include in the data source 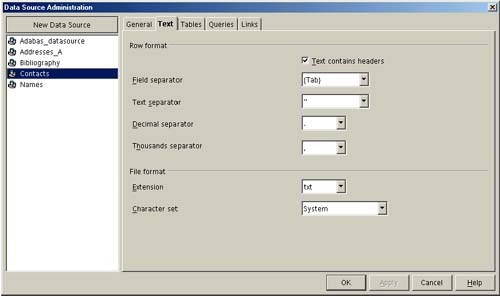 -
Click the Queries tab; the window is shown in Figure 35-11. For more information on queries, see Creating Queries on page 914. -
Click the SQL icon to enter new SQL queries, if you want, for the data source. In the query you can specify only one table, and it must be one of the tables that was displayed and selected in the Tables tab. Example : Select firstname , lastname from sales where state = 'CO' -
Click the New Query Design icon to create queries using a GUI tool where you don't need to know SQL. Figure 35-11. Creating or selecting queries for the data source 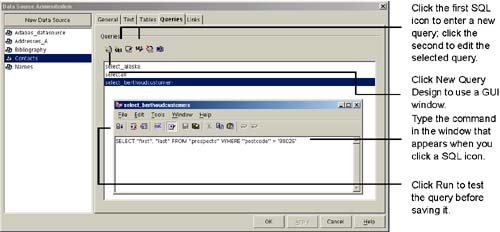 -
Click the Links tab; the window is shown in Figure 35-12. Click the New Link icon if you want to link to other files. This is primarily used for linking to forms that display this data source's data. See Chapter 36, Creating and Using Forms, Controls, and Events , on page 921. Figure 35-12. Creating and selecting links to other files 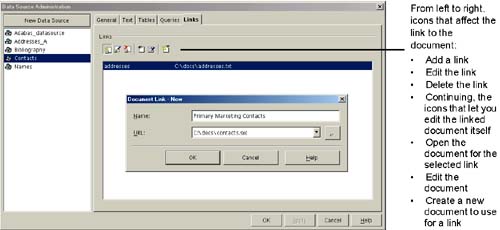 -
Click OK. The data source is now ready to use in mail merges, forms, spreadsheets, and other Writer documents. Creating a Data Source for a Spreadsheet -
Choose Tools > Data Sources. The Data Source window will appear. -
Follow the steps for Creating a Data Source Based on Text Files on page 882, with the following differences: Connecting to a dBase Database dBase isn't a standard database. dBase is based on the contents of a directory, like data sources that you create based on . txt files. So each . dbf file in the directory you point to is a table in your data source. dBase databases are easy to createtake a spreadsheet, save it as dBase, and you've got yourself a database. Editable, too, through forms or just straight in the data source viewer. Performance isn't all that it could be, of course, but for personal or small business use, you could do a lot worse . -
Choose Tools > Data Sources. The Data Source window will appear. -
Click the General tab if it isn't already displayed. -
Click New Data Source. -
Name the data source. -
Select dBase as the type. -
Click the browse icon for the Database URL field and specify the directory where the dBase file or files are. The window is shown in Figure 35-14. Figure 35-14. Naming the data source and specifying the database URL  -
Click the dBase tab. The window is shown in Figure 35-15. Figure 35-15. Specifying character set and index options 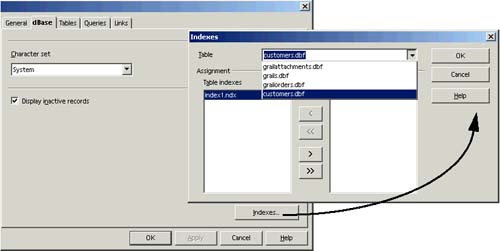 -
Click the Queries tab and create queries if you want. For more information on queries, see Creating Queries on page 914. -
Click the SQL icon to enter new SQL queries, if you want, for the data source. In the query you can specify only one table, and it must be one of the tables that was displayed and selected in the Tables tab. Example : Select firstname, lastname from sales where state = 'CO' -
Click the New Query Design icon to create queries using a GUI tool where you don't need to know SQL. -
Click the Links tab. Connect any file that you want to be able to get at from the database in the future; if you have a form you'll use to view this data, you might want to link it here. -
Click OK to close the window and save changes. Connecting to an Oracle or Other Database Using ODBC Note OpenOffice.org cannot edit Oracle databases. This is a known problem, so check the sun.com/staroffice site periodically to see if they've come up with a patch.
Before You Begin
Do a Dry Run If this is the first data source you set up, you might want to consider doing a practice run, just connecting to a dBase database. (Create a basic spreadsheet of data, save it as dBase). Make sure it's working correctly by editing the data (Editing Data Using the Data Source Viewer on page 914) using data entry forms (Using Forms for Data Entry on page 955), or doing a mailing (Creating Mail Merge Letters and Faxes With Data Sources Using AutoPilots on page 367). In addition, use a test application to make sure that your database is running and accessible from the computer you're using. Platform Notes It's a good idea to use JDBC rather than ODBC on Linux and Solaris. If you're on Windows , you should have an ODBC driver already, in the MDAC package. You can also go on microsoft.com and look for it in http://www.microsoft.com/data/mdac21info/manifest_intro.htm. For Linux-specific tips for setting up MySQL with ODBC, see http://openoffice.homelinux.org/index.php?s=38 Database Notes Use ODBC or JDBC if you want to connect to databases like Oracle. If you're connecting to an Access database, we recommend that you connect via ADO instead. See Connecting to an Access or Other Database Using ADO on page 897. If you're working with Oracle or any similarly robust and complex database, do it hand in hand with your Oracle administrator (and not the internget the head person). Get some pizza and Mountain Dew, and sit down to do this together. You'll need to have installed the Oracle Database Client software, and created a new service name. Your Oracle system administrator can tell you how to get the software and create the service name; with enough pizza, he or she might just take care of it. Just make sure you get the exact service name, however; you'll need it to set up your ODBC data source here in the program. Creating the Data Source See also Setting up Connection Pooling on page 905. -
Choose Tools > Data Sources. The Data Source window will appear. -
Click the General tab if it isn't already displayed. -
Click New Data Source. -
Name the data source; this can be anything, as long as it's something that will make you and other users think, "Oh, that's that ODBC database with the customer list for our grail-shaped beacons ." (Or whatever's in the database.) The window is shown in Figure 35-16. Figure 35-16. Naming the data source 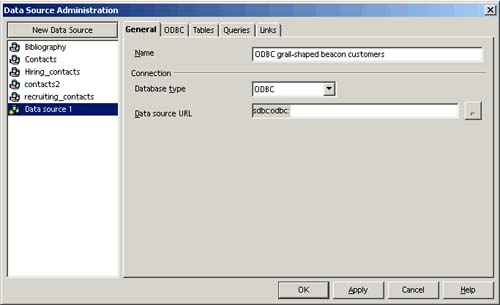 -
Select ODBC from the Database Type list. -
Click the browse icon by the URL field; the window in Figure 35-17 appears. Figure 35-17. Data Source window 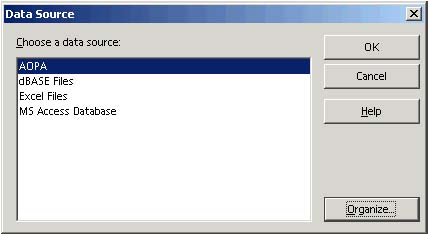 -
Click the Organize button to set up the ODBC data source. The ODBC Data Source Administration window will appear, shown in Figure 35-18. Figure 35-18. ODBC data source administration 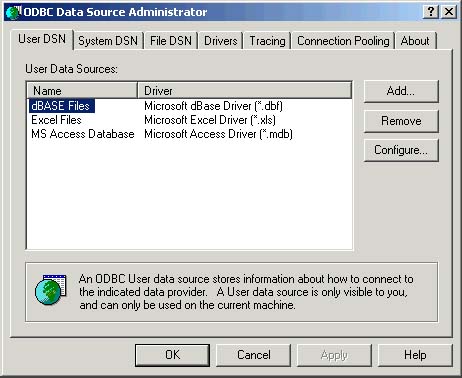 -
Click the Add button. The Create New Data Source window will appear, shown in Figure 35-19. Select the ODBC driver to use and click Finish. Figure 35-19. Selecting an ODBC driver 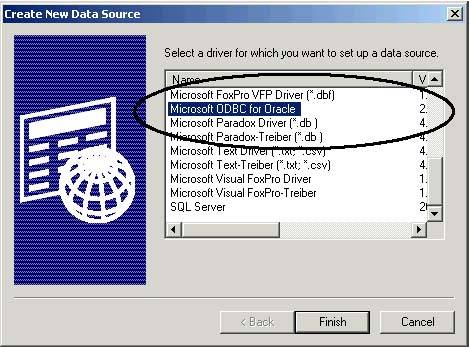 If a message states that the client software was not installed, you need to install the client software mentioned at the beginning of this procedure. -
The Driver Setup window for the driver you selected will appear. Make the appropriate entries as outlined in the following information, then click OK. Oracle setup -
Data Source Name Enter the name of the Oracle data source. -
Service Name Enter the same service name you specified when setting up the database. Your database administrator should be able to give you this. -
User ID Ask your database administrator for a valid user ID to use to access the database. -
Other options Consult your database administrator and database documentation for information on the appropriate selections. Setup for other database types See Figure 35-20 for what some of the windows looks like; consult your database administrator and database documentation for more information. Figure 35-20. ODBC setup windows for Access, Paradox, and dBase 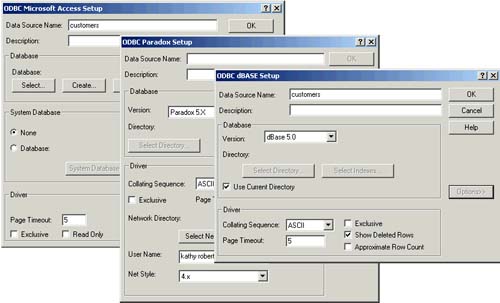 -
The Data Source window will appear, with the new data source connection added. Select it if necessary and click OK. -
In the Data Source Administration window, click the ODBC tab (see Figure 35-21). Figure 35-21. Entering the user ID for database access 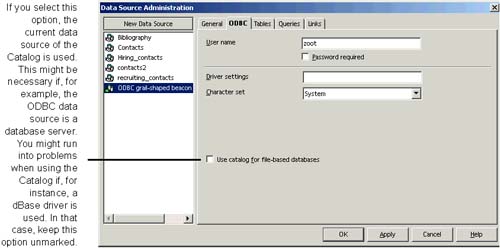 -
Enter the user ID you just specified and whether a password is required. Specify any driver settings that your database administrator wants. -
Click the Tables tab and unmark any tables that shouldn't be accessible to users; the system tables, for instance. -
Add any queries or links as outlined in Figure 35-11 on page 883 and Figure 35-12 on page 884. -
Click OK to save the data source. If errors occur, consult the following. -
If a message appears stating that a connection to the data source could not be established, check the user name, service name, and talk to your database administrator. Also use another tool, on the current computer, to verify whether the database is accessible. -
If that or other errors occur, check the TNSNAMES.ORA file. Make sure that it exists, that it's in the right location, and that it doesn't have any syntax errors. This is where you provide your database administrator with dessert and some free movie coupons . -
Go back and select the Password Required checkbox, if it isn't marked , and try again. Tracing and connection pooling The Data Source Administrator window contains additional configuration tabs. Open the Data Source window and select the ODBC data source, then click the browse icon by the URL field. Next, click the Organizer tab, then click the Tracing and Connection Pooling tabs, shown in Figure 35-22 and Figure 35-23. Consult your database administrator for what entries to add to these windows. Figure 35-22. Setting tracing options for an ODBC data source 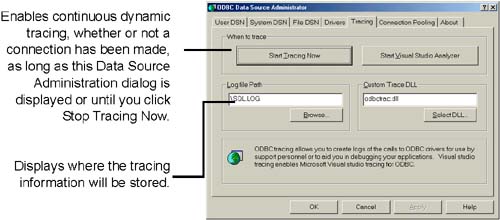 Figure 35-23. Setting connection pooling options for an ODBC data source 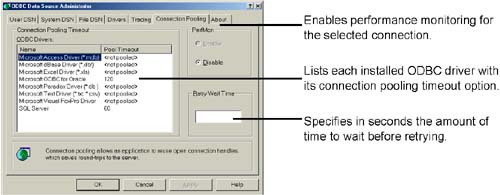 Connecting to an Oracle, MySQL, or Other Database Using JDBC Note OpenOffice.org cannot edit Oracle databases. This is a known problem, so check the sun.com/staroffice site periodically to see if they've come up with a patch.
Before You Begin
Do a Dry Run If this is the first data source you set up, you might want to consider doing a practice run, just connecting to a dBase database. (Create a basic spreadsheet of data, save it as dBase). Make sure it's working correctly by editing the data (Editing Data Using the Data Source Viewer on page 914) using data entry forms (Using Forms for Data Entry on page 955), or doing a mailing (Creating Mail Merge Letters and Faxes With Data Sources Using AutoPilots on page 367). In addition, use a test application to make sure that your database is running and accessible from the computer you're using. Platform Notes We recommend ODBC for use on Windows, and JDBC for use on Linux and Solaris. Database Notes Use ODBC or JDBC if you want to connect to databases like Oracle. If you're using MySQL, we recommend the m.m.mysql-2.0.4-bin.jar driver archive, available from www.mysql.org. Before you begin, enter the JDBC driver classes in the java.ini file, or choose Tools > Options > OpenOffice.org > Security and enter the classes in the Classpath field. The window is shown in Figure 35-24. Figure 35-24. Adding drivers to the classpath 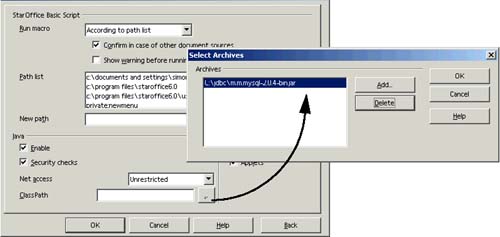 If you're working with Oracle or any similarly robust and complex database, do it hand in hand with your Oracle administrator (and not the internget the head person). Get some pizza and Mountain Dew, and sit down to do this together. You'll need to have installed the Oracle Database Client software, and created a new service name. Your Oracle system administrator can tell you how to get the software and create the service name; with enough pizza, he or she might just take care of it. Just make sure you get the exact service name, however; you'll need it to set up your data source here in the office suite. Creating the Data Source -
Choose Tools > Data Sources. The Data Source window will appear. -
Click the General tab if it isn't already displayed. -
Click New Data Source. -
Name the data source; this can be anything, as long as it's something that will make you and other users think, "Oh, that's that JDBC database with the product information about our grail-shaped beacons." (Or whatever's in the database.) The window is shown in Figure 35-25. Figure 35-25. Naming the data source 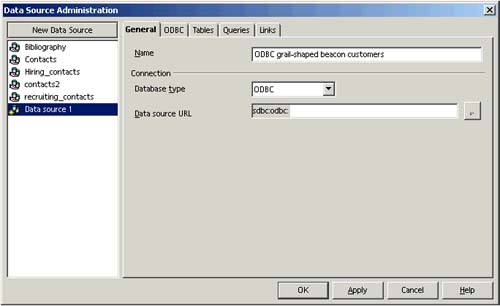 -
Select JDBC from the Database Type list. -
Enter the URL to the database in the Data source URL field. An Oracle example is shown in Figure 35-26 and a MySQL example is shown in Figure 35-27; additional information follows both. Figure 35-26. Specifying the URL to an Oracle database  Figure 35-27. Specifying the URL to a MySQL database  URLs for Oracle databases The format of the URL is as follows: oracle: thin:@ hostname:port:databasename Hostname The machine the database is on. Port The port the Oracle database listens on, on that machine. Database name Just the name of the Oracle database. URLs for MySQL databases The format of the URL is as follows: -
URL mysql:// hostname:port / databasename -
Hostname The machine the database is on. -
Port The port the database listens on, on that machine. The MySQL default is 3306. -
Database name Just the name of the mySQL database. -
Click the JDBC tab and specify the driver class. For Oracle 8.x, for instance, the class is oracle.jdbc.driver.OracleDriver . For MySQL, it's org.gjt.mm.mysql.Driver . The window is shown in Figure 35-28. Figure 35-28. Specifying the driver class 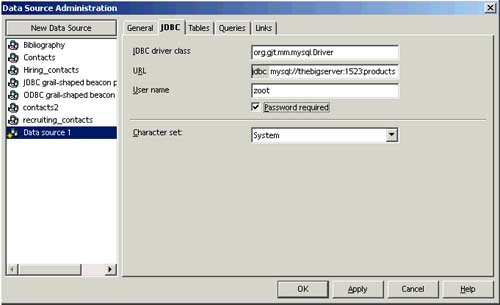 -
Click the Tables tab and if prompted enter a password. Deselect any tables that should not be available to users. -
Add any queries or links as outlined in Figure 35-11 on page 883 and Figure 35-12 on page 884. -
Click OK to save the data source. If errors occur, consult the following. -
If a message appears stating that a connection to the data source could not be established, check the user name, URL, and talk to your database administrator. Also use another tool, on the current computer, to verify whether the database is accessible. -
Check whether the JDBC driver archive is in the classpath and check the driver classname you entered under the JDBC tab. -
Get the latest version of your driver. -
Remove write access for the user to the database. OpenOffice.org can't write to Oracle databases. -
Go back and select the Password Required checkbox, if it isn't marked, and try again. Connecting to an Access or Other Database Using ADO Note UNIX users might want to consider unixODBC and MySQL instead of Access. An excellent document from containing instructions for doing so is at http://openoffice.homelinux.org/index.php?s=38 Database information for ODBC and UNIX can be found at http://unixodbc.org . See http://www.unixodbc.org/doc/OOoMySQL.pdf in particular.
Before You Begin Note You need to install Access 2000 or an update from www.microsoft.com/data in order to use ADO.
ADO is a Windows-specific way to connect to a database, often used to connect to Access databases. You use an interface, similar to a driver, to connect to a database; the database vendor can provide you with it. Contact your database vendor or see www.able-consulting.com. The Microsoft home page also has information on ADO and Access. If you have problems connecting, export the databases to . dbf , dBase. You'll need Microsoft's Data Access Components (MDAC) to use ADO. Windows 2000 and XP have MDAC built in; for other versions, go to microsoft.com/data and find the MDAC manifest. Creating the Data Source -
Choose Tools > Data Sources. The Data Source window will appear. -
Click the General tab if it isn't already displayed. -
Click New Data Source. -
Name the data source. -
Select ADO as the database type. -
Enter the URL to the database. The window is shown in Figure 35-29 with an example of a URL to an Access database; additional information about URL syntax follows. Figure 35-29. URL to an Access database, accessible through ADO 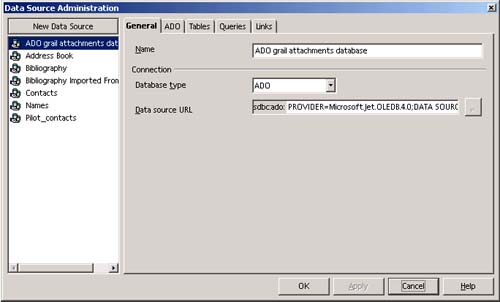 Microsoft Access URL syntax PROVIDER=Microsoft.Jet.OLEDB.4.0;DATA SOURCE= access_mdb_file.mdb where the access_mdb_file.mdb is the full path and filename of the . mdb file. Microsoft SQL Server URL syntax PROVIDER=sqloledb;DATA SOURCE= servername ;INITIAL CATALOG= catalogname where the servername is the host name of the computer where SQL Server is installed, and catalogname is the initial catalog of the database. This is the database that's run on the server. -
Click the ADO tab. Specify the user ID to use to access the database, and select Password Required if appropriate. The window is shown in Figure 35-30. Figure 35-30. Specifying a user for access to a database through ADO 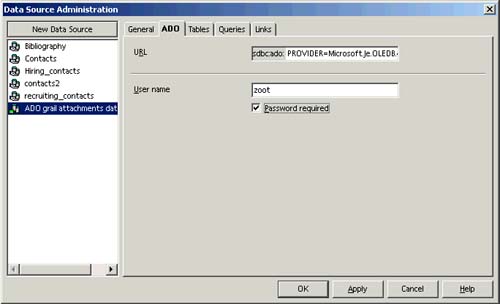 -
Click the Tables tab and unmark any tables users shouldn't have access to. -
Set up queries if you want. -
Click the SQL icon to enter new SQL queries, if you want, for the data source. In the query you can specify only one table, and it must be one of the tables that was displayed and selected in the Tables tab. -
Click the New Query Design icon to create queries using a GUI tool where you don't need to know SQL. For more information see Creating Queries on page 914. -
Click OK to save the data source and close the window. -
If you get errors, check that you're using the right names for the database, server, username, password, and so on. -
Ping the server and server computer to make sure they're running, and test accessing the database fro another computer. Setting Up Any Address Book as a Data Source If you have several address books, complete this procedure once for each, and just name the data sources differently. -
If the Address AutoPilot in Figure 35-31 hasn't appeared just through your starting the program, in OpenOffice.org choose File > AutoPilot > Address Data Source. You can also get at these windows by choose Tools > Data Source, click New Data Source, and selecting Address Book as the data source type. Figure 35-31. The first window for creating a data source from your address book. 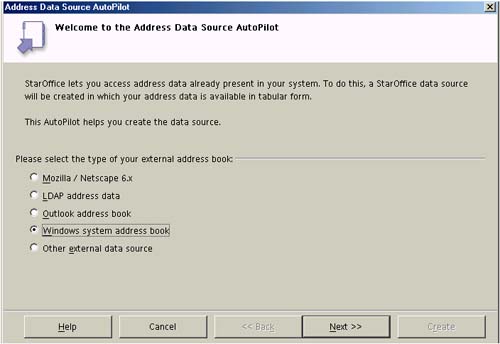 -
Select your address book type. The windows that you see will depend on your choice here. Mozilla/Netscape, Windows, Outlook If you've got a compliant address book, just select that type and click Next. After a few minutes, you'll get the "that's all folks" message and you're done. LDAP After you select LDAP and click Next, you might be prompted to enter additional information. Click the Settings button and enter the appropriate settings in the window shown in Figure 35-32. Figure 35-32. Entering LDAP information 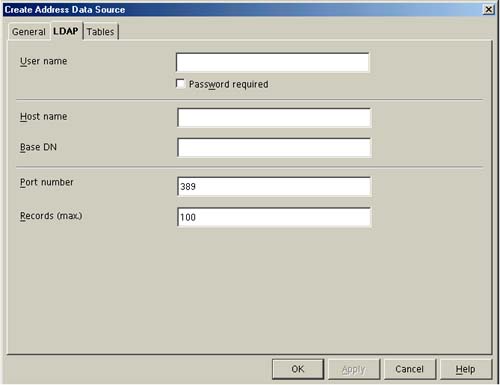 Other (such as another address book exported to tab-delimited text) You definitely need to enter more information for this type. Click Next and you'll be prompted to enter more information. Click Settings and enter information in the windows shown in Figure 35-33 and Figure 35-34. Figure 35-33. Entering additional information about the data format 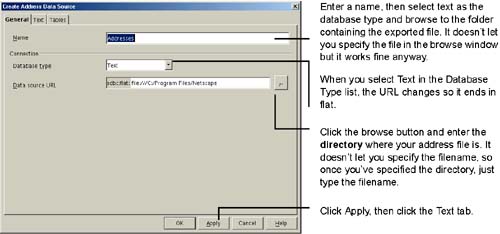 Figure 35-34. Entering the location of the exported text address file 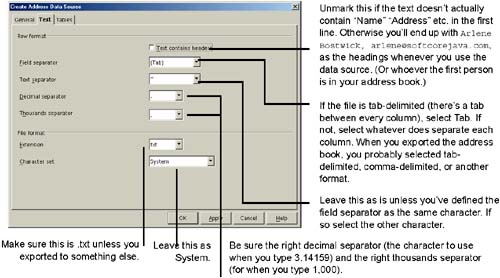 -
After the message that basically says "That's all the information we needed, thanks" just click Next. The window in Figure 35-35 will appear; name the new data source. You're done. Figure 35-35. Naming the data source  Field separator This separator delimits the single data fields from each other. You can choose among a semicolon (;), comma (,), colon (:), tab, space, or another character, which you can enter in the respective combo box. -
The window in Figure 35-35 appears; name the data source and you're done. To use the data source you set up, open any document and choose Tools > Data Sources. More specifically , use it when you choose File > AutoPilot > document_type , or whenever you do a mail merge. For more information, see Chapter 10, Mail Merges, Business Cards, and More , on page 357. Migrating a StarOffice 5.2 Database and Creating a Data Source The StarOffice 5.2 database format isn't supported now, but you can migrate it to a usable format and create a data source so you can connect to it. The AutoPilot creates a new dBase file based on the old database. Note The windows that appear in the AutoPilot vary depending on how the old database was set up. For that reason, and because they're self explanatory, we don't display all the windows. Follow the AutoPilot through and use the directions onscreen.
-
Choose File > AutoPilot > StarOffice 5.2 Database Import. The window in Figure 35-36 will appear. Figure 35-36. Specifying the database to convert  -
Click Next; the window in Figure 35-37 will appear. The windows that you get after this will depend on whether there are any queries or forms attached to the database. We'll ignore those for the most part; the AutoPilot is self explanatory. Figure 35-37. Selecting the items to convert 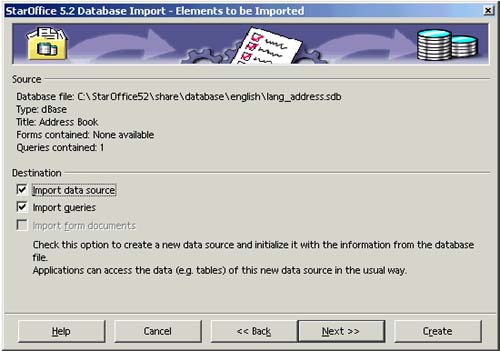 Select the queries and form documents, if you want to convert them. Click Next and enter information as prompted. -
After you've specified how you want to convert forms and queries, the window in Figure 35-38 might appear. You can accept the default directory. This window is a little weird; it just wants a little reassurance that yes, that's the database you specified before, and sure, go ahead and put that . dbf extension at the end. Figure 35-38. Specifying the absolute directory of the old database (doesn't always appear)  -
Click Next; the window in Figure 35-39 will appear. Type the name for the new 6.0 data source that you want to see in data source lists. Figure 35-39. Specifying a data source name for the converted database 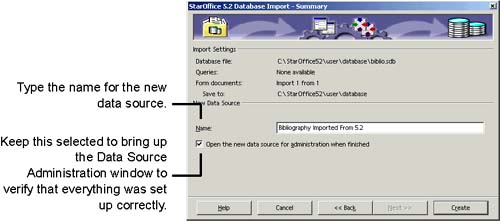 -
Click Create; the window in Figure 35-40 will appear. Click each tab to make sure the data source was created correctly and the database was converted correctly. Figure 35-40. Verifying the new data source and converted database 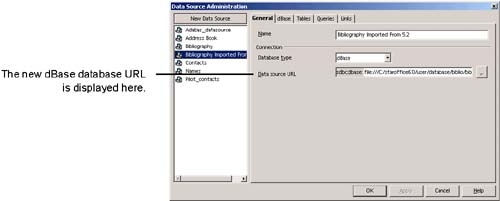 Setting up Connection Pooling Creating a connection to a data source is a fair bit of work for your computer and programs, so this lets you manage the connections: keep them around for a while in case another process needs them, but then delete them if no one wants them. It brings to mind rather sad memories of junior high dances. For all types of sources, choose Tools > Options > Data Sources > Connections and see if you want to modify the settings for any of the drivers, or deactivate connection pooling period. The window shown in Figure 35-41. Figure 35-41. Data source settings 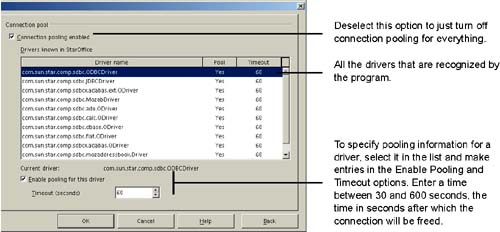 |