Outline Numbering, for Chapter, Figure, and Cross-Reference Numbering This section tells you how to do outline numbering in the following sections: Understanding Outline Numbering Note The name is deceiving. It's not really specifically for outliningit controls levels for nearly every numbering or heading related thing in Writer.
This feature is one of the most confusing and non-intuitive in the entire program; and if it didn't play such an important part in how other features work, you'd be wise to ignore it altogether. However, outline numbering is essential if you want to: -
Cross-reference paragraph numbers Even if you set up numbering in a paragraph style, if you don't use outline numbering, you can't cross-reference the generated number or generated text, such as "Chapter 1", "Figure 2-7", or a number such as "1.1.2" preceding an outlined item. -
Number graphics, tables, and other inserted elements, using the chapter number and the number of the element in the document, such as "Figure 5-1" -
Set up running headings in document headers and footers Automatic numbering for paragraphs isn't a new concept we're just presenting in this book. In fact, Quick Paragraph Formatting on page 208 talks about just that. Outline numbering is different than paragraph numbering, because Writer depends on outline numbering to enable the features in the previous list. Limitations of outline numbering Before we show you how to set up outline numbering, we need to note a few limitations. -
Only one paragraph style can be used as the chapter paragraph, even though you'll see 10 paragraph style levels in the Outline Numbering window. -
Of the paragraph styles listed in the Outline Numbering window , Writer uses the first of those paragraph styles it encounters in the document or book as the chapter-level heading. For example, if you want to use a Heading 2 as a running head in the header or footer of a document or book, but a Heading 1 appears before a Heading 2 as the first paragraph style in the document, Writer sees the Heading 1 as the chapter paragraph and you can't use the Heading 2 for running heads. To fix this problem you'd have to unassign Heading 1 from the list of paragraph styles in the Outline Numbering window so that it's not one of the paragraphs assigned to use outline numbering. -
If you want to use a page numbering format that uses chapter-page (such as 3-1, where 3 is the chapter number), or if you want to number inserted objects like graphics using a numbering format such as "Figure 2-7", you must assign a number format (in the Outline Numbering window) to the level that will serve as the chapter number. But because only one paragraph style can be the chapter paragraph, you can only set up a running head that displays the contents of the chapter-numbered paragraph. Make sure the paragraph style you want to use for the outline numbering is set as the Level 1 paragraph style in the Outline Numbering window. Simplicity is a virtue But the aforementioned limitations, it turns out, are good for a couple of reasons: one, they discourage using chapter-page numbering (such as 3-5 for chapter 3, page 5), which makes it difficult for readers to find page numbers; and two, you're forced to keep your headers and footers simple (yet helpful) by using only one running head. Figure 9-3 shows different outline autonumbering styles for the chapter paragraph. Figure 9-3. Different automatic outline numbering styles for a chapter paragraph 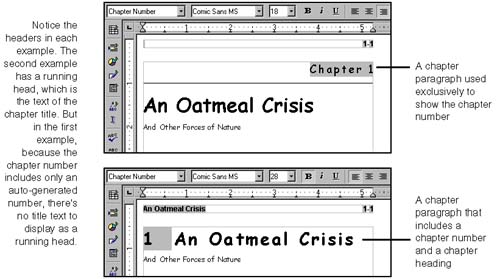 Setting Up Outline Numbering -
Decide which heading level you want to use as your chapter number. -
Choose Tools > Outline Numbering. -
In the Outline Numbering window, select Level 1. -
In the Paragraph style field, select the paragraph style you want to use for the chapter. The paragraph style you select doesn't have to be set up with a chapter autonumber. This can simply be the paragraph style you want to use in running heads. -
If the paragraph style you select as the Level 1 style isn't the style of the first paragraph in the document or book, unassign from the Outline Numbering window any styles that appear before the Level 1 style in the document. To do this, select the levels for the styles you want to remove, and in the Paragraph styles field, select None. 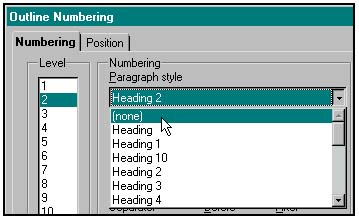 -
If you want the paragraph style to include an automatic chapter number, select a Number format and set appropriate numbering options. See Figure 9-4. Figure 9-4. Setting outline numbering options: Numbering tab 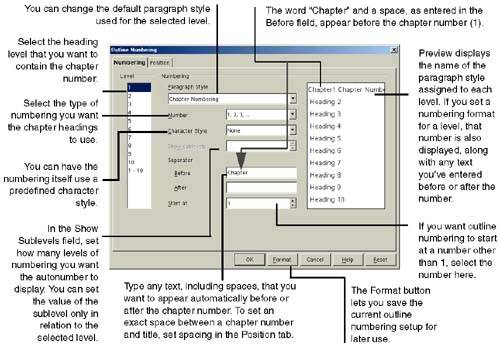 -
Click the Position tab (also Figure 9-4), and set any applicable options, especially if you want to indent the chapter paragraph style or set the amount of spacing between the chapter number and the chapter text. Position changes to the outline numbering style override (but don't replace) the indents and spacing of the paragraph style itself. -
Click OK. The Show sublevels field is extremely important when you want to use hierarchical outline numbering or figure/table numbering that includes the chapter number. For example, assign the Graphic and Table styles to whichever outline levels you want, and set the sublevel of each to a value of 2. That means the Figure/Table paragraph numbering will pick up the level 1 chapter number and generate its own number, such as "Figure 1-5". The Show Sublevels field In the Show Sublevels field, set how many levels of numbering you want the autonumber to display. For example, a sublevel number of 3 will include 3 autonumbers for a paragraph: the numbering of the level 1 and 2 paragraphs (incremented), and the numbering of its own paragraph. You can set the value of the sublevel only in relation to the selected level. Figure 9-5. Setting outline numbering options: Position tab 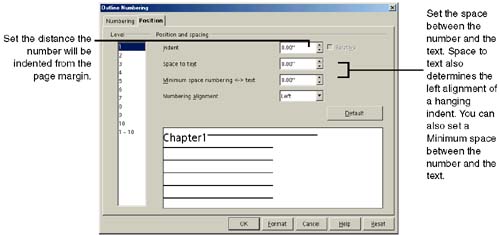 Saving Different Outline Numbering Versions The program lets you save different versions of outline numbering that you can switch between. To save the current combination of outline settings to revert back to later: -
In the Outline Numbering window, click the Format button, and choose Save As, as shown in Figure 9-6. Figure 9-6. Saving an Outline Numbering configuration 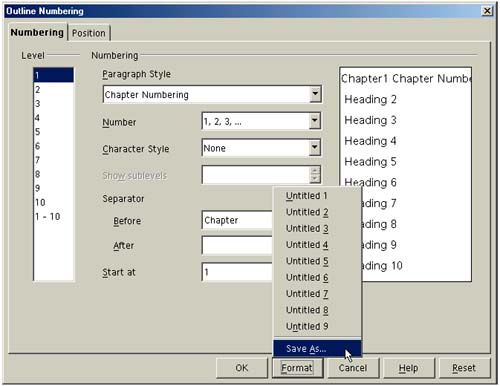 -
In the Save As window, type a name for the configuration, and click OK. The saved format is available to all documents. To select a saved outline numbering versions later, click the Format button, choose the format, and click OK to apply it to the document. |