News Articles
|
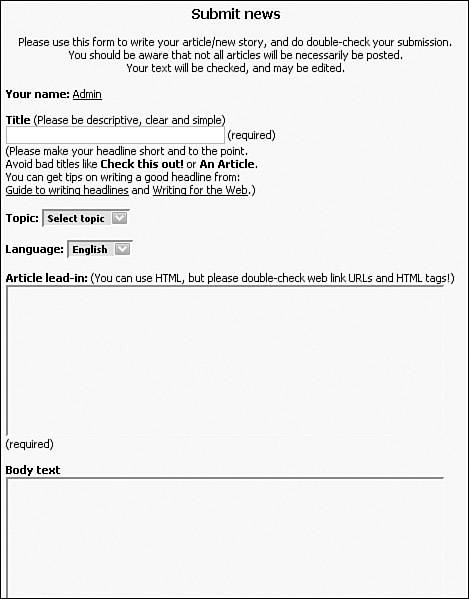
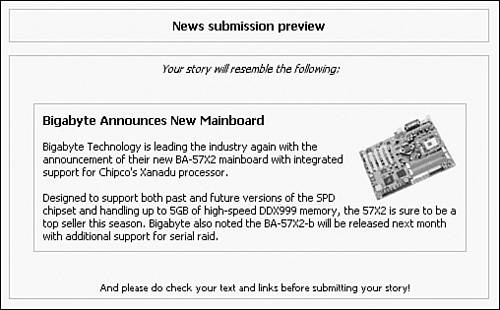
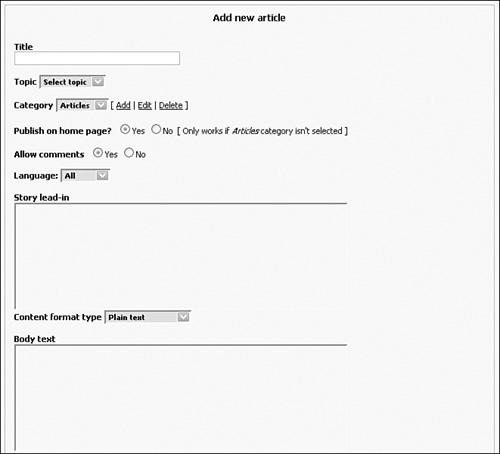
| Now, you can add some articles using these new topics. Two main module forms are used to manage submitted news articles: Add Story and Submit News. (In the example, you use the latter form first because it's simpler and what most site users will be seeing.) First click the Submit News link in the Administration Menu (see Figure 5.5). You are taken to the Submit News Configuration page that allows you to receive an email notification every time someone submits a news article. You can configure who gets the email and what the message says. This tool is disabled by default, but if you do not plan to check for new submissions regularly, this can be a handy reminder. Figure 5.5. Adding news articles to PostNuke. Next click the Submit News link in the Main Menu. You see the standard Submit News form (displayed in Figure 5.6) with only five fields to complete. The Title text box should contain a short, clear description of your content. For a sample submission, enter "Bigabyte Announces New Mainboard." Look at the Topic drop-down list box options. Notice the topics you created earlier automatically appear in this listing. Select a topic. Figure 5.6. Submitting a news article. The Language drop-down list box defaults to the site's Language setting. For most sites, ignoring this option is fine. If you plan to use multiple languages, however, you need to select the language preference with which this article should be shown. In this way, you can enter multiple versions of a given article, each in a different language. Lastly, two main text areas are provided for the article body. The first field, the Article Lead-In field, is required and displays whenever multiple articles are being viewed. For example, on a site's home page, different news postings are listed together. The information should be short and to the point so as not to bog down article browsing. The second field, the Body Text field, is not required and is meant to contain the rest of the story, if the short first field is not completed. When an article is selected by a user, it is opened into its own page and the entire contents of the article are available for reading. The two boxes are not different versions of the same information. The first field is the introduction, and it is displayed above the extended text when the complete article is being read. If the article information can be contained completely in the main article text field, the extended text is not required. The short introduction field is always displayed. Now enter some text into both fields and submit the form. The only option at this point is to preview the submission before it's posted; click the Preview button. You should now see a page that includes your populated form and has a short sample preview of your posting at its top (see Figure 5.7). At the bottom of the form, the Submit button is now available; click the button to add your article to PostNuke. Figure 5.7. A short article preview. Tip You can change the messages displayed with the Submit News module by editing the module's language file. The standard path to this file is /modules/Submit_News/lang/eng/global.php. Change the wording in the single quotation marks under each define line to alter text displayed by the module. Browse your site's News page and you see the article is not yet visible. Notice a new block automatically appears under the Main Menu called Incoming. This block now displays the text: Waiting Content * Submissions: 1 The article you submitted is now in a queue waiting for approval by a site administrator. You could click that link to approve the article, but first return to the Administration Menu page; this time, click the Add Story link. The Add New Article form is basically a copy of the Submit News form with an additional five options. You can see this form in its entirety in Figure 5.8. Figure 5.8. Administrator's Article/Stories submission form. At the top of the page is an unassuming link under Articles/Stories Administration called New Story Submissions. Select this link to review articles waiting in the submission queue. You must preview an article before posting it, so choose Preview in the left drop-down menu and click the Go button. Now, the same Add Story long form appears, but it is populated with the contents of the article submitted earlier. Any content or choices made during the story submission can be changed now during the review process. If a user submitted a story under the wrong topic, just change it before approving the post. The additional fields function as described in the following sections. CategoryAn article category is very similar to a topic. Both divide articles into different groups. Topics display the icons, but categories are listed with an article's title. Categories provide another overlapping level of grouping. Take our computer hardware example. If each topic is concerned with physical components, the categories could be Announcements, Product Previews, Reviews, Benchmarks, and so on. The sample posting has a Mainboard topic and is in the Announcements category. In this way, you can create a more versatile interface to your site's content for your users. The category Articles is a default entry that basically means "no category." Selecting this option publishes an article without any connection to category listings. Publish on HomepageThis option lets you file a posting into the live site, but not display it on the home page. This is great for adding information that is important but no longer timely. It's expected that users will find older articles by the category headings. For this reason, the Publish on Homepage switch only works if you have also selected a category other than the Articles default. Allow CommentsComments are a standard feature of most Content Management Systems (CMSs) that allow readers of an article to comment on its contents. The feature is turned on by default, and submitted comments appear beneath an article when read in its full-page format. Content Format TypeAdministrators have the ability to choose how an article is parsed by the PostNuke engine. In this way, you can take a submitted article and clean up any formatting issues that might be unprofessional or simply inconsistent with your site's styling. Select Plain Text and lines are broken at each return. Any Hypertext Markup Language (HTML) in a submission is displayed and not rendered. Select HTML-Formatted and only legal HTML tags are used to format the content. A document might have clear returns to break up paragraphs, but without the tags to support them, all the text runs together. Note When HTML-Formatted is selected, only tags approved in the HTML Options section of the Website Settings page are rendered. Restricted tags are ignored. The option you choose is dependent on your own styling for your site, and you can select either format for every article. The setting choice is remembered in the PostNuke database and remains with the content. NotesNotes are meant to be treated like an editor's comments or clarifications. They appear in italicized text below the article in both the short and full-page versions. Notes should be kept short, such as a single paragraph in plain text. Program This StoryPostNuke allows you to program a story to appear at a scheduled time. By setting this field to Yes, the following Hour, Day, Month, and Year fields are checked to confirm when the article should be displayed. An article can currently only be scheduled to appear, not expire, so all live articles are designed to be permanent on your site unless manually removed. When you have completed your review of the article, change the final drop-down list box to Post Story and click the Submit button. Your article now appears on the News home page formatted similarly to Figure 5.9. Figure 5.9. News added to the home page. |


|
EAN: 2147483647
Pages: 207