New Installation
|
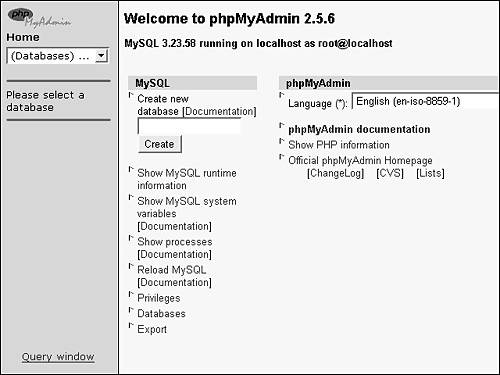
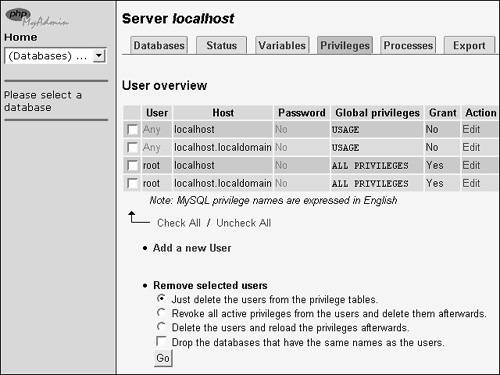
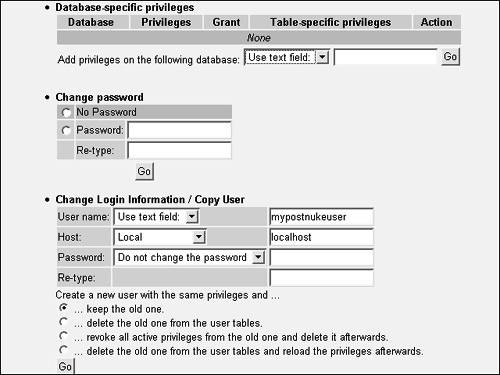
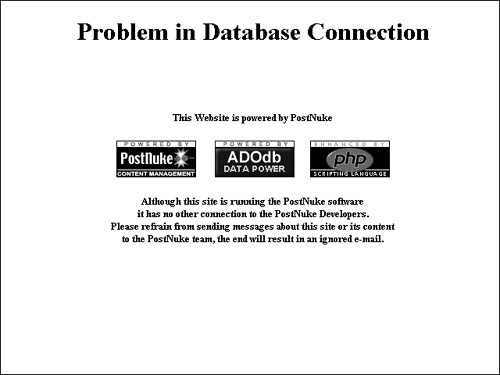
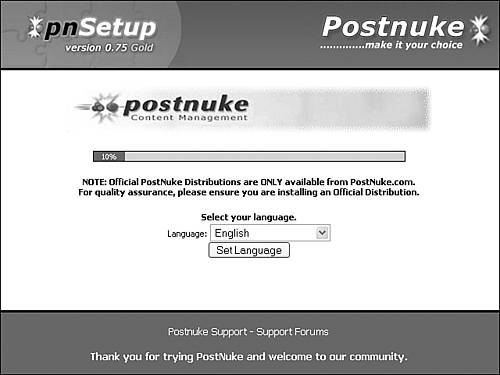
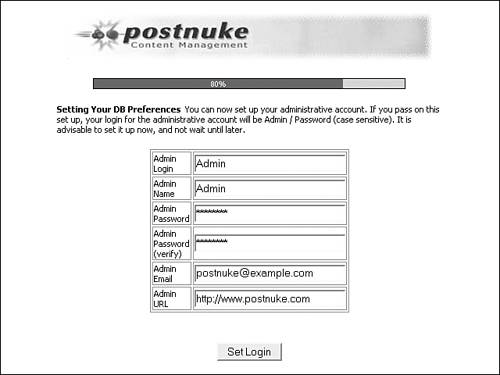
| PostNuke is written in PHP and interpreted live when browsed, so in a sense, the program itself is not actually installed. The files are simply copied to the web server directory. However, PostNuke is a database-driven application, and that is the key to getting it to work. Two main actions must happen to complete your PostNuke install: The PostNuke database must be created with a user given administrative rights, and the database must be populated with PostNuke tables seeded with default data. The former is usually accomplished manually; you set up the tables and data using the automated installer. Database PreparationThe PostNuke install includes scripts to automatically create the database and all the tables the program needs to operate. That said, what you need to do to prepare MySQL for use by PostNuke varies a great deal depending on how your server is set up. If you are running on an external host and do not have direct access to the server, you need to request the creation of the database. A user account also needs to be set up to access the new database. You might be allowed to choose the names of the database and user and select the password. After this is done, you need to keep this information available during the install process. If your database and users have already been created, you can skip the following, more detailed steps. Your host might provide a remote database administration tool, such as phpMyAdmin or cPanel, set up with your database. In this case, some things might already be done for you, such as the creation of the main database, but you have access to other features, such as table and user management. If your server is locally installed or if you have direct access to the server and want to create the database yourself, you can still use a locally installed tool, such as phpMyAdmin, or you can create the database and users using the MySQL command-line interface. Before going through the steps, it's important to know that the absolute minimum database preparation PostNuke needs is a user account on the MySQL server with privileges to create and manage a database. For example, a default root user is created during the MySQL install; you could use the root account for the install and let PostNuke create all the rest, but that is not very secure. It's strongly recommended that you at least create a new user specifically set up for PostNuke. This account will be used continually by PostNuke after the install to interact with the database. Database CreationThe most popular graphical user interface (GUI) for database administration with PostNuke is phpMyAdmin, and so it is specifically covered here. If your host uses a different tool, they should provide you with any directions you might need. phpMyAdmin is installed by default with the root account settings of MySQL. If you have changed the root account password, you also need to edit the config.inc.php settings file for phpMyAdmin to enable access. The application files should simply be placed in a browsable location on your web server, preferably a virtual host location. At this point, you should be able to bring up the main phpMyAdmin page in your browser, as shown in Figure 2.1. Figure 2.1. phpMyAdmin starting page. The first item under the MySQL column is conveniently Create New Database. Type in the name you want for the PostNuke database and click the Create button. The screen then updates to the administration subpage specific to your database, which initially gives you the option to create a new table. Do not create any tables at this time. Note You can navigate around phpMyAdmin databases using the left frame in the interface. A drop-down list box contains the names of every database. The number in parentheses by each name signifies the number of tables within a given database. If you select the first item in the list: (Databases)..., you are taken back to the main starting page for phpMyAdmin. To create a database manually using console commands, you first need to enter the MySQL Monitor shell. From a Linux terminal prompt, type the following: # mysql -u root -p It should be in your path and prompts you for the root password. Windows XP users most likely need to change to the c:\mysql\bin\ directory from the command prompt before running the mysql command. Now that you are at the shell prompt, type the following: mysql> create database [your database name]; You should see the message Query OK, 1 row affected to confirm its creation. Database User CreationWhen a user is created in MySQL, you can grant the account specific rights. For security purposes, when you have an account that is created only for PostNuke to use, it is a good idea to give the account access to only the PostNuke database. If you choose to only set up a user account prior to your PostNuke install, you must grant the user the ability to make a database. But, if you make the PostNuke database yourself, the user can be restricted to only the tables within the one database. That is why the database creation steps are covered before user creation in this text, and it's recommended you create both database and the user account before installing PostNuke. Tip If PostNuke creates your database for you using an account with open database creation privileges, it's a good idea after the install to restrict the user's abilities. It is more secure to grant the PostNuke user access to only the one database containing the PostNuke tables. Open phpMyAdmin to the main administration page, as shown in Figure 2.1. Click the Privileges link (third from the bottom in the MySQL column) to get to the user administration page. Your screen should now look similar to Figure 2.2. Figure 2.2. phpMyAdmin privileges administration screen. Click the Add a New User link. Two tables are available: Login Information and Global Privileges. Complete the text fields for the Login Information. You can use localhost for the Host field. If you have created a database already, you should leave the Global Privileges table blank for security. Click the Go button to create the user. The resulting screen is the administration page for the new user. Besides the same Global Privileges table from the creation screen, this page allows you to grant database-specific access (see Figure 2.3). In the Database-Specific Privileges section, choose the existing PostNuke database from the drop-down list box, and click the Go button. Figure 2.3. phpMyAdmin user management screen. On the next screen, you see a series of check boxes you can enable to grant specific rights to the database. At minimum, you must check the boxes by SELECT, INSERT, UPDATE, DELETE, CREATE, ALTER, and DROP. If your user will be restricted to just the PostNuke database, you can select all 10 of the privilege options for the database to keep it simple. Now submit the form. Your user now has all the access it needs for the PostNuke install. To create a user manually using console commands, reenter the MySQL Monitor shell, as described in the previous "Database Creation" section, and use the Grant command to create a new user as follows: mysql> GRANT SELECT,INSERT,UPDATE,DELETE,CREATE,ALTER,DROP ON [database name].* TO [username]@localhost IDENTIFIED BY '[password]'; The command for creating a user with complete access to a database is as follows: mysql> GRANT ALL PRIVILEGES ON [database name].* TO [username]@localhost IDENTIFIED BY '[password]' WITH GRANT OPTION; Most MySQL command statements are documented with keywords in uppercase, but it is not required to type them that way. Replace the noted variables with the names and password you have chosen, and don't forget the single quotation marks around the password. This creates a user with complete access to the one database. You might also need to change a user's password. This can also be accomplished using Structured Query Language (SQL) at the command prompt with the following command: mysql> SET PASSWORD FOR [username]@localhost = PASSWORD('[password]'); Note It is possible to install PostNuke into an existing database containing data for another application, such as a forum. PostNuke installs with a prefix before each table name to prevent any confusion with other tables that might exist in the database. It's strongly recommended you back up your data before the install. The PostNuke DistributionThe most recent (stable) release of PostNuke is version 0.726-1 Phoenix. It can be found on the PostNuke site at download.postnuke.com under PostNuke, Main Releases, or alternatively there is always a direct link from the PostNuke home page on the right. Archived older versions are available, but there is no benefit to running an older version. Decompress the file to a directory on your server. The distribution package files are contained in two main subdirectories. The html directory has all of the files that you must place in your server's web path. The phoenix-sql directory contains the MySQL dump of the default install structure. If you are using the automated install of PostNuke, which is recommended, you can ignore and/or delete the phoenix-sql data. PostNuke File PlacementIt's important to know how a web server works to place the PostNuke files in the right place. This is often one of the more tricky parts for new users. When you make a request for a web page from a site, a server pulls the file from a specific location on its hard drive. A server might be filled with other directories and applications and files, including its main operating system files, but the web server program knows to look in a specific spot for web pages. If you are running multiple virtual servers, each one is defined with a different specific directory for its files. You need to place the PostNuke application files in the web server directory you want to use for PostNuke. Apache installs by default to /usr/local/Apache2/ on Linux. Web files are served from the /user/local/Apache2/htdocs/ directory. If you are using the default Apache httpd included with your Linux distribution, the path might be integrated more into the operating system, such as having server and configuration files in /etc/httpd/ and having web files served from /var/www/html/. You might also find that the web root is called public_html. Apache on Windows XP installs to c:\program files\apache group\apache2\ and web files are placed by default in c:\Program Files\Apache Group\Apache2\htdocs\. Microsoft IIS is integrated with Windows XP and creates a directory off the root for web files. The full path for IIS is c:\Inetpub\wwwroot\. The configuration files for any web server can be modified to move the default web file location to any location you desire. You can even run multiple, different server services that point to a custom web file directory tree. If you browse a file with the uniform resource locator (URL) of http://www.mywebsite.com/mypage.html, the file mywebpage.html must be in the root of the web server. So, for example, if your server path was /var/www/html/, the file would be at /var/www/html/mypage.html. The path is equal to the server name, no matter how deep the path might be on the hard drive partition. The PostNuke files are contained in the html directory, but if you copy the html directory itself into the web root, you have a path like this: /var/www/html/html/nukefile.php, and your browser URL looks like this: http://www.mynukesite.com/html/nukefile.php. The point is that the html directory itself does not need to be copied; only the directory's contents should be copied. You can install PostNuke into a subdirectory, and in more advanced website configurations, this might be advisable. However, if you want to use PostNuke as your site, where PostNuke appears as your home page, you only want to move the files inside the html directory. If you are using an external host, your provider tells you where those web files need to be placed. It might be the directory to which you FTP, or it might be a subdirectory off your user account. You should move the files to the appropriate web server directory now. The SQL folder is only included for those users who want to install PostNuke manually. If you plan to use the automated install, you can ignore this directory; it does not need to be moved to the web server. You can now test the files and your web server setup. Open a browser and go to your server's URL. You should see the PostNuke "problem" page, as shown in Figure 2.4. Figure 2.4. PostNuke home page before install. Even though PostNuke has not been installed, the PostNuke program only needs a web server with PHP to run its code. The actual install process now creates the database and completes the PostNuke setup. PostNuke Config PermissionsThe final change you need to make to files before running the setup is to confirm access permissions to your PostNuke configuration files. These are called config.php and config-old.php and are also located in the PostNuke root. If your server is a Windows XP system, you should have full access to the files automatically. Linux users, however, need to use chmod to open the permissions. Change to the root directory of your PostNuke files, which at this time is your web server's root, if you expect to run PostNuke as your home page. If you have terminal access to your server, type the following from a Linux command prompt: # chmod 666 config.php config-old.php If you are using an FTP or SSH client to remotely access your server, it should have the ability to set permissions for Unix files. You might have to select a file and click a permissions button or right-click to bring up options. The 666 permissions setting grants both Read and Write access to everyone. Select the options available to give Owners, Group Members, and Other users both Read and Write access. The access markers, if you have the ability to see them, for those two files now look something like this: -rw-rw-rw- Note You can also grant access up to 777, additionally giving Execute permission for the two files, but the install process itself does not require it. Full access is marked like this: -rwxrwxrwx. Automated PostNuke InstallIn your browser, go to the index.php file in the root of your PostNuke install. If you moved the files into your web's root, the address is something like http://www.yourwebsite.com/install.php. If you have moved the files to a subdirectory off your web root, it is http://www.yourwebsite.com/directoryname/install.php. You now see the page in Figure 2.5. Figure 2.5. Selecting your language to begin. Select your language for the install. Additional languages are available for PostNuke and can be installed later. Click the Set Language button to continue. The next screen presents you with the GNU General Public License (GPL), which you must accept to complete the install. If you are not familiar with the GPL, you should read through the document to be certain the licensing fits your needs. Click Next to continue. PostNuke now performs a CHMOD Check on the two configuration files you fixed earlier. The permissions levels are displayed with check marks by each item, as shown in Figure 2.6. Figure 2.6. Configuration file permissions are correct. You are now 40% through the PostNuke install process, and it's time to enter all the database information you have collected. Here, you need to enter the Database Username, Database Password, and Database Name information into their respective fields. If you do not specifically know what other fields need to be altered, leave them at their defaults. Some remote hosts might require that you enter a specific server name in the Database Host field. Some are configured to use localhost or 127.0.0.1. You need to check with your host if you are uncertain. If you are installing PostNuke locally, you should leave the field set to localhost. The Table Prefix field contains the word inserted at the start of every table name. This is to prevent any confusion between tables in a shared database. For example, you can install multiple copies of PostNuke into the same database using different table prefixes (nuke2, nuke3, and so on). After you have completed your changes to the Database Information form, click Submit to continue with the install. You have the opportunity on the next screen to confirm the information you have entered. At this point, you determine whether the process should be completed as a New Install or Upgrade. Click New Install. At the 60% point in the process, you are presented with the option of creating the database. If you have already made a database for PostNuke using the steps described previously, do not check this box. Most external hosts have created a database for you and provided the name, and, in that case, also do not check the box. If you have server access but have left it up to PostNuke to create the database for you, check the box. The install still creates all the tables to populate the database without the box being checked. If you do check the box but have given the install the name of a database that already exists, the install fails. The next screen has a long list of table creation messages such as the following:
Depending on whether you have made the database prior to installation, you might see the phrase No database made. at the top of the line. It is not an error message unless you were trying to create the database at this time. The PostNuke administrative account is set up at 80% (see Figure 2.7). Change the two Admin Password fields to something difficult (preferably impossible) to guess but that you can remember. The default Admin password for the automated install is "Password" (and is case sensitive). You must change the password before making your site public or you risk losing control of the site. Figure 2.7. Setting the Admin account password. The Admin URL field is used to identify your PostNuke website in automated correspondence generated by the PostNuke administrative system. It does not need to be the exact address of your PostNuke site, but you should enter the main URL to your overall site so the address can be used to focus your site's visitors to the right location. The next screen confirms that the administration account is created with another list of database change messages:
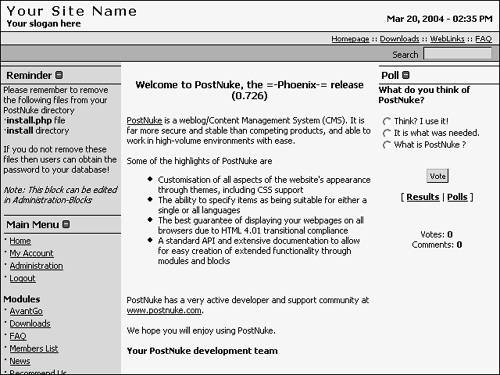
You can click the Finish button, and at the bottom of the PostNuke credits page is a link to your new PostNuke site's home page. The page looks similar to Figure 2.8. Figure 2.8. Your PostNuke home page. Manual PostNuke InstallIf you prefer to do the manual PostNuke installation, you need to use the SQL file included in the zip under the phoenix-sql directory. You also need direct access to the server to issue the required shell commands. First, manually edit the config file before install. Open config.php in an ASCII editor and under Database & System Config, look for the following section of code: $pnconfig['dbtype'] = 'mysql'; $pnconfig['dbtabletype'] = 'MyISAM'; $pnconfig['dbhost'] = 'localhost'; $pnconfig['dbuname'] = ''; $pnconfig['dbpass'] = ''; $pnconfig['dbname'] = 'Phoenix'; $pnconfig['system'] = '0'; $pnconfig['prefix'] = 'nuke'; $pnconfig['encoded'] = '1'; You can enter your username and database name into the dbuname and dbname lines, respectively. The single quotation marks around your names are required, and, of course, delete "Phoenix" from the dbname when you are entering yours. File permissions must be set to 666 for both of the config files as outlined previously. Change to the directory containing the SQL file, or be certain that is it in your path, and type the following command: # mysql [database name]<Phoenix-0.7.2.6.sql This populates the PostNuke database using the configuration files and defaults. Note The default administration account in the SQL dump is still called "Admin," but the password is instead set to "God." Both are case sensitive. Be certain to change your Admin password using the PostNuke interface after you are up and running. "God" is also a common password that is easily guessed. Language PacksPostNuke is a global application used on thousands of websites all over the world. Fifteen language options are available from the main install of PostNuke, but you can find more language packs at the PostNuke Language Project (http://sourceforge.net/projects/pnlanguages/). As of this writing, 32 language packs are available. You can also download an additional translation tool pack called Nukelang for the development of other language versions. You will learn more about site setting changes and the install of additional packages in upcoming chapters. |

|
EAN: 2147483647
Pages: 207