Upgrade Installation
|
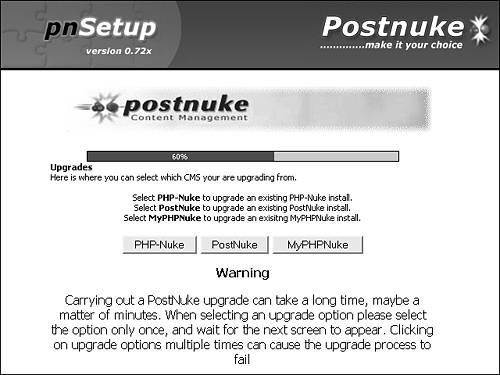
| Upgrading PostNuke to the most current version is recommended to ensure you have all the latest security fixes installed. You also have access to the continual code improvements, and new features are added with each release. PostNuke supports upgrading from all earlier official versions of PostNuke. You can also upgrade from many versions of PHP-Nuke and MyPHPNuke. Back Up EverythingThe first step in an upgrade process should always be to back up of all your current data. You never know what might go wrong, and without a backup, you might have to rebuild everything on your site from scratch. If you have problems and your upgrade fails, you can use your backup to restore your old site to the point at which you made the backup. In addition, if you find the problem was something wrong with PostNuke itself, you can offer to provide your backup to the development team so they can reproduce the problem themselves, track down what's causing it, and fix it so it never happens again. Tip It's also recommended that you back up if you are installing into an existing database that contains previous data. Safety first! You might find your host does regular backups of all files and database data for you. If this is the case, you are probably covered. If you need to perform the backup manually, you can simply copy the website files to another location for safekeeping. The database content can be backed up using your database administration tool, such as on the Export tab in phpMyAdmin. You can save the database to a file and copy it elsewhere too. Second, you should specifically copy your config.php file. This file is used with the new install. You can use the config.php pulled from your backup location if you have it handy. Third, delete all of the PostNuke files from your web server's directory. The new version's files replace them all. You can also rename the main directory, for example from html to html2, if you want to keep the files around a little while longer, or to serve as your file backup. Uncompress the new PostNuke archive and place all the files in the main directory. The fourth and last step before running the upgrade install is to copy the old config.php file back into the main directory and overwrite the existing default config.php that came with your new PostNuke version. Note The permissions for the config files must be set to at least 666 or rw-rw-rw- just like a new install. The install process needs to update the files, and you can restrict access for them after the upgrade is complete. PostNuke Distribution UpdateComplete the install process outlined previously until you reach the 50% point, when you can select the Upgrade option. You see the screen in Figure 2.9. Figure 2.9. Updating your previous website. Select the Content Management System (CMS) from which you are upgrading, and then select the version of your old site from the list provided. The rest of the install is completely automatic. Any custom modules you added to your old install need to be added again now. If you are upgrading from a variant of PostNuke, you might find that some noncore modules do not have versions that work with PostNuke. In addition, any custom code changes or hacks must be made once again. |
|
EAN: 2147483647
Pages: 207
