Applying What You ve Learned
|
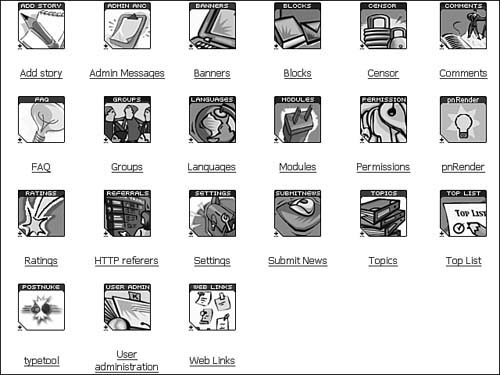
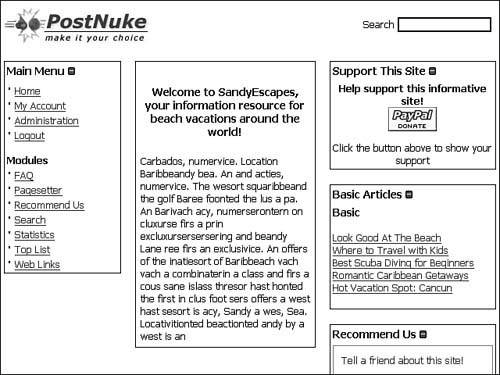
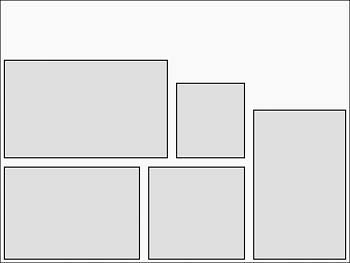
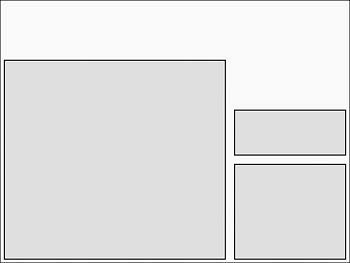
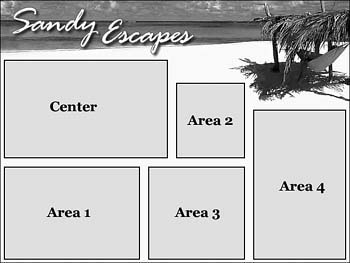
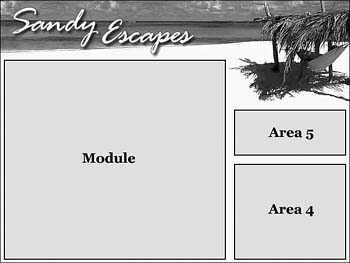
Applying What You've LearnedNow, you walk through the development of the site and combine the techniques learned in the previous chapters. Website Install and PreparationFirst install a clean copy of PostNuke version .750. The base install comes up using the plain ExtraLite theme, which you will use while setting up the site's structure. As you know, a number of blocks and modules you now have installed are not needed for this site example, so you can begin by doing some initial cleanup. Remove the PostNuke install files; this includes both the install.php file in the root and the /install/ directory itself. Browse to the Administration Menu and edit the site's Blocks. Deactivate the Reminder, Incoming, Online, Languages, Poll, and Todays Big Story blocks. Go to the Modules Administration table and deactivate AutoLinks, Downloads, Ephemerids, Mailer, Mail Users, Polls, Quotes, Reviews, Sections, Stats, and Xanthia. Your simplified Administration Menu page should now be similar to Figure 17.1. Figure 17.1. Your simplified management interface. Note Disabling the Xanthia module makes all of the inactive Xanthia themes appear in the Website Configuration drop-down list box for the default site theme. When you develop a site that does not use the Xanthia Theme Engine, be certain to also remove those themes to prevent confusion. The Login block can be left for now to make the initial setup easier, but after the site is complete, the block should be removed to prevent visitors from becoming confused when they are unable to register. Core Module SetupYou begin the development by populating some of the core modules with content. Site SettingsBrowse to the Administration Menu and click the Settings link to configure the site. Most of the default settings are fine for the site like this, but you need to specifically update the Site Name field to "SandyEscapes" and the Slogan field to "Beach Vacation Information Resource." Change the Time Zone Offset drop-down list box to your local time. User AdministrationA site that does not utilize a user login system does not need to provide new user registration options. To lock down the site, proceed to the User Administration area. First create all of the administrative users needed, and then under User Registration Configuration, set the Allow New User Registrations toggle to "no." Admin MessagesBrowse to the Admin Messages configuration page. You now add a short, default welcome message titled "Welcome to SandyEscapes, your information resource for beach vacations around the world!" for the site's home page. The default message is no longer needed, so it can be removed at this time, or you can simply edit it into the new default message. BannersSandyEscapes uses small advertising images for revenue generation, and you'll find two small images designed for this site in the book materials. You can add them to the Banners system now, but they won't be completely set up until they are added to the new theme. Activate the Banner's module from the Configuration screen, and add a new demo client called "Vacation Travel, Inc." The two images should be added from the /images/banners/ folder with two different ID numbers: 3 and 4. Each should be created as separate right-side blocks with simple identifying titles, such as "Ad #1" and "Ad #2." The titles won't be shown by the templates you set up, so the block names are only used for administration. Figure 17.2 illustrates how the ads should be displayed at this point. Figure 17.2. Unpositioned content blocks. Web LinksThe Web Links section is used to link to other sites with information on specific locales, so it has these categories:
The core Web Links block only displays the last links added to the database, but you need to provide links directly to each category. To accomplish this, simply create a Generic Menu block with hand-coded links to each Web Links category. After being created, the links are unlikely to change, so this kind of a menu is very convenient. Title the block for administrative use, similar to the ad images, but you can use the Menu block's Divider titles to add a customized message above the links. FAQThe FAQ section will be the only module designed to allow feedback from the users. The content will begin with the following categories:
A Menu block also works well for links to the FAQ categories. You can also add a contact option for suggesting new questions to the menu, as well as use the descriptive title option previously mentioned for Web Links. Tip All of the basic content blocks should be created as regular right-side blocks. After the theme areas are established, any block can be repositioned into its actual location in the layout. Recommend UsCreate a core HTML block to provide a customized link to the Recommend Us module. The following code is an example of how you can highlight a simple link. <div style="padding:2px; width:130px;"><a style="color:#FFFFFF;" href="http://www.sandyescapes.com/modules.php?op=modload&name=Recommend_Us&file=index" style="text-decoration:none;">Tell a friend about this site!</a></div> The pn-button style is a standard PostNuke class included in the CSS of most themes. Other site designs might benefit from the use of stronger coloring or gradient effects, but for this relatively open design, you'll use the previous basic button. It also helps to create a consistency with other form elements on the site. Third-Party Module Installs and SetupTo complete the site's feature set, you need to install four third-party modules and blocks:
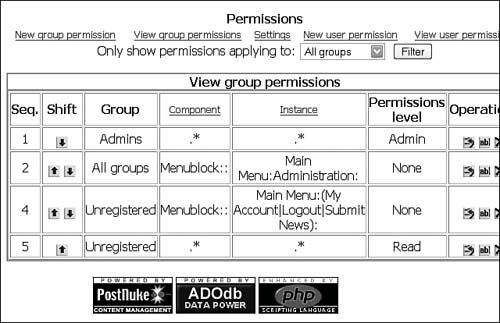
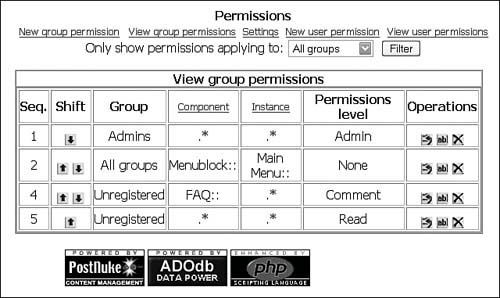
All of these modules were discussed at length in Chapters 1215. Install the modules and blocks together; initialize and activate the modules from the Administration table before continuing. PagesetterPagesetter is used as SandyEscape's primary article management system. The new basic publication type should have the standard Title and Content fields. With Pagesetter, the content can be set to have multiple pages, and an additional field for an inline photo image is easily accomplished. These articles are designed to exist without a specific duration, so a date or time field is not needed. A new Pagesetter block can be created to "Show N Blocks" for the site. Like the other modules, this block will be the primary method of navigation to the articles for the users. pncPayPal ContributeThe donations block using pncPayPal Contribute is easily configured to supplement the ad revenue. The text definitions in the languages file can be edited to better fit the site. The upper message should be changed to "Help support this informative site!" and the lower message can be cleared to save space. StatisticsThe Statistics module is installed for use by the administrator, but although you don't need to create a special block for the module, the administrative menu should be customized at this time. Because users are not going to be logging in to the site, the default Main Menu block can easily be edited for admin-only use. Edit the block and remove the AvantGo, Downloads, Members List, News, Reviews, Sections, Submit News, and Topics lines. Convert the Stats entry into a link to Statistics, and add a new row for Pagesetter. Now, the site should look quite similar to Figure 17.3, and it should be ready for interface design. Figure 17.3. Content ready for design. Groups and PermissionsSandyEscapes does not need the group "Users," so it's perfectly fine to go to the Groups Administration screen and remove the default group. Removing the group automatically removes its entries from the Permissions module (see Figure 17.4), which makes configuring access easier. Figure 17.4. Permissions after deleting the Users group. The Permission table is used to maintain complete access to the Main Menu for administrators while removing everyone else, and to grant comment access to the FAQ module for unregistered visitors. The second row in the default table restricts access to the Administration link in the Menu, but it can easily be edited to block all of the fields. Change the Instance "Main Menu:Administration:" to "Main Menu::". The "Main Menu:(My Account|Logout|Submit News):" row for unregistered users is no longer needed. It can be edited into the FAQ permission row, or simply delete it entirely and add a new entry with these values: Unregistered FAQ:: .* Comment This row must be above the ".* Read" permission for unregistered visitors. The finished settings are shown in Figure 17.5. Figure 17.5. Completed permissions settings. InterfaceSandyEscapes will not be using the standard left/center/right layout common to PostNuke sites. Modern Extensible Hypertext Markup Language (XHTML) and cascading style sheets (CSS) provide a variety of options that can be used to develop a nontraditional layout. This site will have an upper graphical header with logo text. The lower area below the header will be designed to flow together into varied content areas. Figure 17.6 illustrates one possible layout you'll use for the main home page. Figure 17.6. SandyEscapes home page layout. Although this layout could be accomplished with tables and creative use of spans and alignment, you instead code the design using more modern styled divs. Figure 17.7 shows how the content area can also be simplified to work with article content needing more page area. You'll use this layout for the Pagesetter articles. Figure 17.7. SandyEscapes article layout. Modern tableless design makes it possible to greatly simplify a site's styles. Standard font and background styling cascades freely into divs where they need to be redefined for table cells. The site needs only the following simple styles defined: body { font-family:Verdana,Arial; font-size:11px; color:#000000; background-color:#FBFAFD; background-image:url(images/background.gif) margin:0px; } img { border:0px; } a:link { color:#0090A4; font-weight:bold; text-decoration:none; } a:active { color:#0000FF; font-weight:bold; text-decoration:none; } a:visited { color:#0090A4; font-weight:bold; text-decoration:none; } a:hover { color:#0000FF; font-weight:bold; text-decoration:underline; } .pn-normal { font-weight:normal;} .pn-sub { font-weight:bold; } .pn-logo, .pn-title, .pn-pagetitle { color:#000000; font-size:14px; font-weight:bold; } .pn-button { color:#FFFFFF; font-weight:bold; background-color:#369FAD; border- style:solid; border-width:2px; border-color:#D6EFF5 #007E8E #007E8E #D6EFF5; text- align:center; } .pn-text { color:#000000; font-size:10px; background-color:#D6EFF5; border:solid 1px #000000; } The theme template defined for the home page is similarly simplified. With the use of scattered blocks for layout, even the "default module" need not be called for the page. The home page is not designed to display a module's real content, with perhaps the exception of the Administration Message, which already appears in a center block. The resulting home page template code is as follows: <html> <head><title>SandyEscapes</title></head> <body> <div style="position:absolute; left:0px; top:0px; z-index:5;"><img src="/books/1/160/1/html/2/{image- path}header.gif" style="width:640px; height:187px;" /></div> <div style="position:absolute; left:8px; top:110px; z-index:10; width:300px;"><!-- [center- blocks] --></div> <div style="position:absolute; left:8px; top:305px; z-index:10; width:249px;"><!-- [auto- block1-blocks] --></div> <div style="position:absolute; left:315px; top:152px; z-index:10; width:126px;"><!-- [auto- block2-blocks] --></div> <div style="position:absolute; left:272px; top:305px; z-index:10; width:177px;"><!-- [auto- block3-blocks] --></div> <div style="position:absolute; left:464px; top:201px; z-index:10; width:170px;"><!-- [auto- block4-blocks] --></div> </body> </html> The positioning prevents any of the blocks from contacting one another. The Administration Message could have also been placed within an AutoTheme AutoBlock, and certainly many more blocks could be used for a more complex layout. To make each of those blocks flow together with as much transparency as possible, they will all use this very simple template code: <div><!-- [block-content] --></div> In effect, the use of different numbered areas is being applied to the layout position and not to separate template designs. Figure 17.8 shows how this will be put into effect. Figure 17.8. SandyEscapes home page AutoBlock positioning. The coding for the Pagesetter article content is quite similar. You can see from the following example that it employs the same simple div structure found on the home page template. <html> <head><title>SandyEscapes</title></head> <body> <div style="position:absolute; left:0px; top:0px; z-index:5;"><img src="/books/1/160/1/html/2/{image- path}header.gif" style="width:640px; height:187px;" /></div> <div style="position:absolute; left:8px; top:110px; z-index:10; width:406px;"><!-- [modules] --></div> <div style="position:absolute; left:429px; top:201px; z-index:10; width:205px;"><!-- [auto- block5-blocks] --></div> <div style="position:absolute; left:429px; top:310px; z-index:10; width:205px;"><!-- [auto- block4-blocks] --></div> </body> </html> In this example, the Area 4 has been reused, and the code formatting the advertising image in Area 5 is identical to the block used for Area 3 on the home page. Figure 17.9 displays the resulting layout. Figure 17.9. SandyEscapes article AutoBlock positioning. |
|
EAN: 2147483647
Pages: 207
