Chapter 5: Fixing Windows with Knoppix
You or someone you know will encounter a seemingly unfixable problem with a Microsoft Windows operating system environment at one time or another. When this occurred in the past, most users would reinstall their operating systems, sometimes wiping out significant amounts of data that was needed on the system. Now you can use Knoppix to (often) correct your Windows system problems without losing any data and save the time associated with reinstalling all of the operating system files and applications.
Resizing Windows Partitions
Partitioning is a simple scheme for segmenting your physical hard drive into different sections. Power Windows users typically partition their hard drive for performance and backup reasons or to allow for different operating systems to be installed on it. When the system is first partitioned, the drive sizes are determined by the installer's experience and the projected needs for each partition. As time goes on, the partitions' size requirements may change, necessitating resizing.
Many commercial applications, such as PartitionMagic, enable you to repartition your hard drive. They can cost $60 or more, however, and you can get the same base functionality using tools included natively with Knoppix for no cost. This section explains how to resize your Windows partition or other types of partitions using Knoppix and QTParted, which is a user-friendly graphical front end for the command-line partition resizing tool parted.
QTParted works on the following Windows partition types (as well as non Windows file system types):
-
FAT16: Used primarily with Windows 3.1 and earlier versions of MS-DOS
-
FAT32: Used by Windows 95, 98, and ME primarily
-
NTFS: Used by the NT based versions of Windows, including NT, 2000, XP, and 2003
Preparing to Partition
Before you resize your partitions, defragment your hard drive if you can. This process, put very simply, rearranges the hard drive, putting your files together in as logical a manner as possible, usually in a group, and checking for errors.
Although partitioning with the tools described in this chapter are time tested and have been used by many, many people, there is always the chance of an inadvertent input error on your part or the possibility of some other unforeseen circumstance, so back up your important data.
Determine what you want the filesystem layout to be after you have resized your partitions, including the sizes of the partitions. You will need this information to use the tool in the most effective manner. For example, if you have a single partition on the entire hard drive consisting of 100GB and you want to make room for a secondary Windows or Linux partition of 10GB, you would resize the primary partition to 90GB, leaving 10GB for the new partition to be created.
The QTParted tool cannot create space where none exists, so ensure that you have the requisite amount of space available before you attempt to resize. If your primary 100GB partition is filled with 98GB of data, for example, you'd only be able to create a new 2GB partition because that's how much space is available.
QTParted Partitioning
Ready to partition? Boot your Windows machine with Knoppix and choose Knoppix → System → QTParted. A screen similar to the one shown in Figure 5-1 opens.
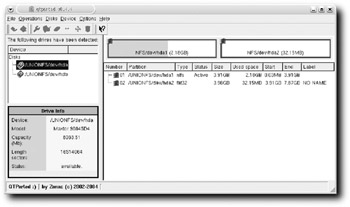
Figure 5-1: QTParted's startup screen
A list of detected disks appears on the left. Information about the selected disk appears below it, and the right window lists its current partitions. In Figure 5-1, QTParted shows that the first disk (/UNIONFS/dev/hda) has two partitions, both of which are Windows filesystem types, indicated by a tiny Microsoft Windows icon in the Number column. The Type column identifies the filesystem (NTFS, FAT32, or FAT16).
The partition graphics above the list also show how much used space each has. In the example, the NTFS partition uses 2.18GB of its 3.91GB space, and the FAT32 partition uses 32.15MB of its 3.98GB.
To begin the resizing operation, right-click the graphical box of the partition you want to resize (alternatively, highlight the partition in the list and right-click), and select Operations → &resize. The QTParted Resize Partition dialog opens (see Figure 5-2).
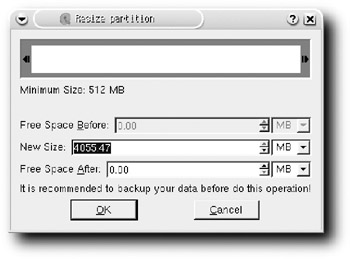
Figure 5-2: QTParted's Resize Partition dialog.
You can use the graphical window at the top by left-clicking the arrows at the sides to make the partition larger or smaller, or you can enter the partition size value you want in the New Size text box. Figure 5-3 shows a partition being resized to 1GB.
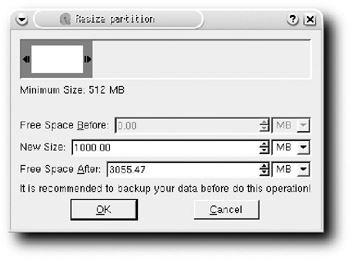
Figure 5-3: Sizing a partition to 1GB
When you have the information entered correctly, click OK (you are not making anything permanent yet.)
The main screen shows your modifications (see Figure 5-4): two partitions and a gray box indicating how much free space you'll gain after resizing. The new FAT32 partition is now 996.22GB and there's 2.99GB of free space. The resized partition is a solid color, indicating it has not been committed yet; you can't format the drive until it has been committed.
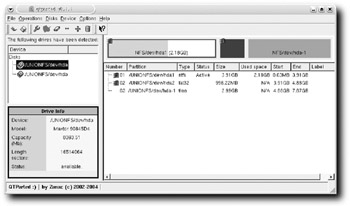
Figure 5-4: QTParted displays the changes you want to make.
If you make a mistake, you can undo everything until you do commit a little later in the process. To undo any changes, select File → &Undo and the system will return to its previous state.
Now you can create another partition in the free space by right-clicking on the gray box and selecting &Create (or by selecting Operations → &Create). The Create Partition dialog opens, as shown in Figure 5-5.
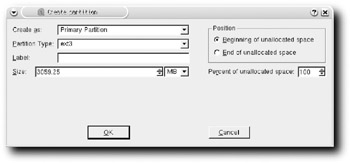
Figure 5-5: QTParted's Create Partition dialog box
Click the arrow at the right of the Create As text box and select the kind of partition you want (Primary Partition or Extended Partition). There is a limitation of four primary partitions imposed on a system by the master boot record, which was a restriction from the early days of PCs. To get around this constraint, the extended partition was created to allow for more partitions on a drive. An extended partition is created by separating one of the four primary partitions into more divisions, called logical partitions. Most operating systems are loaded on a primary partition and boot from there. (Linux is an exception because it can be booted from a logical partition.). If you create an NTFS partition of 2.99GB (all of the free space) as a secondary partition for backups within Windows, the result would be as shown in Figure 5-6.
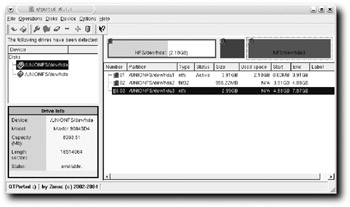
Figure 5-6: Creating a partition in QTParted
After you have made all of your modifications and are comfortable with the changes, you need to make your changes permanent (everything done until this point is "virtual," or for show only). To make your changes permanent, select File → &Commit. Figure 5-7 shows the warning dialog box that appears, indicating that you are about to commit the changes to the hard drive for good. (The grammar and spelling are awkward in parts of this application, but will most likely be corrected in future releases.) If you have a swap partition (virtual memory) on the drive for which you are committing changes, prevent problems by ensuring that swap is turned off, either by booting Knoppix with the noswap cheatcode or by opening a terminal window and typing swapoff -a.

Figure 5-7: QTParted's commit warning
Select Yes. A window displays the progress of your modifications and the estimated time until completion. If everything is successful, your changes are made on the hard drive and you'll see a dialog box similar to one shown in Figure 5-8.
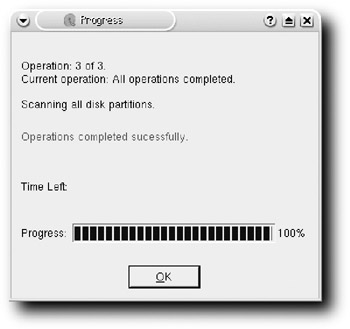
Figure 5-8: Partitioning was successful.
After you have completed the resizing, you can format your new partitions using QTParted — just select Operations → Format.
EAN: 2147483647
Pages: 118