Chapter 1: Unraveling the Knoppix Toolkit Maze
Linux is famous as an operating system that includes almost everything a software user could ever want right out of the box — and for free. The Knoppix developers had quite a time deciding which of the thousands of packages to include, but they did their homework, made their decisions, and you're the one who benefits. This chapter can't cover everything that comes on the Knoppix disk — that would be a book in itself! — but it does take a look at important apps such as K3b and the GIMP that you'll probably find yourself using at one time or another.
| Note | If you don't know how to boot Knoppix, you'll want to learn before you go much further. Head to Appendix A, "Booting Knoppix," for complete instructions. You have to be running Knoppix to really learn from this book. |
Beautifying Knoppix
Out of the box, Knoppix has what could be called "uglification issues." It just ain't as pretty and user-friendly as it could be. One of the first things you may want to do when you start up Knoppix is make it look a bit nicer, so that using it won't cause you to constantly grit your teeth at the old, jagged, ugly fonts.
Then, after making your changes, you want to make sure you save your choices so that when you next boot Knoppix, you won't have to reconfigure the appearance of the OS again. That's covered in depth in the Introduction, but if you somehow skipped over it, for now just select Knoppix → Configure → Save Knoppix, choose a hard drive or USB flash drive to save onto, and then choose that source the next time you boot Knoppix.
Replacing System Fonts
The default fonts are definitely ugly. Blech! We think the best solution is to download and install the Microsoft Web fonts, which are attractive and common. However, if you're not using the persistent home directory, you're going to have a problem. You'll be able to install the fonts, but when you restart Knoppix, you'll have to reinstall all the fonts again, because all of your work will have been blown away. With the persistent Knoppix disk image, all of your work is saved, so you can count on your newly installed fonts being there.
To install the Microsoft Web fonts, use KPackage, the KDE software installation tool; it's a front end to Debian's APT (Advanced Package Tool). From the Knoppix menu, choose Utilities → Manage Software in Knoppix to start KPackage. When KPackage opens, select the All tab, as shown in Figure 1-1.
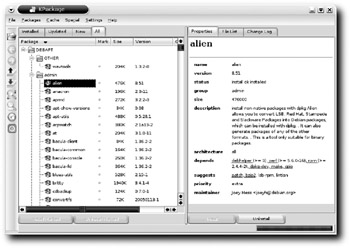
Figure 1-1: KPackage makes it relatively easy to install and manage software.
Then follow these steps:
-
In KPackage, select Special → APT:Debian → Update. APT downloads a list of the software available in the APT repositories Knoppix knows about. This can take a few minutes, so just relax.
Tip Don't know what APT is or how to use it? The author of this chapter has prepared "Updating Your Computer with Debian's APT," a presentation for his Linux students that covers the basics, which you can download from http://www.granneman.com/presentations. (It's available under a Creative Commons license). Alternatively, read the official Debian documentation, APT HOWTO, at http://www.debian.org/doc/manuals/apt-howto/index.en.html.
-
When the APT update completes, go to the All tab and select File → Find Package. Enter the package name, msttcorefonts, as the search term, and click Find.
-
After KPackage finds the package, close the Find Package window and click the Install button at the bottom of the right pane.
-
An Install window opens. Click the Install button at the bottom. (Yes, this is kind of silly, which is why I prefer to use the command line instead of KPackage for installing software. Using the command line is discussed later in this chapter.) Finally, KPackage begins to actually download and install the software you want onto your system.
-
When it's finished, close KPackage.
| Note | If you're curious, the Microsoft fonts have been placed into /usr/share/fonts/truetype/ msttcorefonts. |
However, you can't start using your newly installed fonts just yet. You need to restart X, and fortunately that's pretty straightforward (unlike using KPackage). From the Knoppix menu, select Logout → End Current Session. After X restarts, you need to log back in, and now you can finally start making intelligent font choices!
| Note | Remember that if you're not using the persistent Knoppix disk image, when you reboot, you're going to have to repeat this entire process, again and again, in a Sisyphean task that will never end. Set up and use the persistent Knoppix disk image! |
Now assign some nice new fonts in appropriate places on your system. Keep in mind that this chapter walks through only the major apps on Knoppix, so you're on your own to change fonts on any other apps you use that aren't covered here.
First, fix KDE itself. From the Knoppix menu, select Control Center, expand Appearance & Themes, and select Fonts. The Fonts Control Center displays, as shown in Figure 1-2.
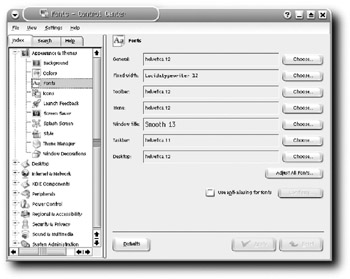
Figure 1-2: Changing fonts in the KDE Fonts Control Center
Ugh, what terrible defaults! Lucida typewriter is ugly, Helvetica is so 1960s, and Smooth is anything but. To pick something better, click Adjust All Fonts; then, in the Select Font window, check the box next to Font. Find and choose either Bitstream Vera Sans or Arial (I prefer Bitstream Vera Sans). Notice, however, that the Fixed Width font does not change. To fix that one, click Choose next to Fixed Width and then select Andale Mono, which is a great monospace font. Click Apply at the bottom of the Fonts screen, and you should immediately see your new fonts in action. Close the Control Center.
Next, open the Konqueror file manager (the Personal Files icon on the panel that looks like a house), and select Settings → Configure Konqueror. The Configure window opens, as shown in Figure 1-3.
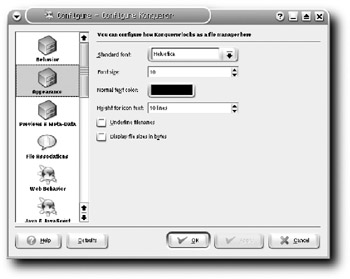
Figure 1-3: Changing the fonts for the Konqueror file manager
Once again, Helvetica is the default. Change it to Bitstream Vera Sans or Arial or another font that you like better. Don't click OK yet; while this window is open, you also can fix the fonts Konqueror uses when it's acting as a Web browser.
| Tip | Change the value for Height for Icon Text to 10 lines (the default is 1), so that it's easier to read. |
Scroll down the left-hand list of icons until you get to Fonts, shown in Figure 1-4.
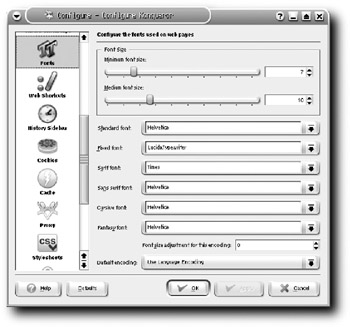
Figure 1-4: Changing the fonts Konqueror uses when it displays Web pages
Change the fonts on that screen to ones that you like better. The following are our recommendations:
-
Standard font: Verdana or Bitstream Vera Sans
-
Fixed font: Andale Mono (if you have it on your system, it's much better than anything in the Courier family)
-
Serif font: Bitstream Vera Serif or Times New Roman (use Times New Roman only if you must; Bitstream Vera Serif is far easier to read)
-
Sans serif font: Verdana or Bitstream Vera Sans
-
Cursive font: Lucida Calligraphy, Lucida Handwriting, and Bradley Hand ITC are great, but none of those is available, so choose Arioso.
-
Fantasy font: Comic Sans MS isn't bad (you're hardly ever going to need this font), but you can pick anything goofy.
Click OK to make the changes and close this window. You can close Konqueror if you'd like. Now that you've changed your system fonts, move on to program fonts.
Changing Application Fonts
You'll probably find yourself using Mozilla Firefox, KMail, and OpenOffice.org often. You can change their fonts to make these programs more usable, too.
Fixing Firefox Fonts
To set up Firefox's fonts, click the Mozilla icon on the panel (yes, it should be the Firefox icon, but it isn't), and then choose Edit → Preferences, click the General icon, and select Fonts & Colors (see Figure 1-5).
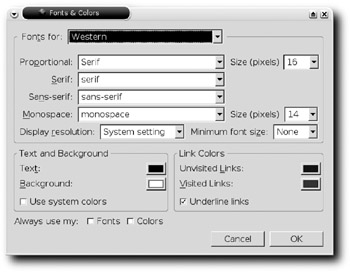
Figure 1-5: Changing Firefox's font options
Make these changes:
-
Proportional: Sans Serif
-
Serif: Bitstream Vera Serif or Times New Roman
-
Sans serif: Bitstream Vera Sans or Verdana
-
Monospace: Andale Mono
Click OK and then OK again to close the Fonts & Colors window. Now isn't that a lot better?
Replacing KMail Fonts
Open KMail from the K menu by selecting Internet → KMail. Choose Settings → Configure KMail, and then click the Appearance icon on the left. You'll see the Fonts tab shown in Figure 1-6.
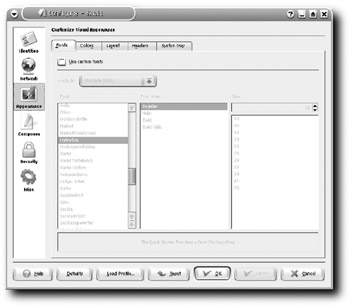
Figure 1-6: Change the fonts that KMail uses
If you check the Use Custom Fonts box, the options in the main part of the screen are "ungrayed." Choose an item from the Apply To drop-down list, and select a font for it; then choose another item from the list, make a font choice, and so on, until all of them have been changed. At that point, click OK, and your new font choices will be applied to KMail.
You can choose any fonts you want, of course. We would change everything except Fixed Width font to Bitstream Vera Sans, Verdana, or Arial — basically, something that's pleasant and readable. For Fixed Width font, try Andale Mono if you have it or Bitstream Vera Sans Mono if you don't. Click OK to close KMail's configuration window, and you're good to go.
| Note | We recommend changing Composer to Andale Mono to stick to plain text for email, which means a monospaced font. |
Switching OpenOffice.org Fonts
Whatever you do, do not open OpenOffice.org (OOo) and expect to configure the fonts. Oh, no. It's not that simple. Instead, from the K menu, select OpenOffice.org 1.1.4 → OpenOffice.org 1.1.4 Printer Administration (see Figure 1-7).
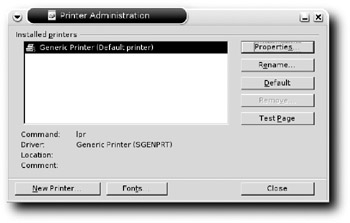
Figure 1-7: Isn't it obvious that you should configure fonts when you configure printers? No? We don't think so, either.
Click the Fonts button to open the Fonts window. Then click Add, which opens the Add Fonts window. Click the button labeled "…" in the Source directory area of the window, navigate to /usr/share/fonts/truetype/msttcorefonts, and click Select. Back in the Add Fonts window, check the Create Soft Links Only box, and then click Select All, followed by OK. You are told that many new fonts were added, so click OK to close that window. Click Close to get rid of the Fonts window, and then click Close again to finally exit Printer Administration.
| Note | If it's any consolation, this process is much improved in the OpenOffice.org 2.0 release, which is still in beta at the time of this writing. You'll see it in a future release of Knoppix. |
To start OOo, click on the program's icon (the one with the birdies) on the panel. After OOo opens (and it'll take a while!), select Tools → Options, click on the + next to Text Document to expand it, and finally select Basic Fonts (Western).
Because you first added all of the Microsoft fonts, OOo (in an effort to achieve maximum compatibility with all the drones using Microsoft Word) changes everything except Heading to Times New Roman, and changes Heading to Arial. Now you're just like the rest of the world.
EAN: 2147483647
Pages: 118