3.12. Roaming User Profiles Do you have a very mobile local user base? Do your users tend to move between machines in your location, and if so, do they often complain to you that their personalized settings and desktop customizations don't travel with them? If you are nodding your head in the affirmative, then roaming user profiles may make your phone ring a bit less. Roaming user profiles are simply collections of settings and configurations for each user that are stored in a network location. Once you perform some fairly simple configuration, every time a user logs on to a machine in your domain with his or her domain credentials, that user's settings will follow them and automatically be applied to their logon session at that particular machine. In this section, I'll show you how to create a baseline profile that will be used by default for new users wherever they log in, and then I'll share some tips on how to make a mass deployment of roaming profilesparticularly for users who already have customized their working environmentsa bit easier for you. 3.12.1. Creating a Basic Profile Before you begin creating a roaming profile, you need to create a temporary user on your machine, and then configure that temporary account's profile however you would like it. For the remainder of this section, I will assume that you're running Windows Server 2003 in an Active Directory environment; therefore, to create a new user, you will need to load Active Directory Users and Computers.  | If you're not running Active Directory yet, have no fear: the following instructions can apply to local users and groups as well. You just need to add the user through the Computer Management applet in Control Panel. For more information on Active Directory, including creating users and groups in AD, see Chapter 5. |
|
Once the tool is loaded, follow these steps: Within Active Directory Users and Computers, right-click on the Users folder (or wherever you might want to create the test user), and from the pop-up context menu, select User from the New menu. Enter the details for this temporary user. In my case, I'll call the user Example Profile User with a logon name of profiletest. Figure 3-46 shows this. Figure 3-46. Creating a test user 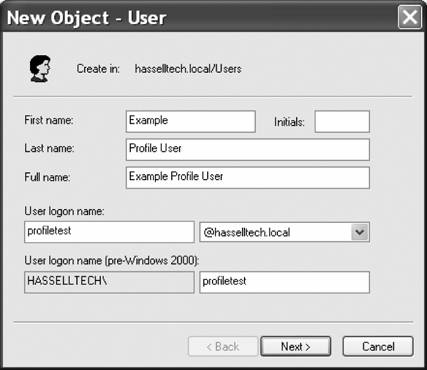 Click Next, and then give this temporary user a secure password. Finish out the wizard, and then log off of the machine. Now, log into the machine using the temporary account you just created.
What just happened? Essentially, creating the temporary account allows you to create a "template," and within the environment of that template you can customize the settings and appearance that will make it into the future roaming profile. All of these settings are stored in a directory on the local computer, which is called something like this: C:\Documents and Settings\<username>
Once you've logged into the machine using the temporary account, configure everything how you would like it: add shortcuts to the desktop, change the format of the Start menu, change the colors, font, and size of windows and title bars, and so forth. Remember: we want this profile to be the default for all users, so create the profile's configuration with that baseline in mind. Once you have finished your customization, log off of the machine, and then log in again with an administrator account. 3.12.2. Making Profiles Available on the Server You might be wondering at this point what is actually stored within a user profile. A profile is actually made up of several different folders: The Application Data folder contains program-specific settings and user security settings that correspond with applications that person has used. The Cookies folder contains all of the web cookies a user has encountered and chosen to allow during his or her travails on the web. The Desktop folder, as obvious as it might sound, contains files, folders, shortcuts, and data regarding the appearance of the desktop on the user's screen. The Favorites folder contains shortcuts to the user's preferred web sites and other frequently visited locations. The Local Settings folder contains application data, history, and temporary files. The My Documents folder contains files for the user, music, pictures, and other things the user tends to store in his home directory. The Nethood folder contains shortcuts to sites in My Network Places. The Printhood folder contains printer shortcuts. The Recent folder shows the most recently accessed files and folders. The Send To folder is where the Send To menu, a popular "right-clicking" destination, is obtained. This folder can contain shortcuts to popular target destinations, like a floppy drive, My Documents, a printer, and so on. The Start Menu folder contains items on the user's Start menu. The Templates folder holds templates for applications, like Microsoft Word and Excel.
If you can't see all of these folders, don't worry; they're most likely still hidden. To see them, select Folder Options from any Explorer window's Tools menu, click the View tab, and select the option to Show Hidden Files and Folders. With that said, the next task is to actually send the profile to your network server. To do this, create a folder on the network drive that will hold roaming profiles. In my case, I'll create a share on my Windows Server 2003 machine called Profiles. Then, on the client machine where your new baseline profile is stored, go into the Control Panel and double-click on System. Then follow these steps: Navigate to the Advanced tab. Under the User Profiles section, click the Settings button. The User Profiles screen appears. Select your temporary user, and then click the Copy To button. The Copy To screen appears, as shown in Figure 3-47. Enter the path to the network profile folder in the Copy Profile To box. (Windows will automatically create a folder underneath the Profiles folder with the appropriate username.) Figure 3-47. Copying the profile to the network server 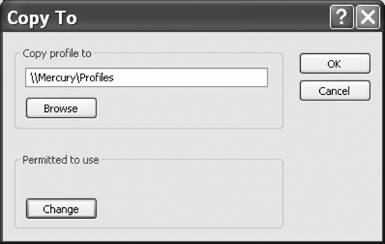 Under the Permitted to Use section, click the Change button. Enter the name of the temporary user you created earlier in this procedure, and then click OK. Click OK on the Copy To screen, and then click OK on the User Profiles screen.
| When you're determining where to put the shared location for user profiles, try to put them on a member server as opposed to a domain controller. Domain controllers have their own issues to deal with, and there's no need to bog them down with profile processing as well as authentication, replication, authenticating, emulating, and so on. While you're at it, make sure that the server you choose is regularly backed up so you don't lose all of your user profiles to a machine failure. |
|
You should be back out to the desktop now. Now, load Active Directory Users and Computers again, right-click on your temporary user and select Properties from the pop-up context menu. Navigate to the Profile tab, and then in the Profile Path box in the User Profile section, enter the full network path to the profile you just copied, including the username. Figure 3-48 shows this. Figure 3-48. Specifying the path for the user's roaming profile 
Click OK, and you're done. The temporary user can now use the profile stored on the network, and whenever he logs onto a machine that is a member of the domain with his domain credentials, he will receive a copy of his profile, including any changes he makes at any time. 3.12.3. On Deploying Profiles En Masse If this worked successfully for you, you can repeat this procedure for other users as needed. Here are a few tips, tricks, and "from-the-streets" experiences to hopefully make the repetitive process a bit easier: If you are selecting multiple accounts in Active Directory to configure a profile path for each, you can use the %USERNAME% variable in the profile path. Windows will sort out the correct username for each user. If your users already have profiles that have been created on their individual machines, you don't necessarily have to copy their profiles to the server. The simple act of specifying a profile path in the user's account properties tells Windows that if no profile exists on the network, it needs to automatically copy the locally stored profile to the server the next time the user logs out. The bottom line here is that if you want to save some time, specify the profile path in your users' account properties, and then tell them to log in to the machine that has their desktop and appearance configured how they like it. Then, have them log off, and their profile will automatically be copied. If you are creating a brand new user that has no profile data anywhere on your network, you'll probably want him or her (and any other new users you create in the future) to automatically receive a default roaming profile. To do this, you need only copy your baseline profile to \\<SERVERNAME>\SYSVOL\<yourdomainname>\Scripts\Default User. Replace your server name and domain name as appropriate. For example, in my case, I would configure my baseline profile to \\MERCURY\SYSVOL\hasselltech.local\Scripts\Default User.
That's all there is to basic roaming profile deployment. By setting up roaming user profiles in your organization, your mobile user base will always have their customizations and preferred environment available to them on networked machines. |