Protect Stored Data
|
| < Day Day Up > |
|
You can protect your stored data by locking files against accidental deletion, by encrypting your Home folder using FileVault, by choosing tight security settings in System Preferences, and by locking your Mac with an open firmware password.
Lock Files Against Accidental Deletion
To protect a file against being accidentally deleted, you can lock it. To do so:
-
Activate the Finder and navigate to the folder that contains the file.
-
Click the file to select it.
-
Open File and click Get Info. The Info window for the file is displayed.
-
Select the Locked check box.
-
Click the Close button (the red button).
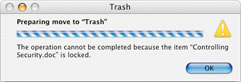
When you’ve locked a file, Mac OS X displays a lock icon at the lower-left corner of its icon. If you try to delete a locked file, Mac OS X displays an error dialog box (as shown here). Click OK.
To delete the file, clear the Locked check box in the Get Info window, and then drag the file to the Trash.
| Caution | When you log in, FileVault decrypts your files and folders so that you can use them. This means that if anyone else can access your Mac while you are logged in, your files have no protection. It also means that using Fast User Switching can be dangerous: if you leave your user session open while another user works on the Mac, your files remain decrypted (because you are still logged in, although another user is active) and are vulnerable to attack. For this reason, it’s best to turn off Fast User Switching if you use FileVault. |
Encrypt Your Home Folder
To help prevent other people from accessing your files, you can encrypt your entire Home folder using FileVault (see “Encrypt Your Home Folder with FileVault” in Chapter 3). After you set a master password for your Mac to ensure that you can recover your files if you forget your own password, FileVault encrypts all the files and folders in your Home folder.
Choose Tight Security Settings
The Security sheet of System Preferences offers four options for tightening security on your Mac:
-
Requiring a password when waking the Mac from sleep or when the screen saver is running
-
Disabling automatic login
-
Requiring a password to unlock secure system preferences
-
Automatically logging an inactive account out
| Tip | If you use a password for waking your computer from sleep or for interrupting the screen saver, configure your Mac to start the screen saver after a short interval of inactivity (or by using a hot corner) as discussed in “Pick a New Screen Saver” in Chapter 2, or configure it to go to sleep quickly (see “Set Energy Saver Options” in Chapter 5). |
To tighten your security settings:
-
Open
 and click System Preferences. The System Preferences window will be displayed.
 -
Click Security. The Security sheet will be displayed (see Figure 8-6).
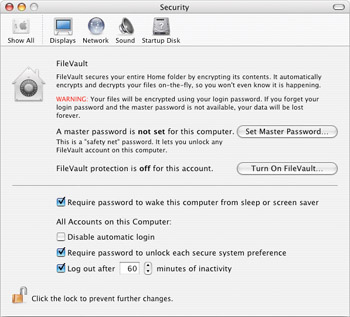
Figure 8-6: Choose tight security settings on the Security sheet in System Preferences. -
Select the Require Password To Wake This Computer From Sleep Or Screen Saver check box to make Mac OS X prompt for a password when anyone wakes it from sleep or interrupts the screen saver.
-
Select the Disable Automatic Login check box if you want to prevent any account from logging in automatically.
-
Select the Require Password To Unlock Each Secure System Preference check box if you want to ensure that sensitive system preferences are kept locked.
-
Select the Log Out After NN Minutes Of Inactivity check box if you want Mac OS X to log each user out automatically after they leave the keyboard and mouse inactive for a specified length of time. The shorter length of time you set, the more security this setting offers.
-
Click System Preferences | Quit System Preferences to close System Preferences.
Lock Your Mac with an Open Firmware Password
To prevent other users from using a FireWire disk or a CD to boot your Mac, you can protect it with an “open firmware password”—a password required to start using the firmware (the permanently installed software) on your Mac.
| Caution | An open firmware password provides serious security, but if you forget your password, you’re in serious trouble—you can’t change the startup disk again. If you use an open firmware password, make sure you don’t forget it. |
To apply an open firmware password:
-
Insert your first Mac OS X installation CD in your optical drive. A Finder window will open showing the CD’s contents.
-
Open View and click As Columns to switch to Columns view.
-
Click Applications, and then click Utilities.
-
Double-click Open Firmware Password. The first Open Firmware Password window will be displayed.
-
Click Change. The Open Firmware Password window shown in Figure 8-7 will be displayed.
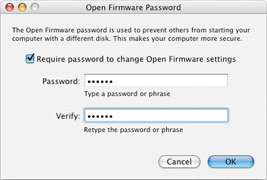
Figure 8-7: You can set an open firmware password to prevent anyone else from starting your Mac using a different disk (such as an iPod or other FireWire disk), a CD, or DVD). -
Select the Require Password To Change Open Firmware Settings check box.
-
Type the password in the Password text box and the Verify text box.
-
Click OK. Mac OS X displays the Authenticate dialog box.
-
Type your password and click OK. The Open Firmware Password application will display a message box telling you that the settings were successfully saved and that they will take effect when you restart your Mac.
-
Open the Open Firmware Password menu and click Quit Open Firmware Password to close the application.
-
Restart your Mac (for example, click
| Restart, and then click Restart).
After you apply the open firmware password, when anyone tries to start your Mac from a disk other than your regular disk, Mac OS X will prompt for the open firmware password.
To remove the open firmware password:
-
Insert your first Mac OS X installation CD and run Open Firmware Password.
-
Clear the Require Password To Change Open Firmware Settings check box.
-
Authenticate yourself.
-
Open the Open Firmware Password menu and click Quit Open Firmware Password to close the application.
-
Restart your Mac (for example, click
| Restart, and then click Restart).
Turn On the Firewall
Mac OS X includes a firewall that you can use to help prevent hackers from getting into your computer while you are online. If your Mac connects directly to the Internet, you should ensure that the firewall is turned on. If your Mac connects to the Internet through a shared Internet connection that already uses a firewall, you probably don’t need to turn your firewall on. (For example, many Internet routers and Internet-sharing hardware devices include a firewall.)
-
Open
and click System Preferences. The System Preferences window will be displayed. -
Click the Sharing icon. The Sharing sheet will be displayed.
-
Click the Firewall tab button (see Figure 8-8).
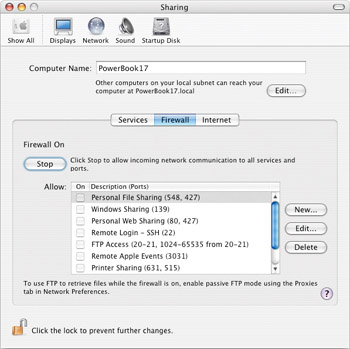
Figure 8-8: On the Firewall tab of the Sharing sheet in System Preferences, turn the firewall on and control the services that can poke holes through the firewall.Tip Mac OS X’s firewall is usually worthwhile, but it can get in your way both in a local network and with Internet traffic. If, after turning on the firewall, you find that you are having network problems either locally or on the Internet, you may need to turn off the firewall again.
-
If the readout says “Firewall Off,” click the Start button to start the firewall.
-
The Allow list box lists the services allowed to open ports in the firewall. You control these services by using the controls on the Services tab (discussed in Chapter 10, “Let Others Access Your Resources”). While you can create new ports by clicking the New button, you will seldom need to do so.
-
Click System Preferences | Quit System Preferences to close System Preferences.
|
| < Day Day Up > |
|
EAN: 2147483647
Pages: 68