Change How Mac OS X Operates
|
| < Day Day Up > |
|
You can customize how Mac OS X operates to suit your preferences.
Set and Use the Date and Time
The time display at the right end of the menu bar may seem simple enough, but you can customize it out of all recognition—or dispense with it.
-
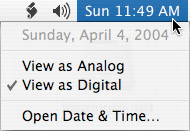
Click the time readout in the menu bar. The time menu is desplayed, including the full date.
-
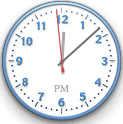
To switch the clock quickly between digital and analog, click the time readout in the menu bar and select View As Analog or View As Digital, as appropriate. The analog clock icon in the menu bar is hard to read, but you can also display the clock in a small window.
-
Click Open Date & Time. The Date & Time sheet in System Preferences will be displayed.
-
Click the Clock tab button.
-
Choose options for the clock:
-
The Show The Date And Time check box controls whether the clock appears at all.
-
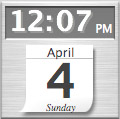
Select the Menu Bar option button to display the clock on the menu bar. Select the Window option button to display the clock in a separate window. For a windowed clock, drag the Transparency slider to adjust the window’s transparency.
-
Select the Digital option button or the Analog option button to control the format.
-
Choose other options, which include showing AM/PM, showing the day of the week, flashing time separators, and announcing the time out loud.
-
-
To change the time or date, click the Date & Time tab button to display the Date & Time tab (see Figure 2-10).
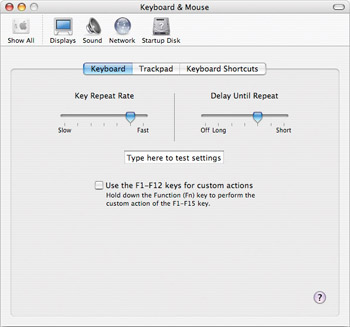
Figure 2-10: You can change the repeat rate and the repeat delay for your keyboard to suit your typing style.-
To set the date and time automatically using a time reference on the Internet, select the Set Date & Time Automatically check box, and choose the server in the drop-down list box.
-
To set the date and time manually, clear the Set Date & Time Automatically check box. Use the controls to set the date and time.
-
-
To specify the time zone, click the Time Zone tab button. Choose your location on the map or use the Closest City drop-down list box to specify your closest city (and thus your time zone).
-
Click System Preferences | Quit System Preferences to close System Preferences.
Improve Accessibility with Universal Access
Mac OS X’s Universal Access feature provides alternatives to the normal way the mouse and keyboard are used as well as some settings that make the screen more readable (or make it audible).
-
Open
 and click System Preferences.
 -
Click Universal Access. The Universal Access sheet will be displayed.
-
Select the options you want to use on the Seeing tab, Hearing tab, Keyboard tab, and Mouse tab (see Table 2-1). Figure 2-9 shows the Keyboard tab.
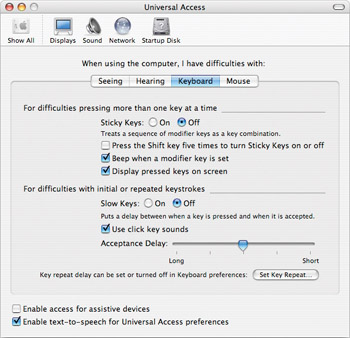
Figure 2-9: The Universal Access features let you access Mac OS X and the applications that run on it in different ways.Table 1: Universal Access Features Tab
Option
Description
Turn On or Off
Seeing
Zoom
Enables you to zoom the screen to a large size to see small items more easily.
Click Turn On Zoom or Turn Off Zoom on the Seeing tab, or press z+option+8.
Seeing
Zoom In
Zooms the display in.
Press z+option+=.
Seeing
Zoom Out
Zooms the display out.
Press z+option+– (hyphen).
Seeing
White On Black
Reverses the video to make the screen more visible.
Click Switch To White On Black or Switch To Black On White on the Seeing tab, or press z+option+control+8.
Seeing
Grayscale
Changes the display from color to grayscale to improve visibility of colors.
Click Set Display To Grayscale on the Seeing tab. Click Set Display To Color to restore color.
Seeing
Enhance Contrast
Increases the contrast to make the screen more visible.
Drag the Enhance Contrast slider on the Seeing tab or press z+option+control+. (period). Press z+option+control+, (comma) to reduce contrast again.
Hearing
Flash The Screen
Makes the screen flash once when Mac OS X plays an alert sound.
Select the Flash The Screen When An Alert Sound Occurs check box on the Hearing tab.
Keyboard
Sticky Keys
Simulates pressing a pair of keys, such as z+a, by pressing one key at a time. The modifier keys z, option, control, and shift “stick” down until the final key of the command sequence is pressed. This is interpreted as the key sequence pressed together. Select the Beep When A Modifier Key Is Set check box to make Mac OS X beep when you press a modifier key. Select the Display Pressed Keys On Screen check box to receive a visual readout of modifier key presses.
Select the On option button or the Off option button in the Sticky Keys area of the Keyboard tab. Alternatively, press shift five times in succession when the Press The Shift Key Five Times To Turn Sticky Keys On Or Off check box is selected.
Keyboard
Slow Keys
Makes Mac OS X wait for the specified delay before it registers a keystroke. Drag the Acceptance Delay slider to set the delay. Select the Use Click Key Sounds check box to make Mac OS X play a click when it registers the keystroke.
Select the On option button or the Off option button in the Slow Keys area of the Keyboard tab.
Mouse
Mouse Keys
Enables you to use the numeric keypad instead of the mouse to move the pointer on the screen. Drag the Initial Delay slider to configure the delay before starting to move the mouse, and the Maximum Speed slider to set the maximum speed at which the mouse pointer moves.
Select the On option button or the Off option button in the Mouse Keys area of the Mouse tab. Alternatively, press option five times in succession when the Press The Option Key Five Times To Turn Mouse Keys On Or Off check box is selected.
All tabs
Assistive Devices
Enables you to use extra assistive devices to control your Mac.
Select or clear the Enable Access for Assistive Devices check box at the bottom of the Universal Access sheet.
All tabs
Text-To-Speech For Universal Access Preferences
Announces the names of the Universal Access options you’re choosing.
Select or clear the Enable Text-To-Speech For Universal Access Preferences check box at the bottom of the Universal Access sheet.
-
Click System Preferences | Quit System Preferences to close System Preferences.
Customize the Keyboard
Mac OS X requires a keyboard for textual communications and typing. You can change the length of the delay before a key that is held down is repeated and the rate at which the key is repeated. On a PowerBook or an iBook, you can also choose whether to use the function keys primarily for default actions or for custom actions.
| Note | If you have a PowerBook or an iBook, the Keyboard tab of the Keyboard & Mouse sheet also lets you choose between using the function keys as normal function keys or for custom actions (such as changing the screen brightness or the audio volume). Select the Use The F1–F12 Keys For Custom Actions check box to use the custom actions; you’ll then need to press fn and the function key to use its default action (which will depend on the application that’s active). Clear the check box to use the default actions. You’ll then need to press fn and the function key to perform a custom action. This functionality was added in Mac OS X version 10.3.3, so if you have an earlier version of Mac OS X, you’ll need to update to 10.3.3 or later to use it. See “Download and Apply Software Updates” in Chapter 5 for instructions on updating Mac OS X. |
-
Open
and click System Preferences. The System Preferences window will be displayed. -
Click Keyboard & Mouse. The Keyboard & Mouse sheet will be displayed.
-
If the Keyboard tab isn’t displayed, click the Keyboard tab button to display it (see Figure 2-10).
-
Click in the Type Here To Test Settings text box and type a few keystrokes to test the settings.
-
Drag the Key Repeat Rate slider to change the rate at which a key repeats when you hold it down. Test the setting.
-
Drag the Delay Until Repeat slider to change the delay until a key starts repeating. Test the setting.
-
When you have set up the keyboard the way you want, click System Preferences | Quit System Preferences to close System Preferences. Alternatively, if you want to customize other aspects of your system, click Show All to display all the categories.
| Note | Mac OS X also lets you apply a different logical layout, such as the Dvorak layout, to the keyboard. The keys themselves don’t change, but they deliver different letters than normal. To apply a different layout, open |
Customize the Mouse and Trackpad
The mouse lets you interact with the screen and point at, select, and drag objects. It also lets you start and stop applications and close Mac OS X. While it is possible to control most aspects of Mac OS X without a mouse, it is much more difficult and usually slower to do so. This makes it vital to configure your mouse so that it works as comfortably as possible.
If you have a PowerBook or an iBook, you can configure its built-in trackpad for speed and comfort. This configuration is independent of the mouse configuration.
Customize the Mouse
-
Open
and click System Preferences to open the System Preferences window. -
Click Keyboard & Mouse. The Keyboard & Mouse sheet will be displayed.
-
Click the Mouse tab button. The Mouse tab contains the same controls as the upper part of the Trackpad tab, shown in Figure 2-11, later in this chapter.
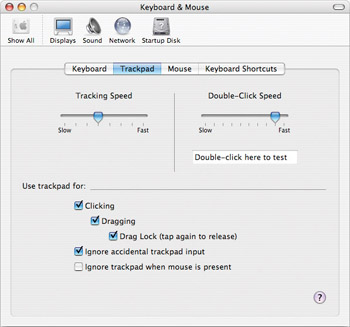
Figure 2-11: If your Mac has a trackpad, configure it on the Trackpad tab of the Keyboard & Mouse sheet in System Preferences. -
Drag the Tracking Speed slider to control the speed at which the mouse pointer moves as you move the mouse.
-
Double-click a word in the Double-Click Here To Test text box to test the double-click speed. If Mac OS X registers a double-click, it selects and highlights the word you clicked. Drag the Double-Click Speed slider as necessary to change the speed, and double-click again in the text box to test it.
-
Click System Preferences | Quit System Preferences to close System Preferences.
Customize the Trackpad
To configure the trackpad on your PowerBook or iBook:
-
Open
and click System Preferences. The System Preferences window will be displayed. -
Click Keyboard & Mouse. The Keyboard & Mouse sheet will be displayed.
-
Click the Trackpad tab button (see Figure 2-11).
-
Drag the Tracking Speed slider to control the speed at which the mouse pointer moves as you move your finger on the trackpad.
-
Double-click a word in the Double-Click Here To Test text box to test the double-click speed. If Mac OS X registers a double-click, it selects and highlights the word you clicked. Drag the Double-Click Speed slider as necessary to change the speed, and double-click again in the text box to test it.
-
Choose whether to use the trackpad for clicking, dragging, and drag lock by selecting the Clicking check box, the Dragging check box, and the Drag Lock check box.
-
You must select the Clicking check box to enable the Dragging check box, and you must select the Dragging check box to enable the Drag Lock check box.
-
If you turn on dragging, tap twice with your finger on the trackpad and then move your finger to drag the object.
-
If you turn on drag lock, tap twice with your finger on the trackpad to lock dragging on. Move your finger to drag the object, and then tap again to release the lock.
-
-
Select the Ignore Accidental Trackpad Input check box if you want Mac OS X to ignore trackpad movements it thinks are accidental. For example, you may brush the trackpad with the base of your thumbs while typing. This option is usually helpful.
-
Select the Ignore Trackpad When Mouse Is Present check box if you want Mac OS X to deactivate the trackpad when you plug a mouse into your PowerBook or iBook.
-
Click System Preferences | Quit System Preferences to close System Preferences.
Change Sounds
Mac OS X plays an alert sound when you try to do something that doesn’t work or when something happens that needs your attention. Mac OS X plays other sounds to give feedback for interface actions, such as moving files to the Trash or pressing the volume keys. You can change the alert sound or prevent Mac OS X from playing feedback sounds by using the Sound sheet in System Preferences.
| Tip | If you don’t want to hear an alert sound, drag the Alert Volume slider all the way to the left. |
-
Open
and click System Preferences. The System Preferences window will be displayed. -
Click Sound. The Sound sheet will be displayed.
Tip From the Sound Effects tab of the Sound sheet in System Preferences, you can also control whether Mac OS X displays the Volume icon at the right end of the menu bar. Select or clear the Show Volume In Menu Bar check box.
-
If the Sound Effects tab (see Figure 2-12) isn’t displayed, click the Sound Effects tab button to display it.
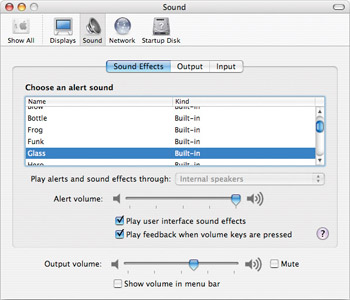
Figure 2-12: On the Sound Effects tab of the Sound sheet in System Preferences, you can configure or suppress the alert sound that Mac OS X plays when it needs your attention. -
Click the sound in the Choose An Alert Sound list. Mac OS X will play the sound to help you choose a suitable one.
-
Drag the Alert Volume slider to set the volume for the alert sound relative to the other audio output (for example, music) on your Mac.
-
If you don’t want Mac OS X to play feedback sounds for actions, clear the Play User Interface Sound Effects check box.
-
If you don’t want Mac OS X to play feedback sounds when you press the volume keys, clear the Play Feedback When Volume Keys Are Pressed check box.
-
If you want to change the overall sound volume, drag the Output Volume slider to the left or right.
-
Click System Preferences | Quit System Preferences to close System Preferences.
Change Language and Regional Settings
Mac OS X lets you determine which language it uses for menus and dialog boxes as well as how numbers, dates, currency, and time are displayed and used.
| Tip | After changing the language, you must log out and log in again to make the change take effect. Alternatively, you can restart your Mac, if you find that easier. |
Change the Language
To change the language Mac OS X uses:
-
Open
and click System Preferences. The System Preferences window will be displayed. -
Click International. The International sheet will be displayed.
-
If the Language tab isn’t displayed, click the Language tab button to display it.
-
To change the language, drag your desired language to the top of the Languages list box.
-
To change the selection of languages available, click Edit, select or clear check boxes as appropriate on the resulting sheet, and then click OK.
-
Click System Preferences | Quit System Preferences to close System Preferences.
-
Log out (open
and click Log Out) to switch the Finder and your desktop to the language you chose.
Change Regional Settings
To change the regional settings Mac OS X uses:
-
Open
and click System Preferences. The System Preferences window will be displayed. -
Click International. The International sheet will be displayed.
Note Mac OS X initially displays only the most widely used regions in the Region drop-down list box. To display all regions, select the Show All Regions check box.
-
If the Formats tab isn’t displayed, click the Formats tab button to display it (see Figure 2-13).
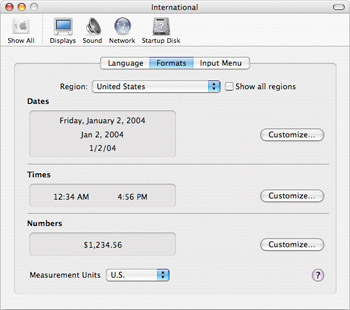
Figure 2-13: Choose your region and customize formats as necessary on the Formats tab of the International sheet in System Preferences. -
In the Region drop-down list box, select the region whose formats you want to use—for example, United States or Canada. The Dates readout, Times readout, and Numbers readout will display samples of those formats.
-
To change one of the formats, click the appropriate Customize button and work on the option sheet that Mac OS X displays. When you’ve finished choosing options, click OK to close the option sheet.
-
In the Measurement Units drop-down list box, select U.S. or Metric if you want to change the default setting for the region you chose.
-
Click System Preferences | Quit System Preferences to close System Preferences.
|
| < Day Day Up > |
|
EAN: 2147483647
Pages: 68