Section 3.1. Getting Started with Firefox
|
3.1. Getting Started with FirefoxYou've installed and configured Firefox; now it's time to start using it and learning about the various components. First, you should learn about toolbars, menus, and printing, three of the basic parts of every web browser. As you're about to find out, Firefox puts its own special touch on each of these vital browser tools. 3.1.1. ToolbarsToolbars contain buttons that perform the same tasks and commands you can find in the menus; the difference is that toolbars put those commands right in front of you, so it's easy to access the ones you use most often. One of the complaints about Mozilla was the inflexibility of its toolbars. Firefox remedies that problem, in spades. 3.1.1.1 Navigation ToolbarThe Firefox Navigation Toolbar, shown in [click here], is a pretty standard affair, with one big difference that separates it from Internet Explorer. Let's move from left to right across the toolbar and quickly look at its features.
First are the traditional Back and Forward buttons (you can also use the Go Another situation in which just clicking Back is inadequate is when you don't want to go back just one pageinstead, you want to jump back 8 pages, or 14, or 35. Back back back back back back...ugh. Too tedious. In cases like that, Back doesn't meet your needs. Fortunately, Firefox (like most other web browsers) has a solution for this problem. Notice the little triangles to the right of the Back and Forward buttons? If you click and hold on those, a menu appears listing the titles of the last 10 web pages you've visited. Select the page you want to jump to, and back you go. If you want to go back more than 10 pages, press the last choice at the bottom of the list. Click and hold the down arrow again, and you'll see the previous 10 pages. Repeat as necessary, jumping back up to 10 pages at a go. The same technique works with the Forward button, but most people don't use it as much. The Reload button reloads the page you're on. Maybe you think it's been updated and you want to see the changes, or maybe you're having problems viewing the web page and want to try it again: in either case, press the Reload button and the page will refresh itself.
The Stop button stops any activity for the current page you're on. If the page is loading, Stop causes the browser to cease that process and display whatever has been downloaded. This can be especially useful if you suddenly realize that a web page is trying to display ridiculously enormous images, and you just don't want to wait. Likewise, if a sound is playing on the page, or a movie is running, Stop should end its activity. (Note that this doesn't always worksome multimedia isn't tied to the Stop button, so pressing it will do nothing; in those cases, try the Esc button.) You can also go to View The famous Home button (or Go
After the default buttons, but still part of the Navigation Toolbar, comes the Location Bar, a close-up of which is shown in [click here].
The Location Bar serves two purposes. It shows you the URL, or web address, of the page you're on, and it also allows you to jump to a new web page by typing or pasting in the page's address and pressing Enter or clicking on the Go button to the right of the Location Bar. On the right side of the Location Bar (just before the Go button) is a drop-down menu; if you click on the down arrow, a menu appears listing the URLs of pages that you've typed in before. If you don't want to retype the address of a page you went to a week ago, there's a good chance that it's sitting there in the Location Bar drop-down, waiting to be chosen.
On the lefthand side of the Location Bar pictured in [click here], you'll notice a small Google icon (the reason it's a Google icon rather than a Firefox icon is that the Mozilla Firefox Start Page is hosted at google.com). If you go to a web page and you see a little icon to the left of the page's address, that page has created a favicon (I know it's spelled funny, but it's pronounced "fave icon"). A favicon is an image file that a web site creates to identify the site visually. They're not required; they're just a fun way to distinguish a web site. If a site doesn't have a favicon, Firefox uses a generic "page" icon instead. Beyond being cute, these little icons do have a use, whether they're specific favicons or generic. They're used in Bookmarks, and they appear on tabs. Even better, if you click on a site's icon and drag it to your desktop, a shortcut is created to that web page. Go ahead and try it. Use Google all the time? Go to Google, then drag its favicon onto your desktop. Boom! A shortcut appears. Double-click on that shortcut, and Google opens in your preferred web browser (which I'm hoping is Firefox).
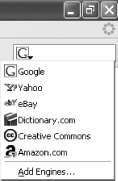
On the far right of the Navigation Toolbar is its most interesting feature: the Search Bar, shown in [click here]. This is one of many ways Firefox differs from competitors like IE.
By default, Firefox comes with six search engines already installed and ready to use in the Search Bar: Google, Yahoo!, Amazon.com, Creative Commons (for more information about this important project, see http://creativecommons.org), Dictionary.com, and eBay. Google is the default, but you can use any of them. Just type your search words into the text box, select your desired search engine, and press Enter on your keyboard. You're immediately taken to that search engine's site, with the results of your search displayed before your eyes.
What's really cool about the Search Bar is that you can add more search engines to it if you like. Just choose Add Engines at the bottom of the Search Bar menu, and Firefox will take you to the Mycroft Project's home page, at http://mycroft.mozdev.org. You can search for new search engines, or you can browse by categories such as Reference, Shopping, Computer, Arts, and the all-purpose General. Mycroft also keeps a list of the most popular engines, which is a good place to look for ideas.
Once you find a search engine that you want to add, select it. A small window will open, asking if you want to add the search engine to the Search Bar. If you really do, select OK; if you made a mistake, select Cancel. When you click OK, the search engine will install, and you'll be able to start using it in the Search Bar right away.
If you want to remove a search engine once you've added it, open Windows Explorer and look in C:\Program Files\Mozilla Firefox\searchplugins\. For each search engine, you'll find two files: a source file containing the code that makes the search engine work, and an icon file containing the icon that appears next to the search engine in the Search Bar drop-down. For instance, Amazon's A9 search engine has these two files in the searchplugins directory: a9.png and a9.src. If you delete both of those files and restart Firefox, A9 will no longer appear as an option in the Search Bar. 3.1.1.2 Bookmarks ToolbarUnder the Navigation Toolbar is the Bookmarks Toolbar, a place where you have quick access to your most visited, most useful sites. I'll cover the Bookmarks Toolbar later in this chapter, in the Section 3.4.1 section. Be sure to read itthe Bookmarks Toolbar is incredibly useful once you change it to fit your specific needs. 3.1.2. MenusIn the same way that web browser toolbars have become somewhat standardized over the years, so have web browser menus. By and large, all browser menus look pretty similar to the basic Firefox menu, seen in [click here].
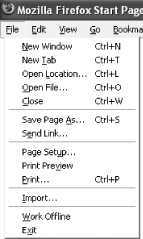
I'll go through these menus quickly, stopping only to look at interesting or unique features that Firefox brings to the web-browsing experience. Two of the menusEdit and Goare so routine that I'm going to skip them altogether so we can focus on the others, which have more to offer. I'll also leave a discussion of the Bookmarks menu until later in this chapter, in Section 3.4.1, as bookmarks are such a large and important topic. 3.1.2.1 The File menuMoving from left to right, the first menu is File (shown in [click here]).
Much of the File menu is boilerplate stuff that every Windows program has, but I do want to draw your attention to the Save Page As option. If you find a page that looks particularly interesting, and you wish to save it, go ahead and select Save Page As from the File menu (or press Ctrl+S). You'll be given a choice, as you can see in [click here].
You can choose a format to suit your needs:
There are two other options on the File menu that also bear mention. Found a link that you want others to check out? Select Send Link, and your default email program will open up a message window with the web address of your current page already in the body of the email, ready to go. If you're a compulsive web-page forwarder like I am, you'll love this feature. Finally, the Import menu item pulls in settings and bookmarks from your old browsers. If you didn't go through the Import Wizard that I discussed in Section 2.2.1, you can start the process now with File
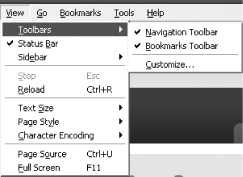
3.1.2.2 The View menuYou want some things, like certain toolbars, to show up in Firefox because you use them. However, there are other things that you don't use that you don't want in front of you. Likewise, you may want the option to change the way a web page looks in Firefox. For any of those needs, take a look at the View menu ([click here]).
If for some bizarre reason you don't want to see the Navigation Toolbar discussed previously in this chapter, you can hide it by selecting View
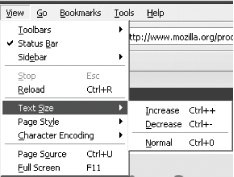
The Status Bar, located at the very bottom of the Firefox window, displays information about the web page, including a progress bar that shows you how far a page has loaded while you're waiting for it to finish. Several of the extensions discussed in Chapter 4 also use the Status Bar to show you valuable information. Since the Status Bar is important, I recommend leaving it alone. Don't hide itit's simply too valuable. Sidebars are a pretty cool feature of Firefox; they're discussed later in this chapter in the section Section 3.3. The Text Size submenu, displayed in [click here], enables you to adjust the size of text on web pages.
Ever found a web page that looks interesting, but the designer used a font so tiny that you can't read it? Just choose View Keep in mind that if you leave the page and continue on to another, your font settings will still be in place, and that may play havoc with the next web page. If you find this to be true, select View
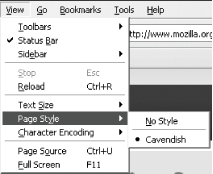
The Page Style options, shown in [click here], are a bit confusing if you're not a web developer, and frankly, most folks will never use this submenu. We'll take a quick look at it, though, so you know what it's all about.
Web developers can create different stylesheets for web sites, which allow them to change the way the site looks by simply updating the stylesheet. To see an example, head over to http://www.mozilla.org/start/1.0/. Scroll all the way to the bottom of that page, and you'll see three links: Orange Style (the default), Blue Style, and Plain Style. Select Blue Style, and the look of the page changes instantly. Now try Plain Style to see a third presentation. Pretty cool, huh? Now go to View There are two problems with Page Style. First, there's no way to know that a web page offers more than one style unless it happens to list them on the page itself. Otherwise, you'll have no idea, unless you start checking out Page Style for every single web site you go toand unless you're extremely bored, I know that's not going to happen. Second, because the vast majority of web sites have only one stylesheet (or none at all, which isn't goodstylesheets are a great thing, and virtually all web sites should use them!), Page Style is useless...unless you want to apply the No Style option, which can come in handy when a web designer has gone so over the top that it's difficult to read the text on the page. Choose No Style, and that overly busy web page turns into plain vanilla, ultra-boringly presentedbut now readabletext.
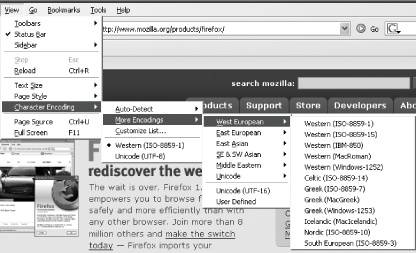
Next up is the Character Encoding submenu of the View menu, shown in [click here]. It looks a bit overwhelming, but fortunately, you'll probably never have to go into that forest of languages and letters.
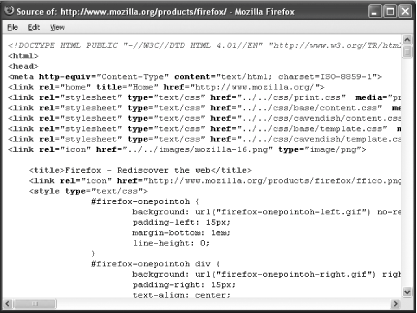
On to View Source. Back in the old days (and by "old days," I mean the mid-1990s!), if you wanted to make a web page, you had to learn HTML, the language in which web pages are coded. There weren't a lot of books on the subject, so most of us learned by opening up our trusty copies of Netscape and selecting View
Frankly, unless you know HTML, CSS, or JavaScript, looking at source code isn't going to help you much. But if you are interested in learning more about the web pages you're looking at, viewing the Page Source is how you do it.
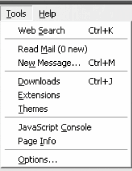
3.1.2.3 The Tools menuThe Tools menu, as seen in [click here], offers many powerful options.
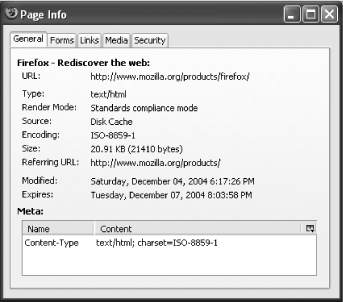
Several of these items are covered in other areas of the book. Web Search was discussed earlier in this chapter in Section 3.1.1.1, while Downloads is discussed later in the Section 3.4.2 section. Extensions and Themes are examined in great depth in Chapter 4 (and when I say "great," I mean it!). Finally, the Options menu choice was the subject of much of Chapter 2 and is covered extensively in Appendix B. With those out of the way, let's look at the remaining items in the Tools menu. Read Mail and New Message have to do with email, of course, and I think they're pretty obvious. Both of these commands work with the default email program on your PC. The JavaScript Console is for webheads only. If you're a web developer programming JavaScript, you'll use this feature; if not, you won't. It's that simple. Page Info provides access to a goldmine of information about the web page you're on. You can see some of it in [click here].
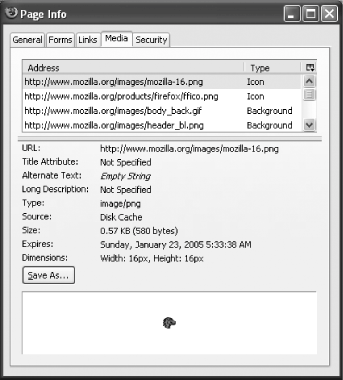
A lot of the stuff in Page Info is for advanced users or web developers, but there's something here for everyone. On the General tab, for instance, Size shows you how big the page is, which might explain why it takes so long to download. Referring URL tells you the page you came from to get to where you are now. Modified and Expires have to do with when the page was last changed and when any cached copies of the web page should try to update themselves.
The other tabs contain useful data as well:
3.1.2.4 The Help menuFirefox is easy to use, but sometimes you're going to need to refer to its built-in Help menu, shown in [click here].
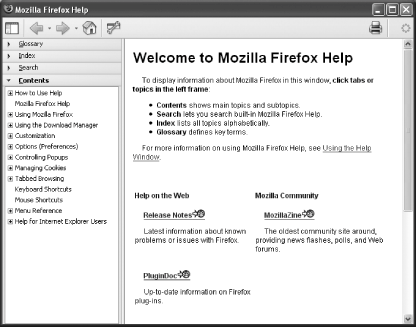
Help Contents opens up a new window with four kinds of help: Glossary, Index, Search, and Contents. [click here] shows you the first page you'll see when you open up Help.
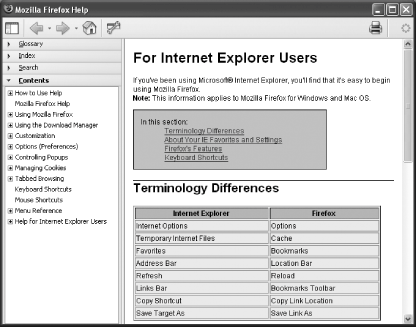
Everything is covered, but not necessarily in depth (leaving the door open for this book and various Firefox web sites and other resources). Think of Firefox's Help as the first place to look, but probably not the last. One particularly nice aspect of Firefox's Help is the For Internet Explorer Users feature, which opens to the screen shown in [click here].
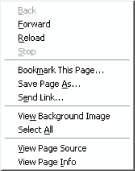
In an effort to make things user-friendly for those leaving the dark sideuh, I mean the Blue EFirefox offers special information comparing and contrasting the ways that IE and Firefox do things. Most are very similar, but there are a few differences, and this part of Firefox Help brings those to the fore. 3.1.2.5 Contextual (right-click) menusMost computer users should know that right-clicking in almost every program brings up a special menu called a contextual menu, or shortcut menu. It's "contextual" because the menu's choices depend upon the context in which you click. The choices in the contextual menu can always be found in the program's normal menus, but these menus are handy because they gather together all the commands that you are most likely to need for the specific item on which you've clicked, so you don't need to go hunting for them. For instance, right-clicking on an image in Firefox brings up a menu specific to images, with options such as View Image, Copy Image Location, Save Image As, and Set As Wallpaper. Right-clicking on the toolbars brings up choices for customization, while right-clicking on a blank area of a web page brings up the contextual menu seen in [click here].
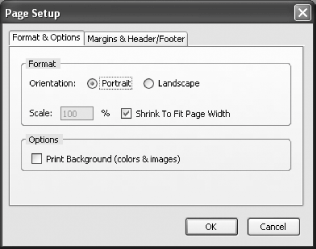
I won't go through all the choices listed in [click here], since they're covered in various places throughout the book. I do want to encourage you to right-click everywhere in Firefox, though, and discover what options the contextual menus offer. Once you learn what's there, you'll find that contextual menus can save you time and make it easier to do the things you want to do with Firefox. 3.1.3. Printing Firefox uses your computer's print system to do its work, so printing from Firefox is pretty straightforward. However, you should still take a look at the File
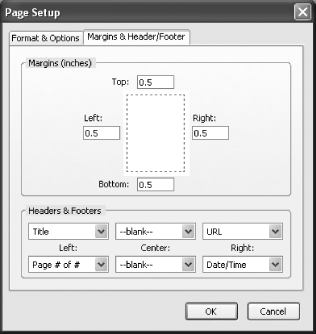
I wouldn't change anything on the Format & Options tab, as these settings work for 99% of all printing needs, but you should know what they do. Portrait prints pages the way most people are used to. For American users, this puts the 8.5" side on the top and bottom, while Landscape puts the 11" side on the top. You should only need to choose Landscape if a web page is using graphics or tables that are so wide that printing in Portrait mode cuts something off. When printing a page that is a bit wider than the page limits, Firefox will do its best to shrink the content to fit your paper. If for some reason you don't want this, uncheck the Shrink To Fit Page Width box. Most of the time, you do not want to print a page's background, as it can use up ink or toner like mad. If you do need to print the background, check Print Background, but don't forget to come back to Page Setup and uncheck it once you're done with that page! The other tab, Margins & Header/Footer, can be seen in [click here].
Again, the default settings on this tab are just fine for most folks, but you may occasionally need to make a few changes. The margins are usually fine, but you can adjust them as necessary. Headers and footers are more interesting. When you print, Firefox by default inserts data in the header and footer of the page. The three drop-down menus in the top row are for the header, while the three drop-downs in the bottom row are for the footer. The choices that Firefox lists when you first open this tab are pretty good, but you can change them if necessary. Your options are as follows:
|
|
EAN: N/A
Pages: 93
 Back or Go
