17.4. Changing Word's Display Word's ribbon and dialog boxes give you more tools than anyone can ever use. The key to working efficiently is to arrange your screen so that it shows the tools you want, where you want them, so don't hesitate to tweak Word's display. Most of the settings to customize your display are found in the Word Options box, which you can open with Office button  Word Options or with the keyboard shortcut Alt+F, I. The other display- related options let you adjust the way Word shows your document, hidden text, and formatting marks. Word Options or with the keyboard shortcut Alt+F, I. The other display- related options let you adjust the way Word shows your document, hidden text, and formatting marks. The Word Options box shows several buttons on the left side. Each time you click a button, you see different settings on the right. Three buttons lead to display-related settings: Popular, Display, and Advanced. 17.4.1. The Popular Display Settings Open the Word Options box, and then click the Popular button. You see options that change Word's display under the heading "Top options for working with Word." See Figure 17-5. 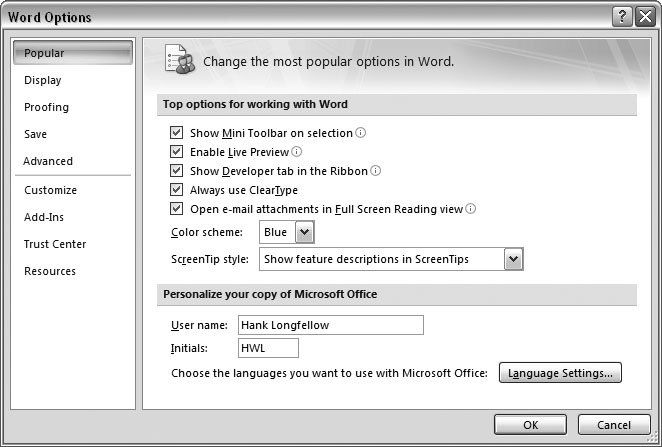 | Figure 17-5. Word stores your name and initials in the Word Options box. It's not some nefarious Microsoft scheme to spy on you. Word uses your name and initials to identify your edits and comments when you collaborate on documents. | |
-
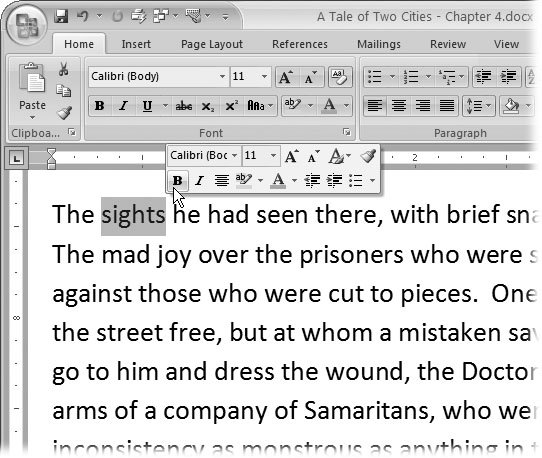
Show Mini Toolbar on selection . The Mini Toolbar pops up when you select text in your document, providing common editing and formatting options, as shown in Figure 17-6. When you install Word, this feature is turned on, but if you find the mini toolbar more nuisance than help, you can suppress its pop-up behavior by removing the checkmark from this option. -
Enable Live Preview . Live Preview is the feature that immediately changes your document to show you formatting options before you apply them. Live Preview can be too demanding for computers that are slow, underpowered, and graphically challenged. If that's the case, remove the checkmark from this box to turn off Live Preview. -
Show Developer tab in the Ribbon . If you're working with macros, forms, templates, or XML, turn on this box to display the Developer tab in the ribbon. The Developer tab provides special tools and buttons that help you create Word documents for others to use. -
Always use ClearType . ClearType is a technology developed by Microsoft that's designed to make text on a screen look better. It works for most computers and most monitors , but in some cases, ClearType can make text look worse . For example, if you have a flat panel monitor and you've changed the resolution to something other than the usual recommended (or native ) resolution, ClearType may not work. In that case, remove the checkmark from this box. -
Open e-mail attachments in Full Screen Reading view . Word's Full Screen Reading view is ideal for documents that you want to read but not edit. Use this option to open all email attachments in Full Screen Reading view instead of Print Layout view, where you might inadvertently make changes to the document. -
Color scheme . You can change the colors of Word's frame, scroll bars, and other accessories with this drop-down menu. There isn't a way to create your own schemes, so you're limited to choosing from the ones that Microsoft provides. Just choose one whose colors you find soothing and that reduces eyestrain. -
ScreenTip style . Screen tips are the messages that pop up when you hold the mouse cursor over a command or a control. You have three choices. Choose "Show feature descriptions in ScreenTips" for a longer, more descriptive message. Choose "Don't show feature descriptions in ScreenTips" for a terse one-or two-word description. Or, choose "Don't show ScreenTips" to eliminate them entirely.
17.4.2. Changing Display Settings Open the Word Options box (Alt+F, I), and then, on the left, click the Display button to see and change some of the common display settings (Figure 17-7). The display options are divvied up into two groups: "Page display options" and "Always show these formatting marks." 17.4.2.1. Page display options The Page display options change the way Word shows your document in the program window. None of these options affect the way your printed document looks. 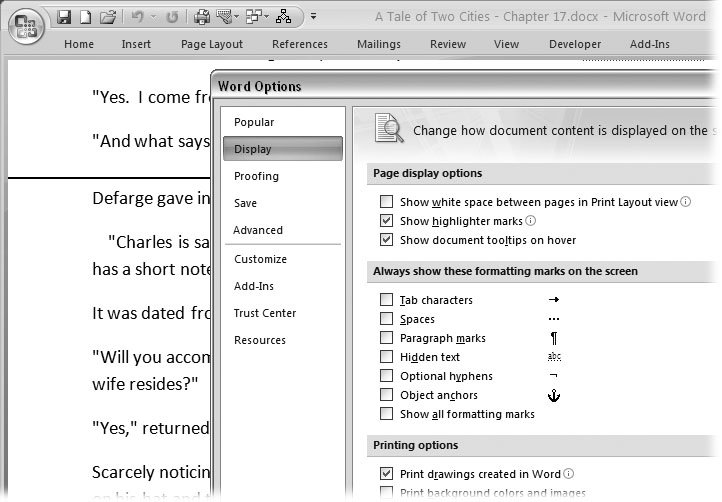 | Figure 17-7. Use the settings in the Word Options Display pane to customize your view of documents. The "Show white space between pages" option shows or hides the top and bottom margins of pages in Print Layout view. | |
-
Show white space between pages in Print Layout view . In Print Layout view, Word shows a complete representation of a printed page including the empty, white space at the top and bottom margins. If you uncheck this box, you don't see the extra white space. You can also show and hide the white space while you're working in your document. When you hold the mouse cursor over the area between two pages, the cursor changes to two arrows on pages. Doubleclick to show or hide the white space. -
Show highlighter marks . The highlighter tool on the Home tab lets you call attention to specific parts of text. Word's factory setting is to show highlighted text. If that annoys you, uncheck this box. -
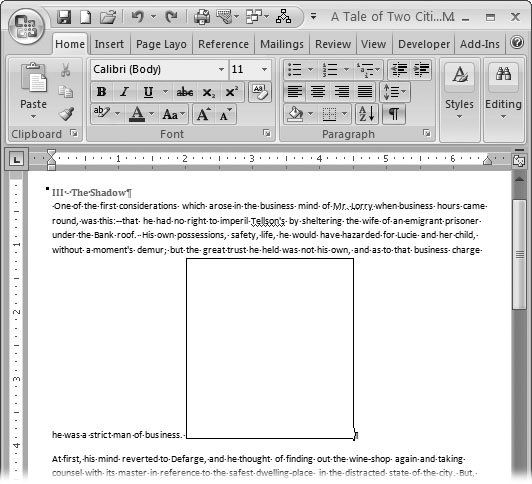
Show document tooltips on hover . Document tool tips are things like reviewer's comments and hyperlink addresses that are hidden within your document's text. When you hold your mouse cursor over an item for a couple of seconds, a document tool tip pops up, showing the additional information. Use this option to turn tool tips on or off. 17.4.2.2. Always show these formatting marks on the screen Invisible characters lurk within your word documentstab characters , paragraph marks, and the other formatting marks that are usually hidden in your text. In fact, sometimes when you're wrestling with formatting issues, it helps to bring these guys out of the shadows. You can show and hide most of these marks using the command Home Paragraph Show/Hide or the keyboard shortcut Alt+H, 8. (Figure 17-8 shows how a document looks with all the formatting marks showing.) If you want a certain mark to always show when you create new documentssay you like knowing where the paragraph breaks arego to Office Word Options and use the checkboxes under "Always show these formatting marks on the screen to show and hide: 17.4.3. Advanced Display Options Click the Advanced button in the Word Options box to see some of the lesser-used and esoteric settings that let you turn on and off major aspects of the program's appearance. Scroll down to the middle of the box, and you see two groups of settings that affect the look of your documents and the Word window: "Show document content" and "Display." 17.4.3.1. Show document content The options under "Show document content" affect the way your document looks when you're working with it. Items with checkmarks in the boxes are visible in your document. Click a checkbox to toggle an option on or off. -
Show background colors and images in Print Layout view . Background colors are more for Web pages than printed pages. They can be distracting when you're typing and editing. Turning off this box hides both background colors and background images used as watermarks. -
Show text wrapped within the document window . Turn on this box if you want the lines of your text to automatically wrap to fit in the document window. So, if you make your window narrower, Word redistributes the words in the paragraph so that you can see all the words. This setting affects the Draft, Outline, and Web Layout views but doesn't change the Print Layout view. In Print Layout view, if you make Word's window narrower than the lines of text, you hide some of the words. -
Show picture placeholders . If you're working on a slow computer with a document that has a lot of pictures, Word can slow down to a crawl. Turn on this box, and all those pictures are replaced with placeholders, as shown in Figure 17-8. Your document scrolls faster, and everything else in Word should be snappier too.
-
Show drawing and text boxes on screen . Drawings and text boxes show in the Print Layout view unless you turn them off by removing the check from this box. -
Show text animation . Animated text is no longer a font option in Word 2007. But Word still shows shimmering letters and marching ant borders in documents created in earlier versions. Mercifully, the powers-that-be in Redmond let you turn off this annoying feature. -
Show bookmarks . You use bookmarks to mark locations in your manuscript. Once they're in place, you can jump to them using the Go To command (F5) and refer to the bookmarks by name in macros and Visual Basic for Applications (VBA) programs (Section 19.3.2). This setting toggles the visibility of bookmarks on the screen. With "Show bookmarks" turned on, they show as gray square brackets surrounding the selected text. -
Show Smart Tags . Smart Tags automatically create links to resources on the Internet when you type specific words into your document (see the box in Section 6.4.3). If you find this quick reference feature annoying, remove the check from this box. -
Show text boundaries . Places dotted lines around the text in your document (including text that appears in the headers and footers) that help you line up images and other page elements. (Text boundaries don't appear in printed copies.) -
Show crop marks . Crop marks are guides for trimming paper when a document is printed on a piece of paper that's larger than the designated page size (Alt+P, SZ). -
Show field codes instead of their values . Field codes usually perform some sort of calculation, and then place the result in the text. For example, a PageNum field code determines the page number, and then places that number in the text. If you want to see the actual field code and not the resulting value, turn on this box. Use the Field shading drop-down menu to highlight fields in your document. The menu provides three options: Never, Always, and "When selected." -
Use draft font in Draft and Outline views . The Draft and Outline views don't show your document as it looks on the printed page. You can specify a particular font and size for these two views to make your document more readable on the screen. -
Font Substitution (button) . When someone gives you a document that uses fonts you don't have on your computer, Word automatically chooses similar fonts to display instead. If you're not happy with Word's choice, use this button to specify substitute fonts. 17.4.3.2. Display options To see the advanced display options, go to Office Word Options Advanced, and scroll down to about the middle of the window. You see the settings listed below. Click to toggle the checkboxesa checkmark means an item is visible in Words display. -
Show this number of Recent Documents . When you click the Office button, Word shows the documents you've recently opened and saved. Use this box to set the number of documents listed. The number can be as high as 50, but something in the 10 to 20 range is usually sufficient. -
Show measurements in units of . Choose the units you'd like to see in your Word rulers and dialog boxes. You have a choice of inches, centimeters, millimeters, points, and picas. -
Style area pane width in Draft and Outline views . A pane listing paragraph styles appears to the left of your text in the Draft and Outline view, as shown in Figure 17-9. Enter a number in this box to set the width of the pane. For example, if you're using inches, enter .5 to devote a half inch to the Style pane. If you don't want to show a Style pane, just set the number to zero. -
Show pixels for HTML features . Turn on this box to use pixels as the unit of measure for dialog boxes related to HTML and web pages. For Web page designers, the pixel (short for picture element) is the basic unit of measure. For example, a Web page may be set to 750 pixels wide by 540 pixels tall, a good fit for many computer screens.
-
Show all windows in Taskbar . The Windows taskbar at the bottom of the screen can group Word documents together under one icon, or it can show each Word document as a separate icon. Turn on the checkbox to see separate icons for each document.
Note: Your Windows options also affect how your Word windows appear in the taskbar. To change the Windows settings, click the taskbar, and then choose Properties from the pop-up menu to adjust the taskbar settings.
-
Show shortcut keys in ScreenTips . You see screen tips when your mouse cursor pauses over a button for a few seconds. This handy setting shows the shortcut keys for the command in the screen tip. It's a good way to learn those shortcuts. -
Show horizontal scroll bar . Displays the horizontal scroll bar automatically when you open a new document. -
Show vertical scroll bar . Shows the vertical scroll bar when you open a new document. -
Show vertical ruler in Print Layout view . Automatically shows the vertical scroll bar in Print Layout view. -
Optimize character positioning for layout rather than readability . This option shows character positioning accurately, as it will appear when you print the document. Use this only when it's critical for layout purposes because it can distort the spacing between characters and make the document harder to read onscreen. |